Installing WordPress on your Managed Cloud: Difference between revisions
No edit summary |
|||
| (3 intermediate revisions by 2 users not shown) | |||
| Line 1: | Line 1: | ||
=Installing WordPress on your Managed Cloud Server= | =Installing WordPress on your Managed Cloud Server= | ||
The first thing you will want to do is ensure you have your website defined and setup under Virtual Hosts in the [https://xmission.com/control XMission Control Panel]. You can find information on doing that [http://wiki.xmission.com/XMission_Control_Panel/Services_Tab#Virtual_Hosts here]. | The first thing you will want to do is ensure you have your website defined and setup under Virtual Hosts in the [https://xmission.com/control XMission Control Panel]. You can find information on doing that [http://wiki.xmission.com/XMission_Control_Panel/Services_Tab#Virtual_Hosts here]. | ||
| Line 159: | Line 155: | ||
/** Configures WordPress to apply core updates automatically */ | /** Configures WordPress to apply core updates automatically */ | ||
define('WP_AUTO_UPDATE_CORE', true); | define('WP_AUTO_UPDATE_CORE', true); | ||
</pre> | |||
Once you've added this, hit '''esc''' to get back into console mode. Following this, press '''shift+;''', then type in '''wq''', then hit '''enter/return'''. This will write and close the document. | |||
Please repeat these instructions on the file wp-includes/functions.php and enter the following at the bottom of the file. | |||
<pre> | |||
/** Configures WordPress to automatically install updates to installed Plugins */ | /** Configures WordPress to automatically install updates to installed Plugins */ | ||
add_filter( 'auto_update_plugin', '__return_true' ); | add_filter( 'auto_update_plugin', '__return_true' ); | ||
</pre> | </pre> | ||
Once this is done, we want to change the permissions on the folders in this directory. Enter the following command to update permissions as needed. | Once this is done, we want to change the permissions on the folders in this directory. Enter the following command to update permissions as needed. | ||
| Line 174: | Line 173: | ||
Once this is done, go ahead and log back into your control panel if you logged out. | Once this is done, go ahead and log back into your control panel if you logged out. | ||
From here, you can manage your website. | From here, you can manage your website. | ||
==Web Security== | |||
Before we finish, however, we're going to install the '''Sucuri''' plugin, which is a security plugin we strongly recommend to all WordPress users. | |||
Click on the '''Plugins''' option in the menu to the left. | Click on the '''Plugins''' option in the menu to the left. | ||
| Line 205: | Line 207: | ||
From here, your WordPress installation is complete. You can install your own themes and plugins, and further customize the site as you see fit. | From here, your WordPress installation is complete. You can install your own themes and plugins, and further customize the site as you see fit. | ||
[[Category: Cloud Troubleshooting]] | |||
Latest revision as of 15:52, 22 January 2020
Installing WordPress on your Managed Cloud Server
The first thing you will want to do is ensure you have your website defined and setup under Virtual Hosts in the XMission Control Panel. You can find information on doing that here.
Next, we will need an A record in your DNS records pointing to your managed server. The IP address for the server can be found in the services section of the control panel. If XMission is managing your DNS, add an A record following the instructions here. Remember you can only one one A record per domain or sub-domain.
Next, we need to setup a database for Wordpress to use. This can also be done on the control panel, and you can find information on adding a database here. Make sure you note the username, database name, and password.
Now you need to figure out how you plan on installing the server, FTP or SSH.
Installing WordPress on your Managed Cloud Server via FTP
Things You Will Need
- FTP Access to your server
- The latest WordPress files
- A web browser
- An FTP Client (We recommend FileZilla)
- A Text Editor
Installing WordPress
First, unzip the wordpress files you've downloaded from the link above into a location you'll remember. Everything will extract into a "WordPress" folder by default.
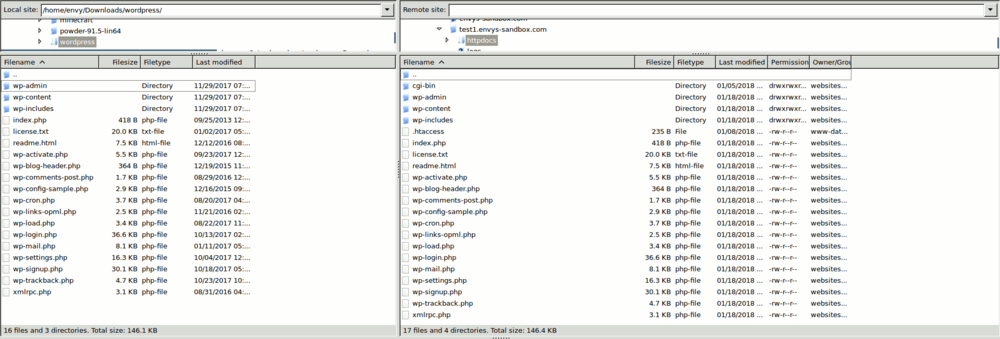
Next, open up your FTP client, and navigate to the httpdocs directory of your website. We will want to delete the index.html file that is in there by default. After that, put all of the files inside the "WordPress" folder into the httpdocs directory.
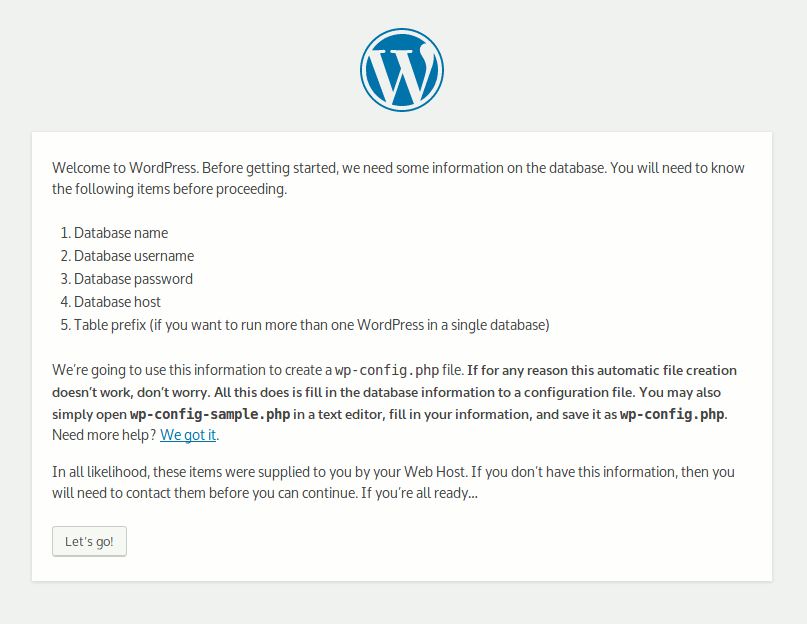
Now that this is done, we can go to your website and start configuring Wordpress. Open up your website in a web browser. You should be greeted by a Welcome to WordPress screen. As you can see, they ask that you know your database name, username, and password. The host and table prefix we don't need to worry about here. Click Let's Go!
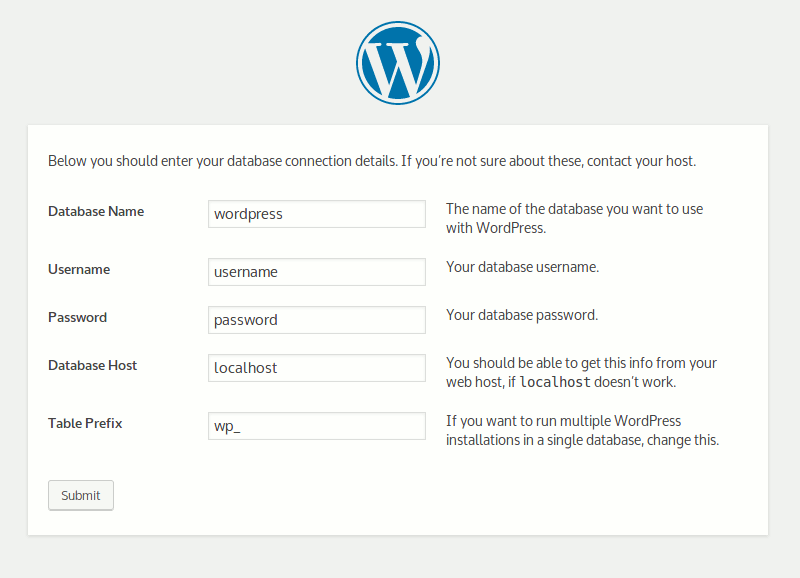
On this next page, you need to fill in the information it is asking for. Input the database name, username and password you setup. You can leave the host as 'localhost', and database prefix as is. Click Submit.
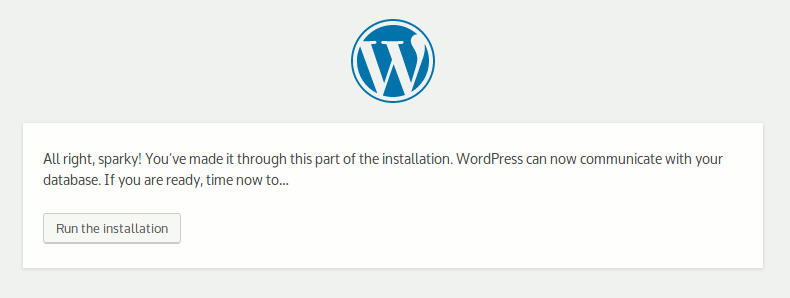
The next page simply notifies you that Wordpress is ready to go. Click on Run the installation.
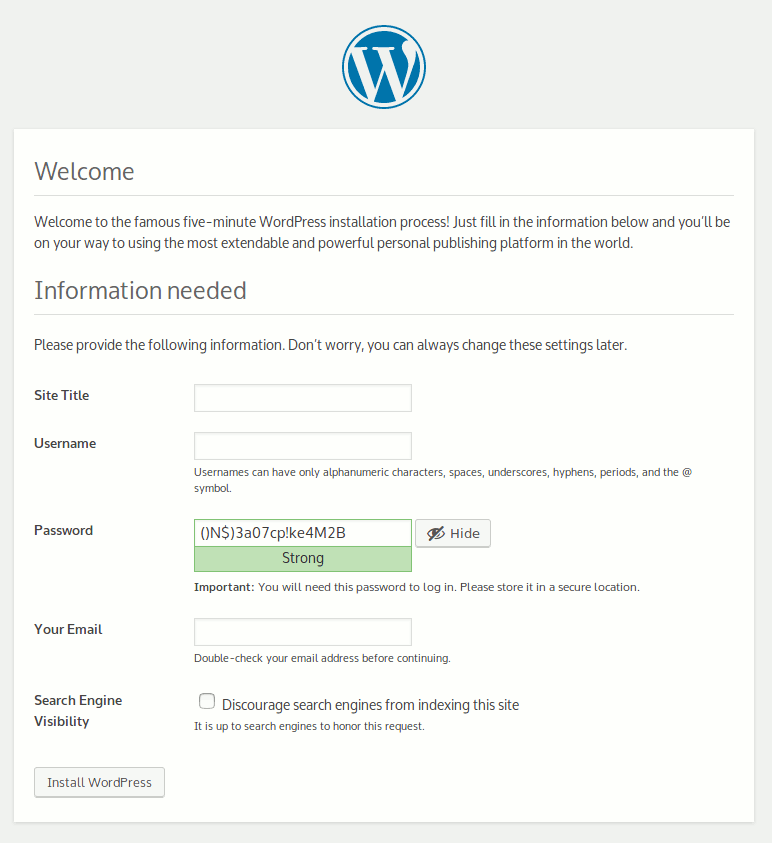
The next page asks you to come up with a Site Title, Username, password for aforementioned user, and an email address to associate with the user. You can also enable a feature that requests that search engines don't index your site, although it is up to the search engine itself to honor those requests. Click Install WordPress.
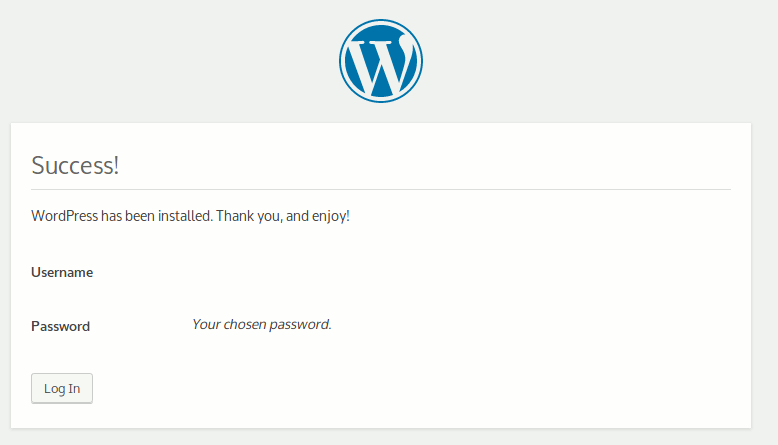
Once this is done, it will confirm your username. Click Log In.
You will now be taken to a login screen, where you can input your new username and password. Input your information, and login to confirm everything is working.
If everything went according to plan, you should be greeted by the WordPress dashboard.
Now we want to head back into our FTP client, and take a look at the wp-config.php file that has appeared (you may need to right click on the remote server window and click Refresh.
Right click on the wp-config.php file and select View/Edit.
We want to go down to the bottom of the file, and add these lines:
/** Sets up 'direct' method for wordpress, auto update without FTP */
define('FS_METHOD','direct');

/** Configures WordPress to apply core updates automatically */
define('WP_AUTO_UPDATE_CORE', true);

/** Configures WordPress to automatically install updates to installed Plugins */
add_filter( 'auto_update_plugin', '__return_true' );
Installing WordPress on your Managed Cloud Server via SSH
Things You Will Need
- SSL Access to your server
- A Text Editor (we recommend VIM, which this guide will be using as it is built into the servers)
- A Web Browser
Installing Wordpress on your Managed Cloud Server
Open your SSH client and log into your server using the websites username and your password.
Navigate to the httpdocs folder that relates to your website (which can be found in the vhosts folder). In here, the first course of action should be to delete the index.html file that's there.
websites@server:~/vhosts/domain.tld/httpdocs$ rm index.html
Now, we want to download the WordPress files.
websites@server:~/vhosts/domain.tld/httpdocs$ wget "https://wordpress.org/latest.zip"
Once you've done this, unzip the Wordpress files we just downloaded, and delete the zip file when we're done.
websites@server:~/vhosts/domain.tld/httpdocs$ unzip latest.zip
websites@server:~/vhosts/domain.tld/httpdocs$ rm latest.zip
Once we get it extracted, we'll need to move the wordpress files into the httpdocs folder itself, as they currently reside in the wordpress folder within our httpdocs folder. Thankfully, this is pretty easy.
websites@server:~/vhosts/domain.tld/httpdocs$ cd wordpress/
websites@server:~/vhosts/domain.tld/httpdocs/wordpress$ mv * ..
This will move all files and folders within the wordpress folder to the folder above it, which is our httpdocs folder.
Now that this is done, we can go to your website and start configuring Wordpress. Open up your website in a web browser. You should be greeted by a Welcome to WordPress screen. As you can see, they ask that you know your database name, username, and password. The host and table prefix we don't need to worry about here. Click Let's Go!
On this next page, you need to fill in the information it is asking for. Input the database name, username and password you setup. You can leave the host as 'localhost', and database prefix as is. Click Submit.
The next page simply notifies you that Wordpress is ready to go. Click on Run the installation.
The next page asks you to come up with a Site Title, Username, password for aforementioned user, and an email address to associate with the user. You can also enable a feature that requests that search engines don't index your site, although it is up to the search engine itself to honor those requests. Click Install WordPress.
Once this is done, it will confirm your username. Click Log In.
You will now be taken to a login screen, where you can input your new username and password. Input your information, and login to confirm everything is working.
If everything went according to plan, you should be greeted by the WordPress dashboard. Now we need to get back into the command line to fix a few things before we finish.
If you tried to install themes or plugins at this point, you probably noticed WordPress threw a prompt at you and asked you about your connection. This is what we're fixing here.
First, head into your httpdocs/ directory. You will want to open up the wp-config.php file, we recommend using the text editor built into the server, VIM.
websites@server:~/vhosts/domain.tld/httpdocs$ vim wp-config.php
VIM is a very powerful editor, but for the time being, all you need to know is that you move the cursor with the arrow keys, i to get into edit mode (allowing you to type), and esc to get back into console mode.
Press shift+g to drop to the bottom of the wp-config.php file, then $ to move to the end of the last line. Press i to get into edit mode, then below the last line, enter the following.
/** Sets up 'direct' method for wordpress, auto update without FTP */
define('FS_METHOD','direct');

/** Configures WordPress to apply core updates automatically */
define('WP_AUTO_UPDATE_CORE', true);
Once you've added this, hit esc to get back into console mode. Following this, press shift+;, then type in wq, then hit enter/return. This will write and close the document.
Please repeat these instructions on the file wp-includes/functions.php and enter the following at the bottom of the file.
/** Configures WordPress to automatically install updates to installed Plugins */
add_filter( 'auto_update_plugin', '__return_true' );
Once this is done, we want to change the permissions on the folders in this directory. Enter the following command to update permissions as needed.
websites@server:~/vhosts/domain.tld/httpdocs$ find . -type d -exec chmod -R 775 {} \;
You will get some errors here, specifically for the "./.htaccess" and "./wp-config.php" files. This is okay, as these two files are owned by a different user as they are system generated, but they do not need the permissions we are assigning.
Once this is done, go ahead and log back into your control panel if you logged out.
From here, you can manage your website.
Web Security
Before we finish, however, we're going to install the Sucuri plugin, which is a security plugin we strongly recommend to all WordPress users.
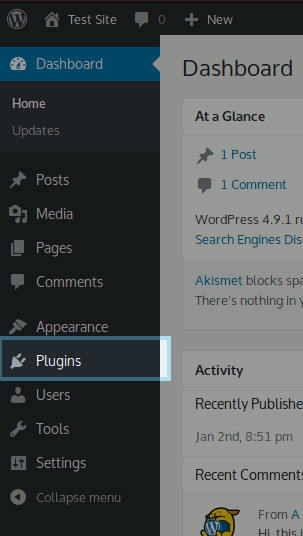
Click on the Plugins option in the menu to the left.
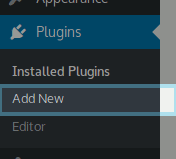
In the Plugins screen, click Add New.
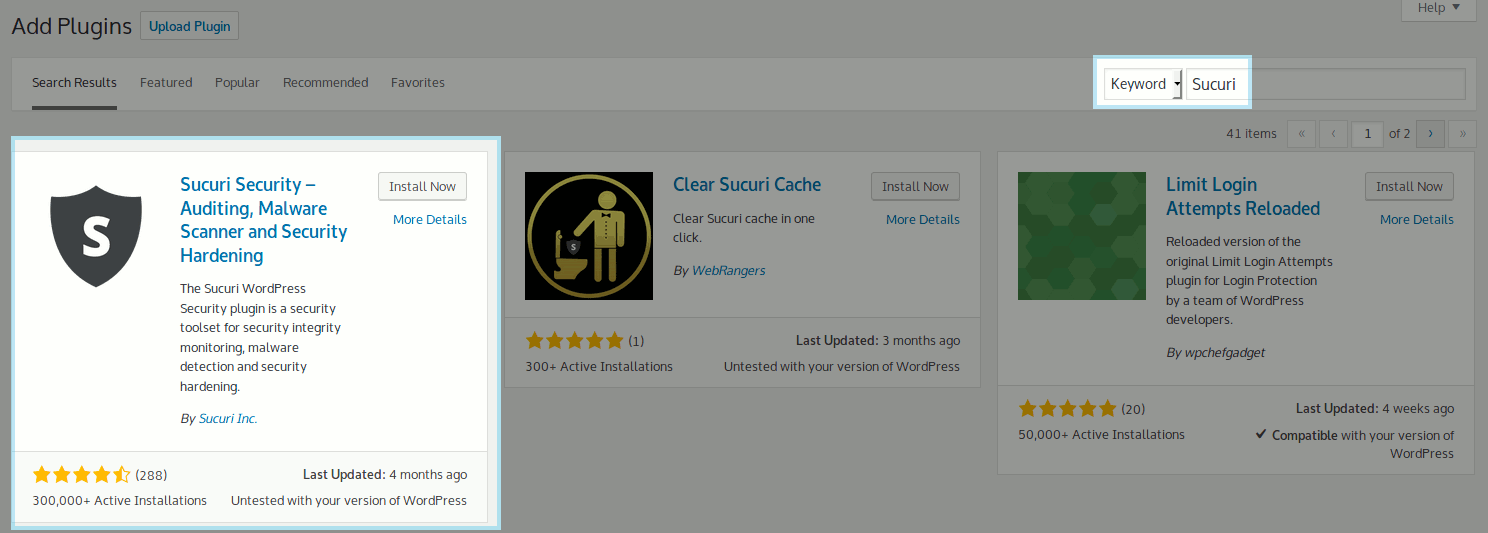
On the Add Plugins screen, do a search for sucuri in the search box to the top right. The plugin you're looking for should be the first one, titled Sucuri Security -- Auditing, Malware Scanner and Security Hardening. Click Install Now in the Sucuri plugin's little box.
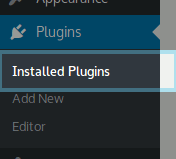
Now, under the Plugins menu on the left side, we want to go to Installed Plugins.
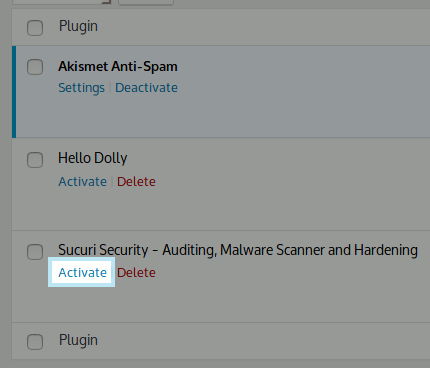
Click Activate on Sucuri.
Sucuri is now active, and provides a baseline level of security to your account. It will use the email address used when setting up the site to send alerts to, so ensure it is a valid email.
From here, your WordPress installation is complete. You can install your own themes and plugins, and further customize the site as you see fit.
