XMission Email:Mozilla Thunderbird: Difference between revisions
mNo edit summary |
m Jab moved page Mozilla Thunderbird to XMission Email:Mozilla Thunderbird: Formating |
||
| (9 intermediate revisions by 4 users not shown) | |||
| Line 1: | Line 1: | ||
1. Open up Thunderbird and Click ''Tools'' and select ''Account Settings'' | |||
:[[Image:Thunderbird1.png]] | |||
<br/> | |||
<br/> | |||
<br/> | |||
2. Click on ''Outgoing Server (SMTP)'' in the menu on the left. In the ''Server Name:'' field enter mail.xmission.com In the ''User Name:'' field enter your XMission user name. | |||
:[[Image:Thunderbird2.png]] | |||
<br/> | |||
<br/> | |||
<br/> | |||
3. Click the ''Add Account'' button. Select ''Email account'' then click ''Next'' | |||
:[[Image:Thunderbird3.png]] | |||
<br/> | |||
<br/> | |||
<br/> | |||
4. In the ''Your Name:'' field enter your name as you would like it to appear on your outgoing messages. In the email address field enter your XMission email address, then click ''Next''. | |||
:[[Image:Thunderbird4.png]] | |||
<br/> | |||
<br/> | |||
<br/> | |||
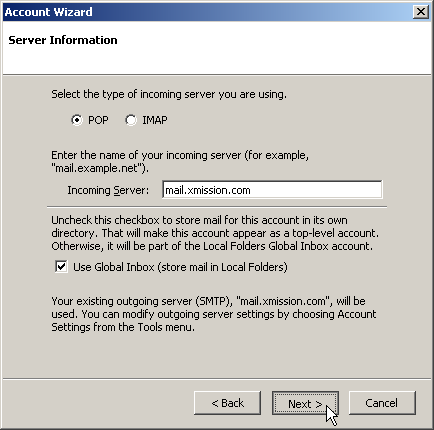
5. Select POP. In the ''Incoming Server:'' field enter mail.xmission.com then click ''Next''. | |||
:[[Image:Thunderbird5.png]] | |||
<br/> | |||
<br/> | |||
<br/> | |||
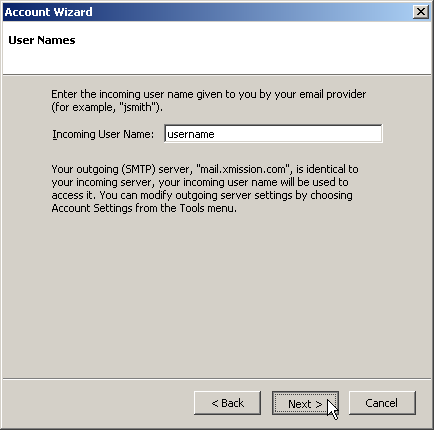
6. In the ''Incoming User Name:'' field, enter your XMission user name then click ''Next''. | |||
:[[Image:Thunderbird6.png]] | |||
<br/> | |||
<br/> | |||
<br/> | |||
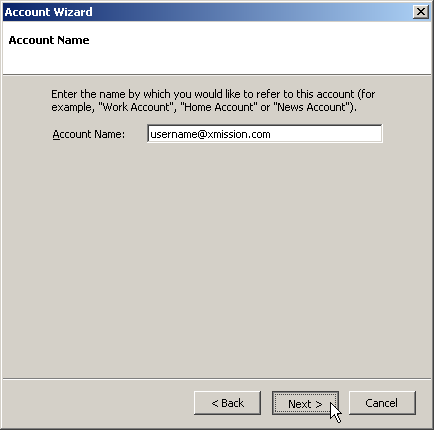
7. The ''Account Name:'' field is used to identify your XMission account. By default it will have your email address there, you can leave that or enter whatever you would like, then click ''Next''. | |||
:[[Image:Thunderbird7.png]] | |||
<br/> | |||
<br/> | |||
<br/> | |||
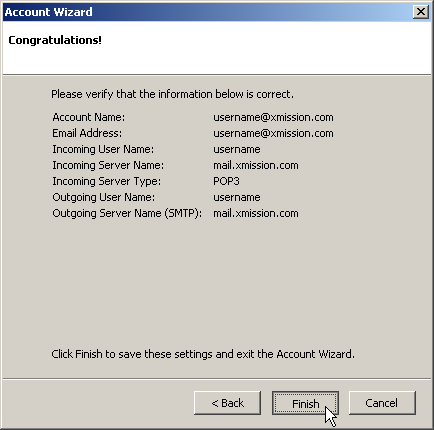
8. Look over the information and verify that everything is correct, then click ''Finish''. | |||
:[[Image:Thunderbird8.png]] | |||
<br/> | |||
<br/> | |||
<br/> | |||
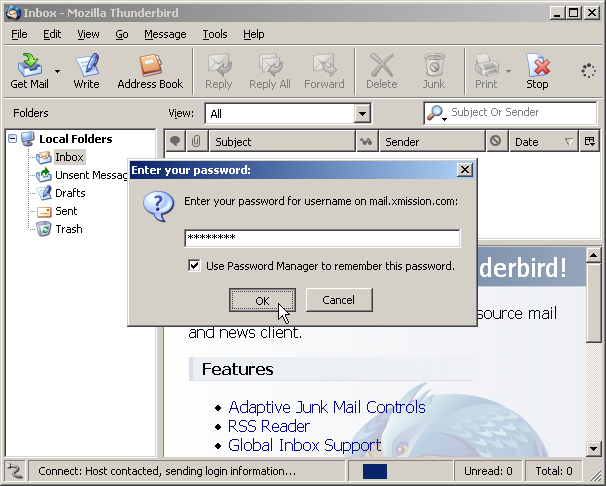
9. You can now click on the ''Get Mail'' icon. You will be prompted to enter your XMission password. You can check the box to have your password remembered, or leave it unchecked to enter it each time you check for new mail. | |||
:[[Image:Thunderbird9.png]] | |||
Congratulations! You are now set up to send and receive mail using Mozilla Thunderbird. | Congratulations! You are now set up to send and receive mail using Mozilla Thunderbird. | ||
[[Category:Client Email Configuration|XMission Email|Thunderbird]] | |||
[[Category:XMission Email|Thunderbird]] | |||
[[Category:Email]] | |||
[[Category: | |||
Latest revision as of 16:34, 14 January 2014
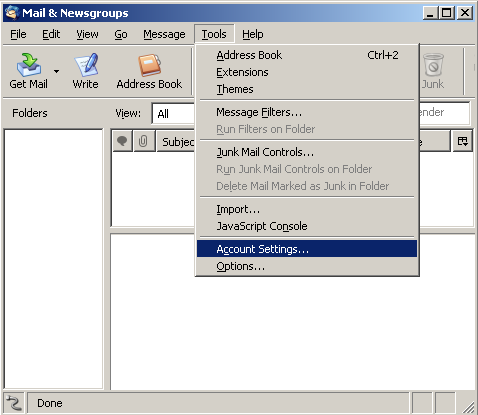
1. Open up Thunderbird and Click Tools and select Account Settings
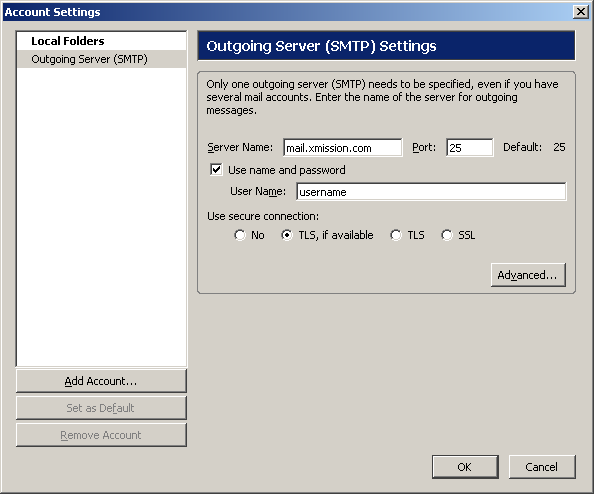
2. Click on Outgoing Server (SMTP) in the menu on the left. In the Server Name: field enter mail.xmission.com In the User Name: field enter your XMission user name.
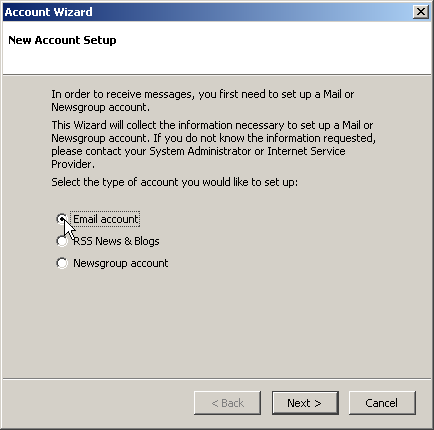
3. Click the Add Account button. Select Email account then click Next
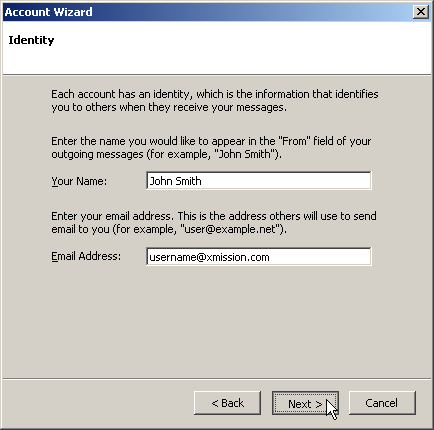
4. In the Your Name: field enter your name as you would like it to appear on your outgoing messages. In the email address field enter your XMission email address, then click Next.
5. Select POP. In the Incoming Server: field enter mail.xmission.com then click Next.
6. In the Incoming User Name: field, enter your XMission user name then click Next.
7. The Account Name: field is used to identify your XMission account. By default it will have your email address there, you can leave that or enter whatever you would like, then click Next.
8. Look over the information and verify that everything is correct, then click Finish.
9. You can now click on the Get Mail icon. You will be prompted to enter your XMission password. You can check the box to have your password remembered, or leave it unchecked to enter it each time you check for new mail.
Congratulations! You are now set up to send and receive mail using Mozilla Thunderbird.
