Difference between revisions of "Secure Your Sites"
From XMission Wiki
m (Jab moved page Create a CSR to Secure Your Sites: Updated Version) |
|||
| Line 1: | Line 1: | ||
| − | = | + | ==Plesk Unlimited Hosting: Securing Your Sites== |
| − | + | === Creating CSR === | |
| − | + | SSL certificates secure transfer of sensitive data from visitors to your website, and also verify the site identity. Below you can find two lists of SSL certificates: the first one showing certificates that you use for securing your websites and the other one showing certificates that you purchased. | |
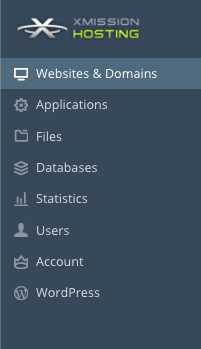
| − | + | * From the Hosting control panel Click on Websites and Domains - if you just logged in you are already there. | |
| − | [[File: | + | [[File:Plesk_tabs_new.png]] |
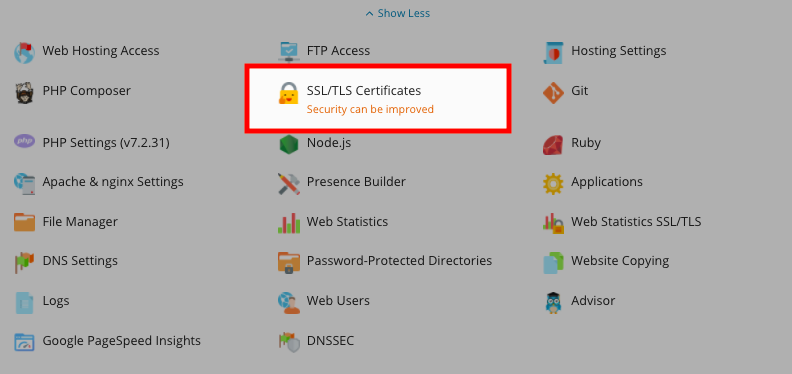
| − | + | * Find the domain you wish to use your SSL Certificate for and click on the little down arrow to see more options. | |
| − | [[File: | + | [[File:SharedHosting-SSL-00.png]] |
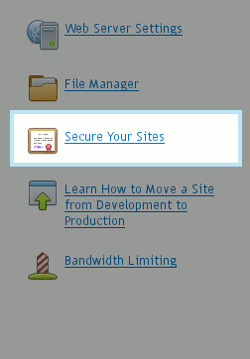
| − | + | * Next choose '''Secure Your Sites''' | |
| − | [[File: | + | [[File:SharedHosting-SSL-01.png]] |
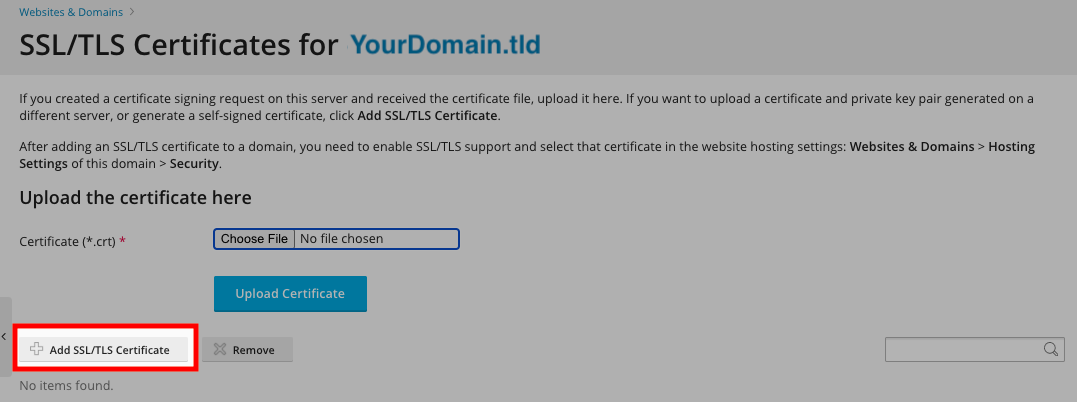
| − | + | * Next choose '''Add SSL Certificate''' | |
| − | [[File: | + | [[File:SharedHosting-SSL-02.png]] |
| − | + | * Next fill in the form to generate a CSR then hit Request | |
| − | [[File: | + | [[File:SharedHosting-SSL-03.png]] |
| − | + | * Certificate Name: ''This will help you identify this certificate in the repository.'' | |
| − | + | * Country: ''This is defaulted to United States'' | |
| − | + | * State or province: ''The state in which your company resides'' | |
| − | + | * Location(city): ''The city in which your company resides'' | |
| − | + | * Organization Name: ''This can be your company name'' | |
| + | * Organization Department: ''Website, IT or variations, should not exceed 64 characters'' | ||
| + | * Domain name: '' The domain name for which you want to purchase an SSL certificate. This should be a fully qualified domain name. Example: your-domain.com or www.your-domain.com'' | ||
| + | * Email: ''The website administrator's email address'' | ||
| − | |||
| − | ''' | + | * After you fill out the above form it will generate a '''CSR''' this is what you need to purchase a SSL Certificate. |
| + | * Confirmation that your CSR was created | ||
| + | [[File:SharedHosting-SSL-04.png]] | ||
| − | |||
| − | + | * Click on the Certificate name to view your CSR | |
| + | [[File:SharedHosting-SSL-05.png]] | ||
| − | + | ||
| − | [[Category:Unlimited Hosting| | + | |
| + | |||
| + | * Locate the CSR section on the page, and copy the text that starts with the line -----BEGIN CERTIFICATE REQUEST----- and ends with the line -----END CERTIFICATE REQUEST----- to the clipboard. | ||
| + | [[File:SharedHosting-SSL-06.png]] | ||
| + | |||
| + | |||
| + | * '''NOTE''' when ordering an SSL Certificate the validation email must match your domain with the following conditions | ||
| + | **admin@<domain.tld> | ||
| + | **administrator@<domain.tld> | ||
| + | **hostmaster@<domain.tld> | ||
| + | **webmaster@<domain.tld> | ||
| + | **postmaster@<domain.tld> | ||
| + | |||
| + | |||
| + | |||
| + | === Installing SSL Certificate === | ||
| + | * Once you have ordered your SSL Certificate, you should receive an email to approve the creating of the certificate. Once you approve the process, another email will be sent to you with your Certificate. | ||
| + | |||
| + | * Log in to your Control Panel | ||
| + | * Find the domain you wish to secure and click on the little down arrow to expand the options | ||
| + | * Choose '''Secure Your Sites''' | ||
| + | * Click on the Certificate Name that you created earlier | ||
| + | * After you have copied the Certificate from the email you received past it in the box for Certificate | ||
| + | ** Be sure to include -----Begin Certificate----- and -----End Certificate----- | ||
| + | [[File:SharedHosting-SSL-07.png]] | ||
| + | |||
| + | |||
| + | * Now you need to assign the certificate to your site. To do that, from the menu choose'''Websites and Domains''' | ||
| + | * Find the domain you are add the SSL Certificate for and choose '''Hosting Settings''' | ||
| + | [[File:SharedHosting-SSL-08.png]] | ||
| + | |||
| + | |||
| + | * Then check the box for SSL Support and select your certificate | ||
| + | [[File:SharedHosting-SSL-09.png]] | ||
| + | |||
| + | |||
| + | * Click '''OK''' at the bottom and that is it. | ||
| + | |||
| + | |||
| + | [[Category:Unlimited Hosting|Secure Your Sites]] | ||
Revision as of 10:28, 5 December 2014
Plesk Unlimited Hosting: Securing Your Sites
Creating CSR
SSL certificates secure transfer of sensitive data from visitors to your website, and also verify the site identity. Below you can find two lists of SSL certificates: the first one showing certificates that you use for securing your websites and the other one showing certificates that you purchased.
- From the Hosting control panel Click on Websites and Domains - if you just logged in you are already there.
- Find the domain you wish to use your SSL Certificate for and click on the little down arrow to see more options.
- Next choose Secure Your Sites
- Next choose Add SSL Certificate
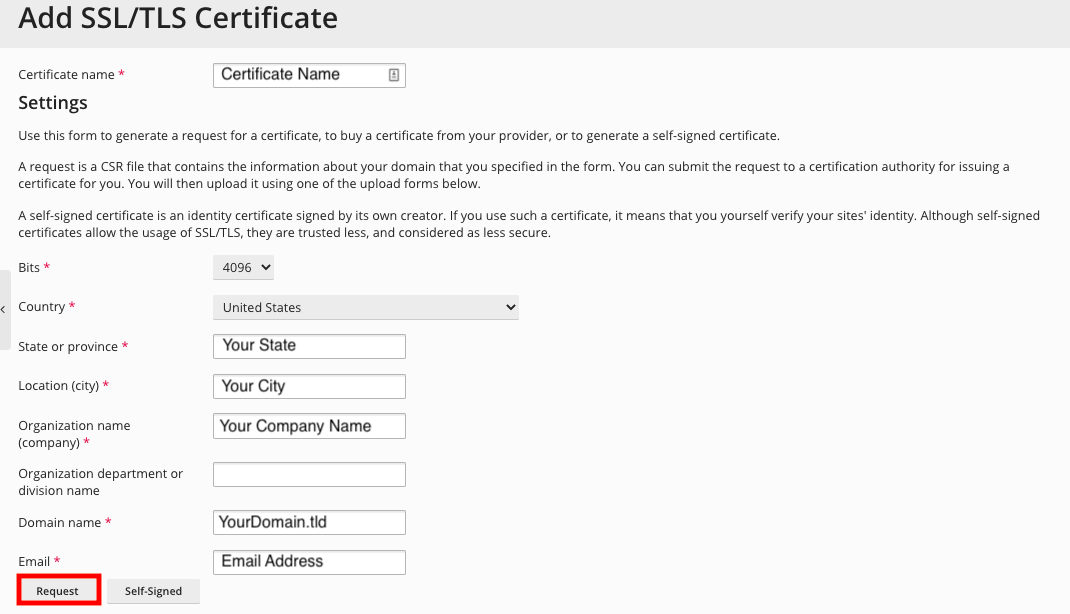
- Next fill in the form to generate a CSR then hit Request
- Certificate Name: This will help you identify this certificate in the repository.
- Country: This is defaulted to United States
- State or province: The state in which your company resides
- Location(city): The city in which your company resides
- Organization Name: This can be your company name
- Organization Department: Website, IT or variations, should not exceed 64 characters
- Domain name: The domain name for which you want to purchase an SSL certificate. This should be a fully qualified domain name. Example: your-domain.com or www.your-domain.com
- Email: The website administrator's email address
- After you fill out the above form it will generate a CSR this is what you need to purchase a SSL Certificate.
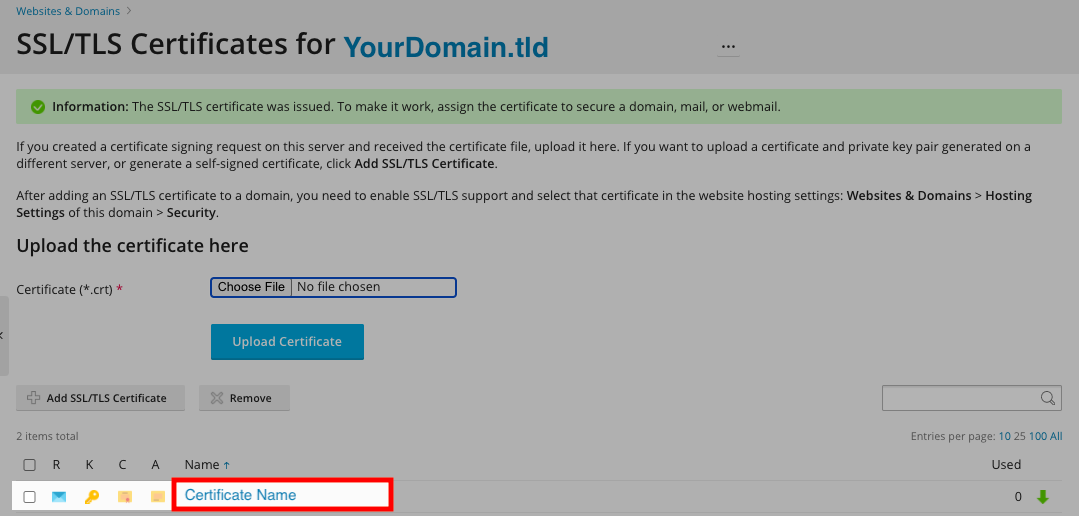
- Confirmation that your CSR was created
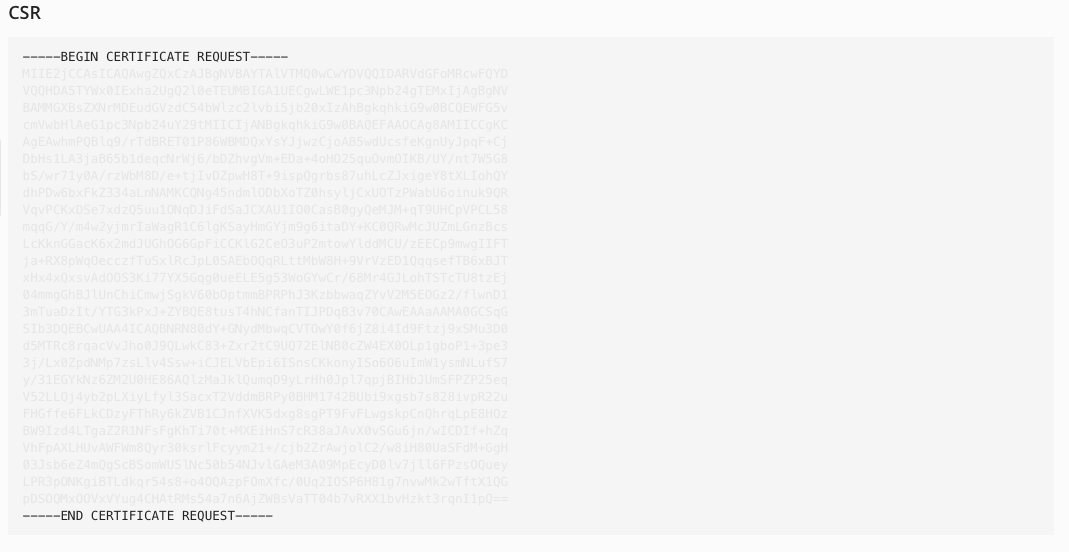
- Click on the Certificate name to view your CSR
- Locate the CSR section on the page, and copy the text that starts with the line -----BEGIN CERTIFICATE REQUEST----- and ends with the line -----END CERTIFICATE REQUEST----- to the clipboard.
- NOTE when ordering an SSL Certificate the validation email must match your domain with the following conditions
- admin@<domain.tld>
- administrator@<domain.tld>
- hostmaster@<domain.tld>
- webmaster@<domain.tld>
- postmaster@<domain.tld>
Installing SSL Certificate
- Once you have ordered your SSL Certificate, you should receive an email to approve the creating of the certificate. Once you approve the process, another email will be sent to you with your Certificate.
- Log in to your Control Panel
- Find the domain you wish to secure and click on the little down arrow to expand the options
- Choose Secure Your Sites
- Click on the Certificate Name that you created earlier
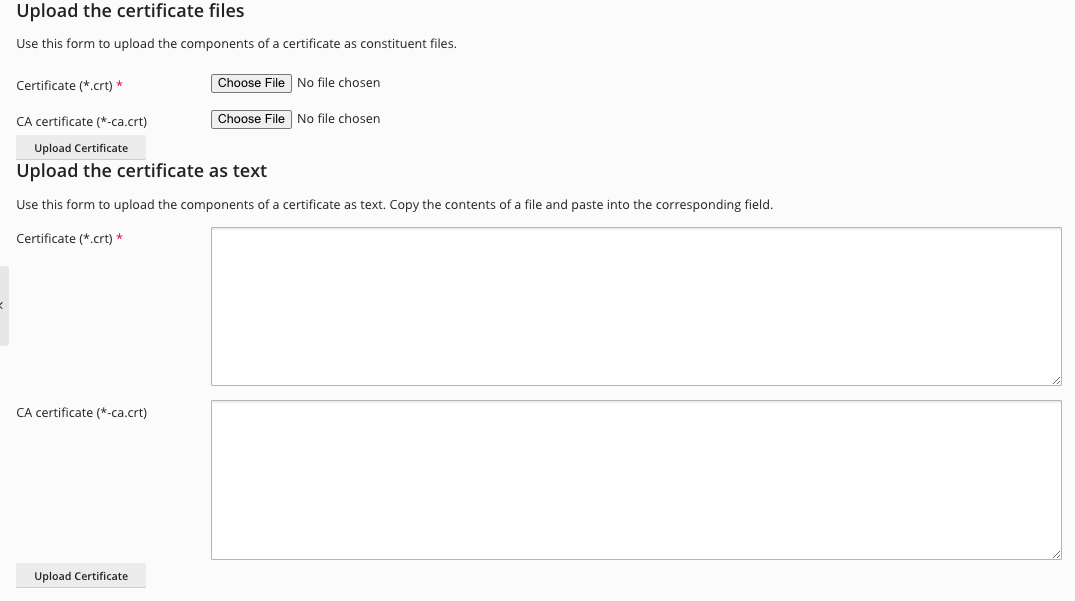
- After you have copied the Certificate from the email you received past it in the box for Certificate
- Be sure to include -----Begin Certificate----- and -----End Certificate-----
- Now you need to assign the certificate to your site. To do that, from the menu chooseWebsites and Domains
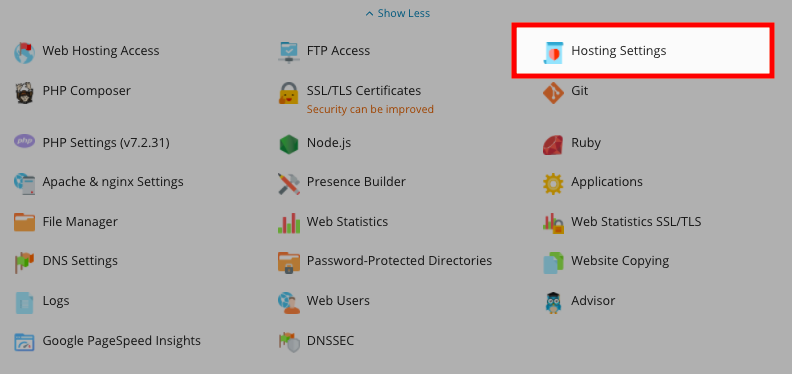
- Find the domain you are add the SSL Certificate for and choose Hosting Settings
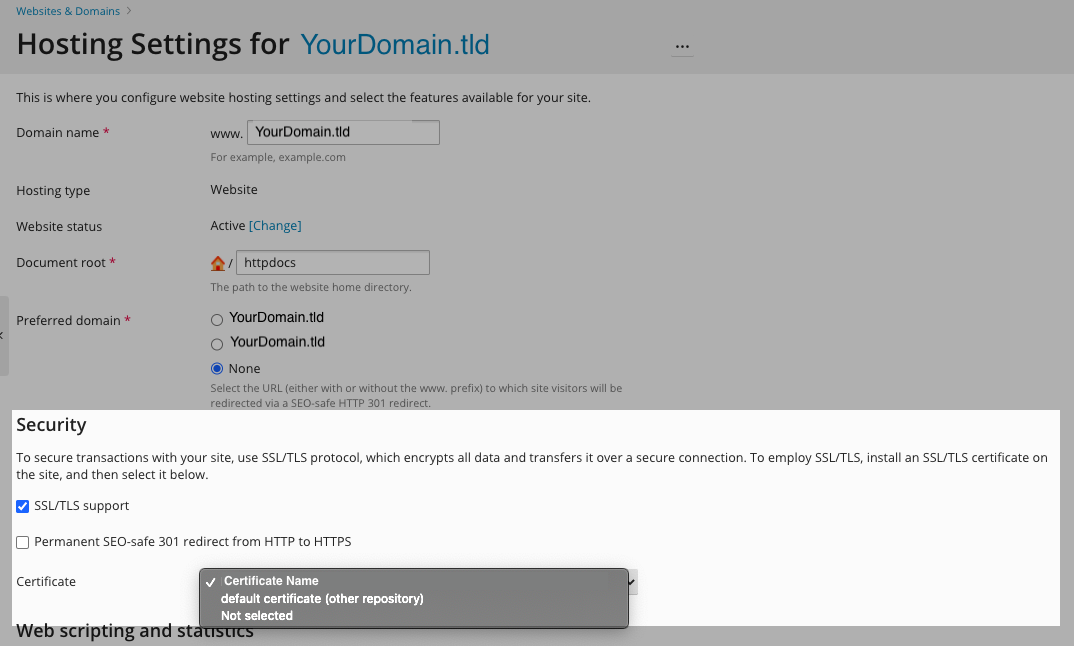
- Then check the box for SSL Support and select your certificate
- Click OK at the bottom and that is it.
