Difference between revisions of "XMission Email:MacMail 9.x"
From XMission Wiki
(→Configure Mac Mail 9.X for XMission Email) |
(→Configure Mac Mail 9.X for XMission Email) |
||
| Line 46: | Line 46: | ||
# Click the '''ADVANCED''' tab in the newly opened window | # Click the '''ADVANCED''' tab in the newly opened window | ||
# You may keep the server port at 587 with "use ssl" checked, or change the port number to 465 | # You may keep the server port at 587 with "use ssl" checked, or change the port number to 465 | ||
| − | # Make sure your User Name is correct in the User Name field | + | # Make sure your User Name is correct in the User Name field. If your email is bob@xmission.com - your username is bob |
| − | |||
# Enter your email password in the password field | # Enter your email password in the password field | ||
# Click '''Ok''' | # Click '''Ok''' | ||
Revision as of 14:31, 29 December 2015
Configure Mac Mail 9.X for XMission Email
- Click on MAIL in the top menu bar
- Next choose Add Mail Account
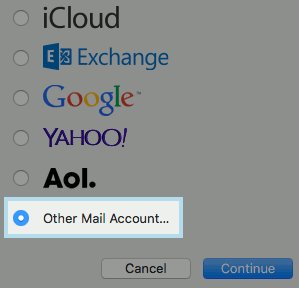
- Select Add Other Account you will have to scroll down to see it
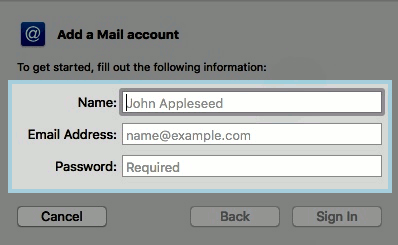
- Next add your Name, Full Email Address, and your Email Password
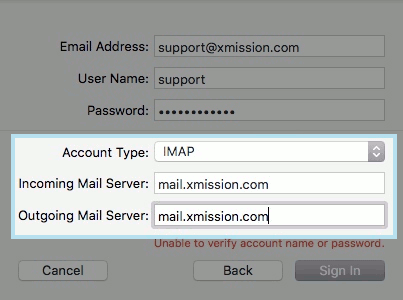
- Next you will want to fill in both Incoming and Outgoing Mail servers to "mail.xmission.com" followed by clicking "Sign In"
- Account Type: - We suggest IMAP
- Mail Server: - mail.xmission.com
- User Name: - your XMission user name - for instance if your email is bob@xmission.com - your username is bob
- Password: - your email password
- Now that the account is added, we will edit the account.
- Click MAIL in the top menu bar
- Click PREFERENCES
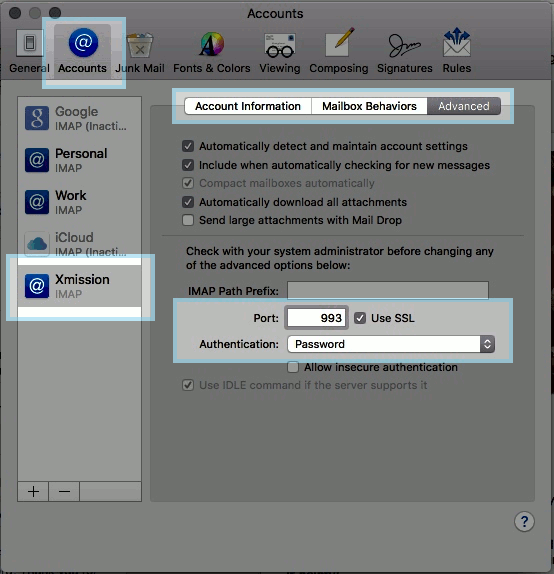
- Click ACCOUNTS at the top of the new window
- Click your XMission email from the left hand side column listings
- Navigate to the ADVANCED tab
- Change the PORT to "993" with USE SSL checked
- Change AUTHENTICATION to "Password"
- Next you will see the Incoming Mail Server info the default settings should be fine however you can check them by going to:
- Click MAIL in the top menu bar
- Click PREFERENCES
- Click ACCOUNTS at the top of the new window
- Click your XMission email from the left hand side column listings
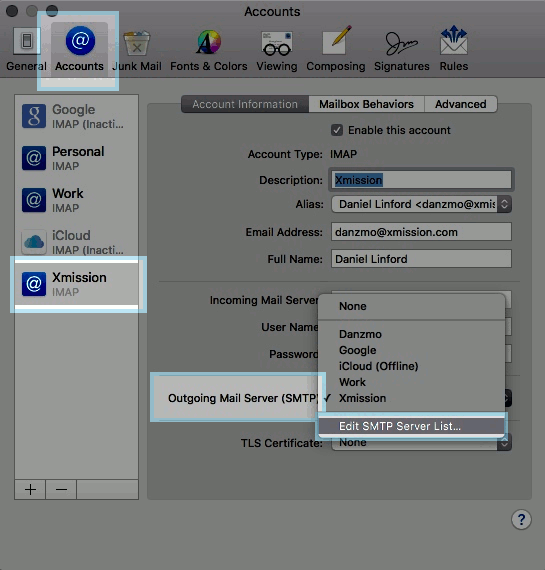
- Click the UP AND DOWN ARROWS located next to the OUTGOING MAIL SERVER (SMTP)
- Click EDIT SMTP SERVER LIST
- Next you will fill in the Outgoing Mail Server info
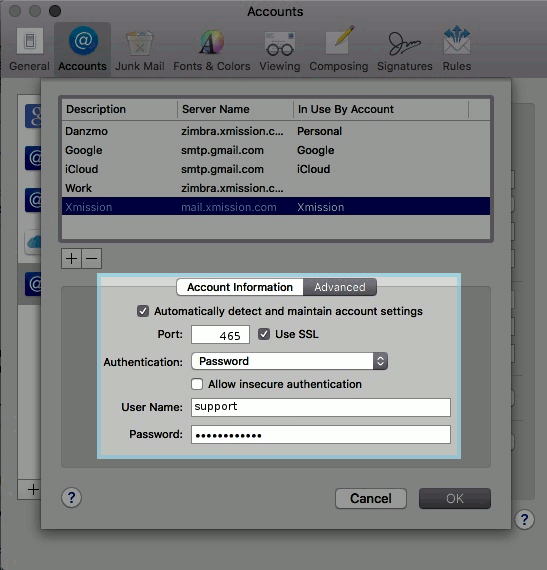
- Click the ADVANCED tab in the newly opened window
- You may keep the server port at 587 with "use ssl" checked, or change the port number to 465
- Make sure your User Name is correct in the User Name field. If your email is bob@xmission.com - your username is bob
- Enter your email password in the password field
- Click Ok
- SMTP Server: - mail.xmission.com
- User Name: - your XMission user name - for instance if your email is box@xmission.com - your username is bob
- Password: - your email password
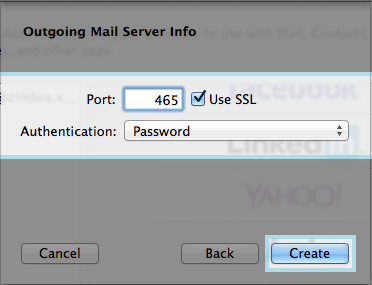
- Next you will enter the port information
- Port: - We recommend 465 and check the box for SSL
- Authentication: - Password
- After you click Create your account will be set up.
