Hosted Email:MacMail 7.x: Difference between revisions
Jump to navigation
Jump to search
mNo edit summary |
|||
| (10 intermediate revisions by 3 users not shown) | |||
| Line 1: | Line 1: | ||
{{archived}} | |||
'''Archived article - Please update your mail client.''' | |||
[[File: | '''DISCLAIMER:''' All Archived pages are for documentation for products no longer supported by the developer. XMission will not be able to support issues regarding deprecated applications. We strongly recommend upgrading to a current version of this mail client that is well supported and compliant with modern email standards. The Zimbra webmail interface is always up to date and well supported. Please give it a try: https://zimbra.xmission.com | ||
= Configure Mac Mail 7.X for Zimbra = | |||
* Click on '''APPLE ICON''' in the top menu bar | |||
* Next choose '''SYSTEM PREFERENCES''' | |||
* Choose '''INTERNET ACCOUNTS''' | |||
* Select '''Add Other Account''' you will have to scroll down to see it | |||
[[File:Mail7.x-0.png]] | |||
| Line 18: | Line 25: | ||
* Next you will put in the Incoming Server | * Next you will put in the Incoming Server Information | ||
[[File:Mail7.x-3.png]] | [[File:Mail7.x-3.png]] | ||
* ''Account Type:'' - We recommend IMAP | * ''Account Type:'' - We always recommend IMAP | ||
* ''Mail Server:'' - zimbra.xmission.com | * ''Mail Server:'' - zimbra.xmission.com | ||
* ''User Name:'' - your full email address | * ''User Name:'' - your full email address | ||
| Line 26: | Line 33: | ||
* Next you will enter the | * Next you will enter the Outgoing Server Information | ||
[[File:Mail7.x-4.png]] | [[File:Mail7.x-4.png]] | ||
* ''SMTP Server:'' - zimbra.xmission.com | * ''SMTP Server:'' - zimbra.xmission.com | ||
| Line 34: | Line 41: | ||
* After you click on Create your account will be set up. | * After you click on Create your account will be set up. | ||
If you have a Zimbra Premium and need to | |||
If you have a Zimbra Business Premium or Personal Premium account and need to configure sync for: | |||
* [[Hosted Email:Calendar Sync OSX| Calendar Sync]] | |||
* [[Hosted Email:Contacts Sync OSX| Contacts Sync]] | |||
[[Category:Client Email Configuration|Zimbra|MacMail 7.x]] | |||
[[Category:Zimbra|MacMail 7.x]] | |||
Latest revision as of 13:41, 27 March 2019
Archived article - Please update your mail client.
DISCLAIMER: All Archived pages are for documentation for products no longer supported by the developer. XMission will not be able to support issues regarding deprecated applications. We strongly recommend upgrading to a current version of this mail client that is well supported and compliant with modern email standards. The Zimbra webmail interface is always up to date and well supported. Please give it a try: https://zimbra.xmission.com
Configure Mac Mail 7.X for Zimbra
- Click on APPLE ICON in the top menu bar
- Next choose SYSTEM PREFERENCES
- Choose INTERNET ACCOUNTS
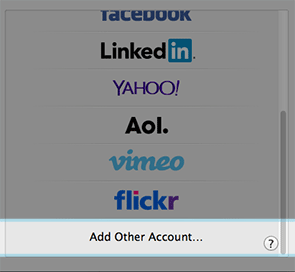
- Select Add Other Account you will have to scroll down to see it
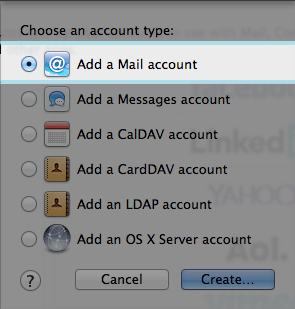
- Next choose Add a mail account
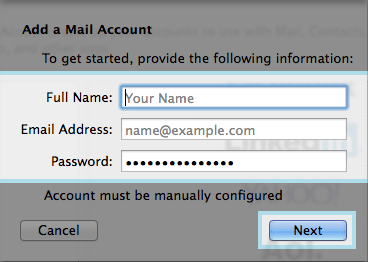
- Next you will want to fill in all the fields and click on NEXT
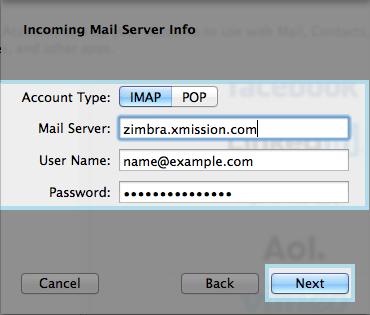
- Next you will put in the Incoming Server Information
- Account Type: - We always recommend IMAP
- Mail Server: - zimbra.xmission.com
- User Name: - your full email address
- Password: - your email password
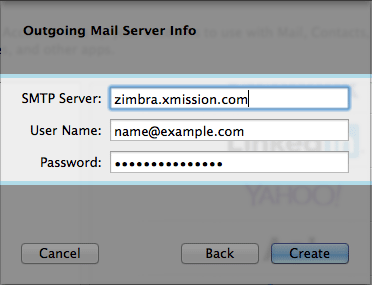
- Next you will enter the Outgoing Server Information
- SMTP Server: - zimbra.xmission.com
- User Name: - your full email address - this is not optional
- Password: - your email password - this is not optional
- After you click on Create your account will be set up.
If you have a Zimbra Business Premium or Personal Premium account and need to configure sync for:
