DSL Actiontec M1000 Single IP Setup: Difference between revisions
Jump to navigation
Jump to search
mNo edit summary |
No edit summary |
||
| (5 intermediate revisions by 3 users not shown) | |||
| Line 1: | Line 1: | ||
{{archived}} | |||
#Open your web browser and go to http://192.168.0.1 | #Open your web browser and go to http://192.168.0.1 | ||
#Click on the <span class"button">Quick Setup</span> tab at the top. | #Click on the <span class"button">Quick Setup</span> tab at the top. | ||
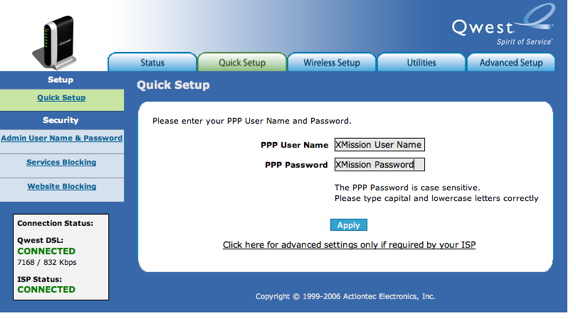
#Enter your XMission user name and password, then click <span class="button">Apply</span>. | #Enter your XMission user name and password, then click <span class="button">Apply</span>. | ||
#: | #:[[Image:m1000-1.png]] | ||
When the DSL and Internet lights have gone solid on your Actiontec, the setup is complete and you may use your Internet connection. | When the DSL and Internet lights have gone solid on your Actiontec, the setup is complete and you may use your Internet connection. | ||
[[Category:DSL|Actiontec M1000 Single IP]] | [[Category:DSL Troubleshooting|Actiontec M1000 Single IP]] | ||
[[Category:DSL]] | |||
[[Category:PPPoA]] | |||
Latest revision as of 12:48, 6 June 2019
- Open your web browser and go to http://192.168.0.1
- Click on the Quick Setup tab at the top.
- Enter your XMission user name and password, then click .
When the DSL and Internet lights have gone solid on your Actiontec, the setup is complete and you may use your Internet connection.
