Netscape 6 Setup: Difference between revisions
Jump to navigation
Jump to search
new page |
No edit summary |
||
| (5 intermediate revisions by 3 users not shown) | |||
| Line 1: | Line 1: | ||
{{archived}} | |||
#Open Netscape. | #Open Netscape. | ||
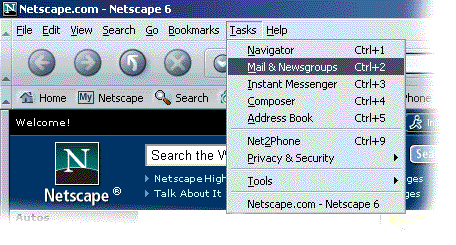
#Click <span class="button">Tasks</span> and select <span class="button">Mail & Newsgroups</span>. | #Click <span class="button">Tasks</span> and select <span class="button">Mail & Newsgroups</span>. | ||
#: | #[[Image:Winns601.png]] | ||
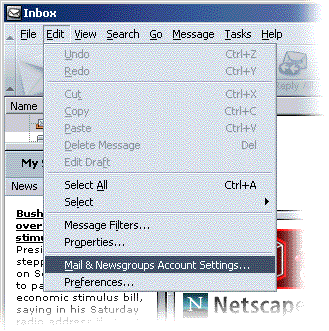
#Click <span class="button">Edit</span> and select <span class="button">Mail & Newsgroups Account Settings</span>. | #Click <span class="button">Edit</span> and select <span class="button">Mail & Newsgroups Account Settings</span>. | ||
#: | #[[Image:Winns602.png]] | ||
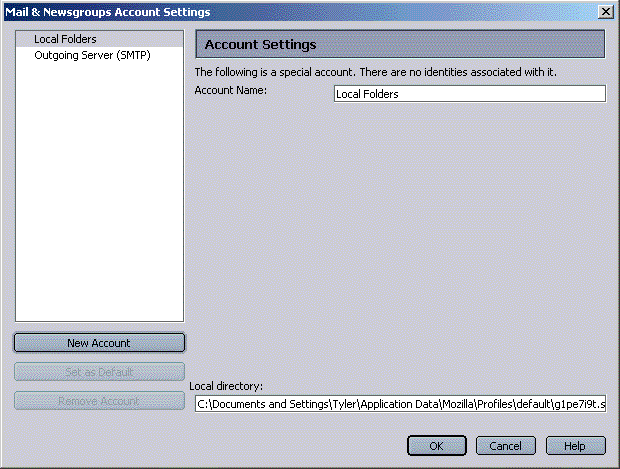
#Click <span class="button">New Account</span>. | #Click <span class="button">New Account</span>. | ||
#: | #[[Image:Winns603.png]] | ||
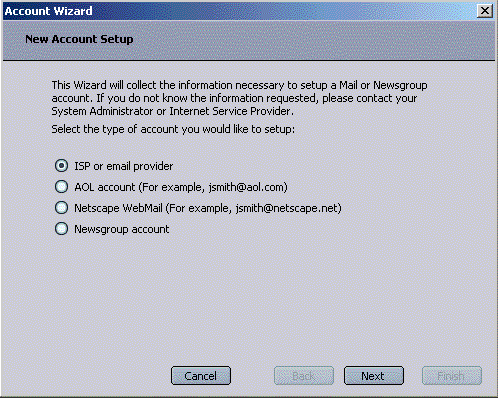
#Select <span class="button">ISP or email provider</span>. | #Select <span class="button">ISP or email provider</span>. | ||
#Click <span class="button">Next</span>. | #Click <span class="button">Next</span>. | ||
#: | #[[Image:Winns604.png]] | ||
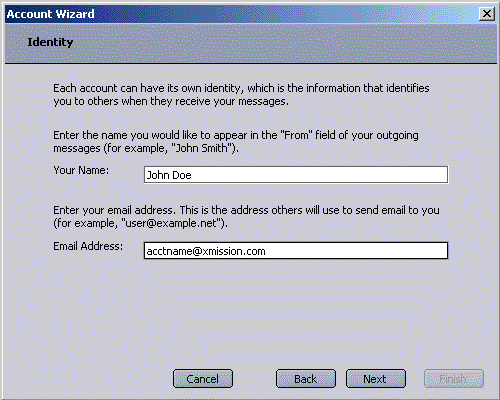
#In the field labeled <span class="button">Your Name:</span>, enter the name you would like to appear on outgoing email messages. | #In the field labeled <span class="button">Your Name:</span>, enter the name you would like to appear on outgoing email messages. | ||
#In the field labeled <span class="button">Email Address:</span>, enter your XMission email address. | #In the field labeled <span class="button">Email Address:</span>, enter your XMission email address. | ||
#Click <span class="button">Next</span>. | #Click <span class="button">Next</span>. | ||
#: | #[[Image:Winns605.png]] | ||
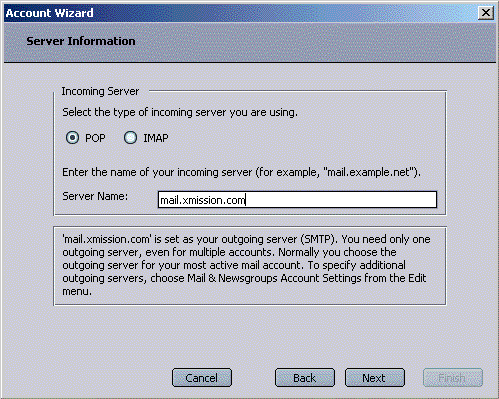
#Under <span class="button">Select the type of incoming server you are using.</span>, select <span class="button">POP</span>. | #Under <span class="button">Select the type of incoming server you are using.</span>, select <span class="button">POP</span>. | ||
#In the field labeled <span class="button">Server Name:</span>, enter <tt>mail.xmission.com</tt>. | #In the field labeled <span class="button">Server Name:</span>, enter <tt>mail.xmission.com</tt>. | ||
#Click <span class="button">Next</span>. | #Click <span class="button">Next</span>. | ||
#: | #[[Image:Winns606.png]] | ||
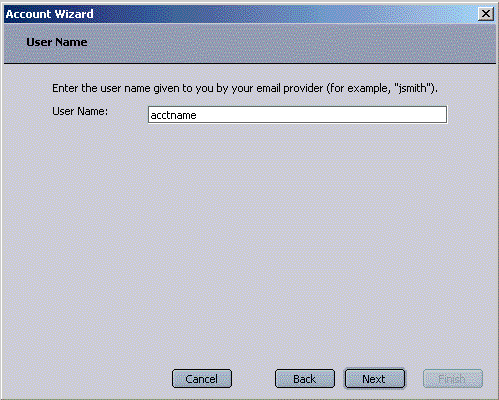
#In the space provided, enter your XMission username. | #In the space provided, enter your XMission username. | ||
#Click <span class="button">Next</span>. | #Click <span class="button">Next</span>. | ||
#: | #[[Image:Winns607.png]] | ||
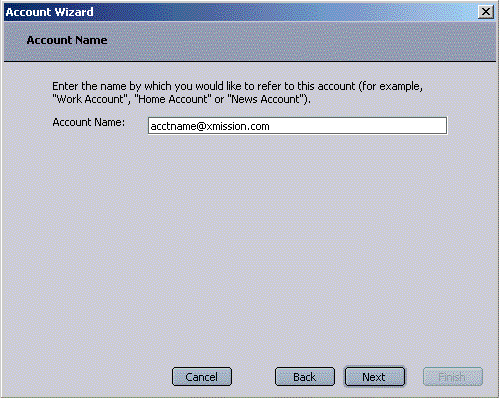
#Click <span class="button">Next</span> again. | #Click <span class="button">Next</span> again. | ||
#: | #[[Image:Winns608.png]] | ||
#Verify all the settings and click <span class="button">Finish</span>. | #Verify all the settings and click <span class="button">Finish</span>. | ||
#: | #[[Image:Winns609.png]] | ||
#Click <span class="button">OK</span>. | #Click <span class="button">OK</span>. | ||
| Line 30: | Line 33: | ||
[[Category:Email]] | [[Category:XMission Email Archives|Netscape 6]] | ||
Latest revision as of 15:56, 14 January 2020
![]()
- Open Netscape.
- Click and select .
- Click and select .
- Click .
- Select .
- Click .
- In the field labeled , enter the name you would like to appear on outgoing email messages.
- In the field labeled , enter your XMission email address.
- Click .
- Under , select .
- In the field labeled , enter mail.xmission.com.
- Click .
- In the space provided, enter your XMission username.
- Click .
- Click again.
- Verify all the settings and click .

- Click .


Congratulations! You should now see your Inbox. You're ready to start sending and receiving email.