DSL Actiontec M1000 Multiple IP Setup: Difference between revisions
Jump to navigation
Jump to search
mNo edit summary |
No edit summary |
||
| (6 intermediate revisions by 3 users not shown) | |||
| Line 1: | Line 1: | ||
{{archived}} | |||
#Open your web browser and go to http://192.168.0.1 | #Open your web browser and go to http://192.168.0.1 | ||
#Click on the <span class="button">Advanced Setup</span> tab. | #Click on the <span class="button">Advanced Setup</span> tab. | ||
#Under the '''IP Addressing''' section, click <span class="button">WAN IP Address</span>, on the warning screen, click <span class="button">Yes</span>. | #Under the '''IP Addressing''' section, click <span class="button">WAN IP Address</span>, on the warning screen, click <span class="button">Yes</span>. | ||
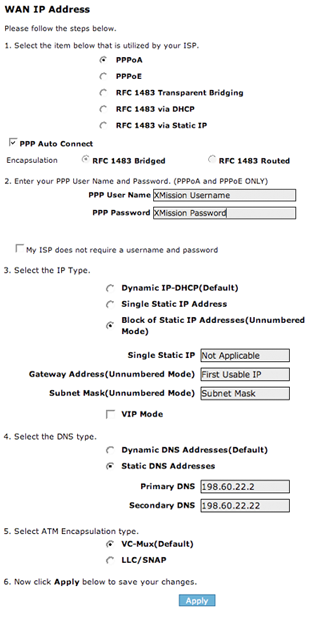
#Fill in the information requested as show in the screenshot below | #Fill in the information requested as show in the screenshot below | ||
#: | #:[[Image:m1000subnet.png]] | ||
#Click <span class="button">Apply</span> | #Click <span class="button">Apply</span> | ||
| Line 9: | Line 11: | ||
[[Category:DSL Troubleshooting|Actiontec M1000 Multiple IP]] | |||
[[Category:DSL]] | |||
[[Category:DSL|Actiontec M1000 Multiple IP]] | [[Category:PPPoA]] | ||
Latest revision as of 12:48, 6 June 2019
- Open your web browser and go to http://192.168.0.1
- Click on the tab.
- Under the IP Addressing section, click , on the warning screen, click .
- Fill in the information requested as show in the screenshot below
- Click
Once the DSL and Internet lights are solid you may use your Internet Connection.
