Zimbra Basics: Difference between revisions
m →Disabling Junk Mail: FQDN |
|||
| (75 intermediate revisions by 4 users not shown) | |||
| Line 1: | Line 1: | ||
==Overview/Logging In== | ==Overview/Logging In== | ||
The Zimbra user interface is a browser-based utility that allows you to manage not only your email but the many collaborative tools available for your use. | The Zimbra user interface is a browser-based utility that allows you to manage not only your email but the many collaborative tools available for your use. | ||
To login to the Zimbra | To login to the Zimbra webmail interface, go to https://zimbra.xmission.com and login with your full email address and password. | ||
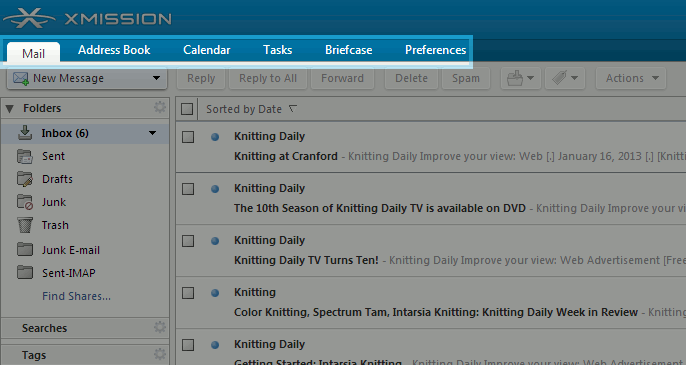
The application tabs near the top of your screen indicate what areas of Zimbra you will be working with. Please note that only customers who have purchased | The application tabs near the top of your screen indicate what areas of Zimbra you will be working with. '''Please note that only customers who have purchased Premium Hosted Email will see and be able to utilize all the application tabs.''' If you find that one of these application tabs is missing and would like to have it available, consider upgrading to a higher level of service! For more information, please contact our sales team. | ||
The different application tabs have different features and tools available. They are as follows: | The different application tabs have different features and tools available. They are as follows: | ||
*'''Mail''': Compose, delete, and manage your email. | *'''Mail''': Compose, delete, and manage your email. | ||
*''' | *'''Contacts''': Create, remove, share, and manage contacts for your email. | ||
*'''Calendar''': Create, remove, share, and manage deadlines, appointments, meetings, etc...(Only available in '''Standard''' and '''Premium''' packages) | *'''Calendar''': Create, remove, share, and manage deadlines, appointments, meetings, etc...(Only available in '''Standard''' and '''Premium''' packages) | ||
*'''Tasks''': Create, remove, share, and manage tasks, including task or project priorities and progress. (Only available in '''Standard''' and '''Premium''' packages) | *'''Tasks''': Create, remove, share, and manage tasks, including task or project priorities and progress. (Only available in '''Standard''' and '''Premium''' packages) | ||
*'''Briefcase''': Create, remove, share, and manage items saved to your briefcase. (Only available in '''Standard''' and '''Premium''' packages) | *'''Briefcase''': Create, remove, share, and manage items saved to your briefcase. (Only available in '''Standard''' and '''Premium''' packages) | ||
*''' | *'''Preferences''': Manage your user preferences. | ||
[[Image:1zimbratabs.png]] | |||
==Change Password== | |||
Changing your password through the Zimbra webmail interface is easy and we will show you how below. First, take a few seconds to read about password best practices. | |||
'''Password requirements:''' | |||
This blog post on email and password security is extremely informational: https://xmission.com/blog/2017/10/17/best-practices-for-zimbra-email-security | |||
XMission recommends using secure passphrases consisting of multiple words and special characters since they can be much easier to remember. | |||
* Ideally it is best to use longer, more complex pass phrases to properly protect yourself, and your company, from hackers. Our Zimbra system supports passwords up to 128 characters. We request a minimum password length of 12-15 characters. | |||
* Shorter passwords require use of at least 1 of the following: UPPER CASE letter, lower case letter, special characters, and a numeral to meet minimum security requirements. | |||
* Passwords expire after 1 year and must be changed at that time. Changing more frequently is advised. | |||
* You can never re-use your current password. | |||
* Please allow 15 minutes for your new password to propagate through the system. | |||
* Write your password down in a secure location until you memorize it then destroy the note. | |||
XMission Personal Premium accounts must change their password here: https://xmission.com/password | |||
'''How to change your password in Zimbra webmail:''' | |||
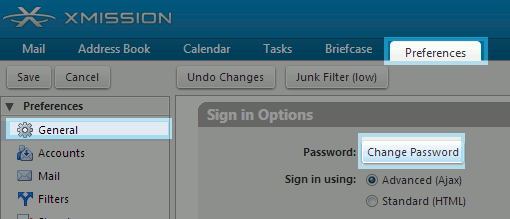
* Click the ''Preferences'' tab. | |||
* Ensure ''General'' is selected in the left-hand column. | |||
* Click the ''Change Password'' button. | |||
[[Image:1zimbrachangepwd.png]] | |||
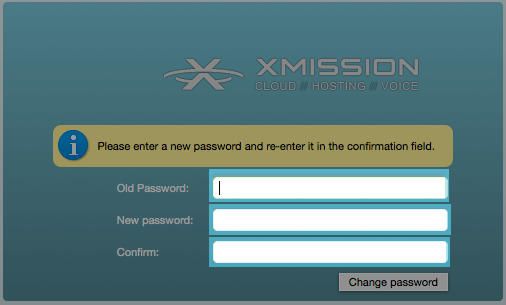
* Complete the fields in the pop-up window and click ''Change password'' to complete. | |||
Contact your Domain Administrator as they can perform password changes. XMission will not change end user mailbox passwords. | |||
[[File:Zimbra_changePassword_2.png]] | |||
==Quota== | |||
Near the upper-right corner of your window and to the right of the '''Search''' field, you will see your "Display Name" and a bar beneath. This bar will fill up and change color as your storage increases. | |||
[[Image:1zimbraquota1.png]] | |||
For more detailed information on your quota, simply hover your mouse cursor over your name and a window will pop up with detailed information regarding your account quota. | |||
[[Image:1zimbraquota2.png]] | |||
Zimbra quota measured as follows: 1 GB = 1024 MB | |||
==System Limits== | |||
XMission provide hosted Zimbra for business email needs. Certain limits apply per organization, domain, and user level. | |||
* Recipients addressed per hosted email domain per day | |||
** 100,000 recipients external to the organization, with no hard quota on recipients internal to the organization | |||
** XMission Hosted Zimbra business email service is not intended for bulk email services. | |||
* Maximum size of any hosted Zimbra mailbox | |||
** 50 GB (51,200 MB) | |||
** This is a hard quota and cannot be changed. | |||
* Maximum aliases | |||
** 50 aliases per user level mailbox | |||
** There is no limit to suffix-support mailbox aliases user+suffix@example.com | |||
** 10 domain aliases per organization domain | |||
* Recipients addressed per user per day using on business domain | |||
** 5,000 recipients external to the organization | |||
** Internal domain email unlimited | |||
* Number of recipients per message | |||
** 500 - hard coded limit | |||
** Bulk mailing should use external service | |||
==Dragging and Dropping== | ==Dragging and Dropping== | ||
| Line 26: | Line 100: | ||
==Mail== | ==Mail== | ||
===Managing your Inbox=== | |||
Video about managing your Inbox: https://help.zimbra.com/videos/8x/Managing_Your_Inbox.mp4 | |||
===Compose email=== | |||
It is very easy to create and compose a new email from within the Zimbra webmail interface. From within the Mail tab you can click on the "'''New Message'''" button in the left column. There are also several handy keyboard shortcuts that can be utilized to initiate a new email. The options are; ''''c'''' for compose new, ''''C'''' to compose in an external browser window, ''''nm'''' for new message, ''''r'''' for reply, and ''''a'''' for reply-all. | |||
Video on how to compose email from within Zimbra webmail: https://help.zimbra.com/videos/8x/Compose_an_Email.mp4 | |||
===Viewing=== | |||
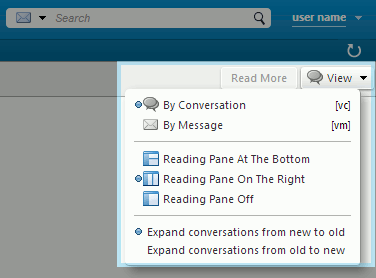
Zimbra webmail offers multiple viewing options. To access these, cllick the '''View''' pull-down menu near the upper-right corner of your window. | |||
You can choose to view '''By Conversation''' or '''By Message'''. Most prefer the conversation view as it groups email conversations together. | |||
Zimbra also provides options on how email appears in the web browser. Choose from '''Reading Pane At The Bottom''', '''Reading Pane On The Right''', or '''Reading Pane Off'''. We suggest you try all 3 to see which option best meets your needs. | |||
''TIP'': '''Reading Pane On The Right''' gives the look and feel of the Outlook mail client. | |||
[[Image:1zimbramessageoptions.png]] | |||
Zimbra video on Message Views: https://help.zimbra.com/videos/8x/Conversation_View.mp4 | |||
<!-- ===Viewing External Email=== | |||
Zimbra allows you to check all your email account through the web interface. Check them separately or create a "universal inbox" for all accounts. | |||
To set up your external account you need the following details: | |||
* '''Account type''' IMAP or POP - This is the type of email the service provider uses, IMAP is best. | |||
* "''Username''' Typically the username is the part before the "@" or it can be the full email address. (example, "sales" or "sales@xmission.com") | |||
* '''Email server''' This is the server name for your external account. (example, mroute01.xmission.com) | |||
* '''Advanced settings''' Your provider should let you know if they do not use standard IMAP (143) or POP (110) port. Please enable "Use an encrypted connection ( SSL) when accessing this server" to secure your email transactions with the external server. The port numbers will change. | |||
'''Receiving external messages to your account''' | |||
When you retrieve your external email messages, the messages and attachments are saved to the folder you specified when you configured your account information. | |||
Messages from your external accounts have to be checked manually. Messages are not automatically received in the Zimbra web client. | |||
If you configured the Inbox to be the folder to save the external account's messages, click Get Mail on the toolbar. Your Inbox folder is updated with all new messages including messages from your external accounts. NOTE: Only POP email accounts can be set for viewing in your Inbox folder. | |||
If you configured another folder for your external accounts, select that folder and click the Get Mail button from the toolbar. Messages are delivered to your folder. Click Refresh to see the latest messages. | |||
NOTE: If accessing a standard (ie non-Zimbra) xmisison.com mail account, use mroute01.xmission.com as the email server, rather than mail.xmission.com. --> | |||
===Tagging=== | ===Tagging=== | ||
Tagging allows you to quickly filter your mail, contacts, tasks, and documents according to your own parameters. | Tagging allows you to quickly filter your mail, contacts, tasks, and documents according to your own parameters. | ||
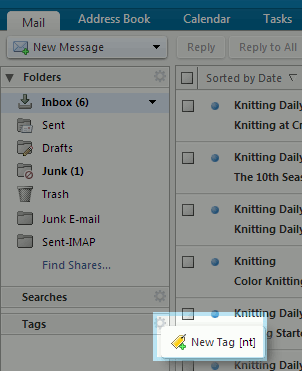
You can create up to seven different colored tags to help you organize your email, contacts, tasks, and documents. To create a new tag, right-click | You can create up to seven different colored tags to help you organize your email, contacts, tasks, and documents. To create a new tag, simply click on the '''gear icon''' [[Image:Gear_icon.png]] near the upper-right corner of '''Tags''' heading and then click '''New Tag'''. | ||
[[Image:1zimbratag1.png]] | |||
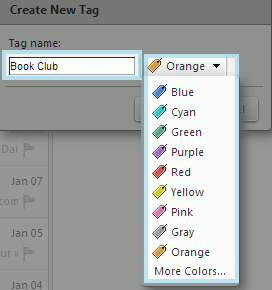
Alternatively, you can right-click in the '''Tags''' section in the left-hand column and select <span class="button">New Tag</span> and then complete the following: | |||
*'''Tag Name''': This is a description of the tag. | *'''Tag Name''': This is a description of the tag. | ||
*'''Color''': Using the pull-down menu, select the color you want associated with this tag. | *'''Color''': Using the pull-down menu, select the color you want associated with this tag. | ||
[[Image:1zimbratag2.png]] | |||
To finish, click <span class="button">Ok</span>. | To finish, click <span class="button">Ok</span>. | ||
| Line 48: | Line 179: | ||
===Searching=== | ===Searching=== | ||
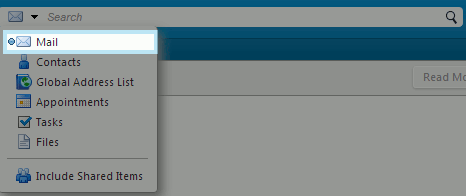
You can quickly search for an email or emails by typing in any text in the search field and clicking | You can quickly search for an email or emails by typing in any text in the search field and clicking the '''Search''' icon [[Image:1search_icon.png]]. Be sure the pull-down menu beside the text field is set to '''Mail'''. | ||
[[Image:1zimbrasearch.png]] | |||
Simple searches can be done by just entering a word into the search field. | Simple searches can be done by just entering a word into the search field. | ||
| Line 88: | Line 219: | ||
Use the asterisk * as a wildcard after a prefix. For example, the search string '''do*''' returns items such as do, dog, door, etc.... | Use the asterisk * as a wildcard after a prefix. For example, the search string '''do*''' returns items such as do, dog, door, etc.... | ||
Your searches can even be saved! To save a search, simply click <span class="button">Save</span> on the search bar. You will be prompted to give your search a name. Once you've named your search, you can look up saved searches in the advanced search mode and quickly run them. For example, let's say you often need to find emails you've exchanged with your grandmother. You would type "from:grandma@internet.com" in the search field, and click <span class="button">Save</span>. You could name your search "Grandma's Emails" and quickly run that search whenever you like from the Advanced Search menu! | Your searches can even be saved! To save a search, first run your search and then simply click <span class="button">Save</span> on the search bar. | ||
[[Image:1zimbrasearch2.png]] | |||
You will be prompted to give your search a name. Once you've named your search, you can look up saved searches in the advanced search mode and quickly run them. For example, let's say you often need to find emails you've exchanged with your grandmother. You would type "from:grandma@internet.com" in the search field, and click <span class="button">Save</span>. You could name your search "Grandma's Emails" and quickly run that search whenever you like from the Advanced Search menu! | |||
Video on Zimbra Search: https://help.zimbra.com/videos/8x/Searching_in_Zimbra.mp4 | |||
===Folders=== | ===Folders=== | ||
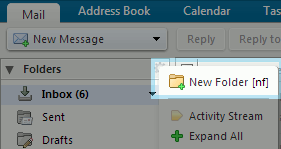
Creating new folders with the Zimbra user interface is easy. If you wish to create a a folder, simply click on the | Creating new folders with the Zimbra user interface is easy. If you wish to create a a folder, simply click on the '''gear icon''' [[Image:Gear_icon.png]] near the upper-right corner of the left-hand column and then click '''New Folder'''. | ||
[[Image:1zimbrafolder1.png]] | |||
Alternatively, you can right click on the folder heading or any folder and choose '''New Folder'''. You will then be prompted to name your new folder. Once named, the folder will now be displayed along with your other folders in the left-hand column. | |||
[[Image:1zimbrafolder2.png]] | |||
Once you have created a new folder, you may move the folder around by simply dragging and dropping it on the location you'd like it to be. | Once you have created a new folder, you may move the folder around by simply dragging and dropping it on the location you'd like it to be. | ||
If you would like to rename, delete, or share a folder, simply right-click on that folder and choose the appropriate option from the pop-up menu. | If you would like to rename, delete, or share a folder, simply right-click on that folder and choose the appropriate option from the pop-up menu. | ||
==Address Book== | ==Address Book== | ||
===Adding Contacts=== | ===Adding Contacts=== | ||
There are a few ways to add a new contact to your | There are a few ways to add a new contact to your Contacts. | ||
If you receive an email from someone you'd like to add as a contact, simply right-click on the email and choose <span class="button">Add to Contacts</span> from the pop-up menu | If you receive an email from someone you'd like to add as a contact, simply right-click on the email and choose <span class="button">Add to Contacts</span> from the pop-up menu. | ||
If you'd like to create a contact from scratch, click on the ''' | [[Image:1zimbracontact1.png]] | ||
This will automatically bring you to the contact creation screen, where you can define more information for the contact if you wish. Once you are happy with the contact info you've entered, click <span class="button">Save</span> near the upper left corner of the window. You will see a box that says '''Contact Created'''. | |||
If you'd like to create a contact from scratch, click on the '''Contacts''' tab near the top of your screen and click <span class="button">New Contact</span>. | |||
[[Image:1zimbracontact2.png]] | |||
This will also present you with the contact creation screen. Enter all the information you would like, and then choose <span class="button">Save</span> near the upper left corner of the window. You will see a box that says '''Contact Created'''. | |||
Video on creating and managing Contacts in Zimbra: http://help.zimbra.com/videos/8x/Contacts.mp4 | |||
====Contact Groups==== | ====Contact Groups==== | ||
Within your | Within your Contacts, you're not limited to single contacts. You can create multiple '''Contact Groups''' to help you keep organized. | ||
For example, suppose some fellow coworkers and/or friends wanted to form a Book Club. These people are all in your | For example, suppose some fellow coworkers and/or friends wanted to form a Book Club. These people are all in your Contacts, but you want to more easily find and email them. You would create a new '''Contact Group.''' | ||
To create a new '''Contact Group''', | To create a new '''Contact Group''', ensure you have selected the '''Contacts''' tab and click the arrow beside '''New Contact''' to open a new menu. Then, simply click '''New Contact Group'''. | ||
[[Image:1zimbracontgroup1.png]] | |||
Simply complete the following: | Simply complete the following: | ||
*'''Group Name''': The name of your new contact group. | *'''Group Name''': The name of your new contact group. In this example, our Contact Group would be named "Book Club." | ||
*'''Group Members''': You can search for individuals to add in the right-hand column Search field or add members immediately from your domain by selecting one ore more of them and clicking <span class="button">Add</span>. Alternatively, if you wanted to add everyone in the right-hand column, you could just click <span class="button">Add All</span>. | *'''Group Members''': You can search for individuals to add in the right-hand column Search field or add members immediately from your domain by selecting one ore more of them and clicking <span class="button">Add</span>. Alternatively, if you wanted to add everyone in the right-hand column, you could just click <span class="button">Add All</span>. | ||
[[Image:1zimbracontgroup2.png]] | |||
You can also manually add email addresses using the box near the bottom right hand corner. Simply type the email address(es) you want to add, separate them with a comma, and click "Add." | |||
[[Image:1zimbracontgroup3.png]] | |||
Once you have all the members you want in your new '''Contact Group''' simply click <span class="button">Save</span> along the application toolbar near the top. | Once you have all the members you want in your new '''Contact Group''' simply click <span class="button">Save</span> along the application toolbar near the top. | ||
= | If you want to remove a member from your '''Contact Group''' simply click the red "X" alongside the contact's name. | ||
[[Image:1zimbracontgroup4.png]] | |||
Remember to click <span class="button">Save</span> along the application toolbar near the top to apply your changes! | |||
Video on creating a personal Contact Group in Zimbra: http://help.zimbra.com/videos/8x/Create_a_Contact_Group.mp4 | |||
===Searching Contacts=== | |||
You can quickly search for a contact or contacts by typing in any text in the search field and clicking the '''Search''' icon [[Image:1search_icon.png]]. Be sure the pull-down menu beside the text field is set to '''Contacts'''. | |||
[[Image:1zimbrasearchcontacts.png]] | |||
===Additional Address Books (Create, Add Contacts, Delete, etc...)=== | |||
To | It is even possible to create multiple contact folders to help you manage your contacts. To create a new Contact Folder, ensure you have selected the '''Contacts''' tab and click the arrow beside '''New Contact''' to open a new menu. Then, simply click choose <span class="button">Contacts Folder</span>. | ||
[[Image:1zimbraaddress1.png]] | |||
You | You will be prompted to name your new folder and select a location to store it. Once you click <span class="button">Okay</span>, you will see your new contact folder listed under the '''Contacts''' heading on the left-hand column. | ||
[[Image:1zimbraaddress2.png]] | |||
Alternatively, to create a new contact folder you may right-click on the '''Contacts''' heading on the left-hand column and select <span class="button">New Contact Folder</span>. | |||
[[Image:1zimbraaddress3.png]] | |||
=== | ==Preferences== | ||
===Auto-Reply or Vacation=== | |||
To set an "auto-reply" or "vacation" message, click on the '''Preferences''' tab and then select the '''Out of Office''' option. | |||
[[Image:1zimbravacation1.png]] | |||
Then, be sure to enable your "away" message by ticking the option '''Send auto-reply message'''. In the box below that, type the message you would like sent when someone sends you an email. | |||
[[Image:1zimbravacationnew.png]] | |||
If you like, you can set the span of dates for the auto-reply message to be sent. '''If you don't set this, remember to disable your auto-reply message when you no longer wish it sent.''' | |||
You can also set a different message to be sent to "external senders." In this case, that would be anyone outside of your domain. | |||
Be sure to click <span class="button">Save</span> near the upper-left corner of the window to save your changes. | Be sure to click <span class="button">Save</span> near the upper-left corner of the window to save your changes. | ||
===Filters/SPAM Filtering=== | Note: The Zimbra auto responder feature only sends one response per address to prevent spam abuse. | ||
Enabling | |||
Video reference: http://help.zimbra.com/videos/8x/Out_of_Office_Message.mp4 | |||
===Filters=== | |||
====Junk/SPAM Filtering==== | |||
'''The following option is only available for Premium Zimbra accounts. If you would like this functionality, please contact our Sales department.''' | |||
Enabling and disabling Junk Filtering with the Zimbra web interface is quick and simple. First, click on the '''Preferences''' tab and then select '''Junk Filter'''. | |||
[[Image:1zimbrajunk1.png]] | |||
XMission has three template rules for you to choose from. | |||
*Low - Default level of spam filtering | |||
*High - Stricter level of spam filtering | |||
*Disabled - No spam filtering | |||
If you find you are getting too much SPAM, you may want to consider selecting the '''High''' option. Alternatively, if you don't want to risk losing legitimate messages you may want to choose the '''Low''' or even '''Disabled''' option. Be sure to click '''OK''' to apply your changes. | |||
[[Image:1zimbrajunk2.png]] | |||
<blockquote style="background-color: lightblue; border: solid thin grey;">Unfortunately, the more strict your SPAM filter, the more likely you are to risk losing legitimate messages. However, if you have a lower setting, your risk of losing legitimate messages is not as great but you may receive more SPAM. '''Please remember you may check your "Junk" folder at any time. This will help you refine your filtering decisions, and also ensure you don't miss any legitimate messages.'''</blockquote> | |||
XMission additionally allows you to customize your Spam Assassin scoring system. You can do this using the '''Custom''' field. Spam Assassin is a robust system that presses every messages through a variety of filters to determine it's "SPAM score." Essentially, however many asterisks you place in the '''Custom''' field increases or decreases the likelihood of SPAM. For example, 8 asterisks in this field (the default '''Low''' setting) permits any message that scores 8 or less to be received. Alternatively, 5 asterisks (the '''High''' setting) only permits message that score 5 or less to be received. '''Increasing the number of asterisks will permit higher scoring messages to be received whereas decreasing the number of asterisks will consider more messages "Junk"''''. | |||
[[Image:1zimbrajunk3.png]] | |||
<blockquote style="background-color: lightblue; border: solid thin grey;">It's important to remember that spammers make every effort to make messages look legitimate, and that many legitimate messages may have systemic problems that cause them to look like SPAM. Ultimately, in the immortal words of the great Grant Sperry, "Fighting SPAM is more of an art than a science."'</blockquote> | |||
Zimbra Base Business mailboxes use the following method to configure unwanted mail settings. | |||
https://wiki.xmission.com/Zimbra_Spam_Filtering#Zimbra_Base_Filtering | |||
[[Category:Zimbra|Basics]] | |||
===Signatures=== | |||
Enabling Signatures with the Zimbra web interface is quick and simple. Here is how: | |||
From your preferences, select Signatures as seen in the image below<br> | |||
[[File:Zimbra Signatures.png]] | |||
On the right side of the screen you can select New Signature and design your signature as seen below | |||
[[File:Zimbra_Signatures_2.png]] | |||
* Format in Plain Text is just that a Plain Text signature. You can also choose Format in HTML and use Color and Images in your Signature. | |||
* Using Signatures - Primary account - If you have multiple signatures you can select what signature you need for new emails or replies and forwards. | |||
==Document and File Sharing== | |||
Working in Briefcase | |||
Briefcase can be used to share and manage documents that you create in Briefcase or documents and images that you upload to your Briefcase folders. Use Briefcase to save files in your account so that you can access these files whenever you log in to your account from any computer. | |||
You can share your briefcases folders with others who can view and edit the files in the shared Briefcase. | |||
You can create multiple briefcase folders and then upload any type of file from your computer or your computer network, save attachments sent with your email messages, and create new documents. | |||
Files in Briefcase are copies of the original file, whether the file is on your computer or an attachment to your email. Changes you make to files in your briefcase do not change the original file. | |||
http:// | Zimbra 8.X Briefcase video tutorial: http://help.zimbra.com/videos/8x/Briefcase.mp4 | ||
'''NOTE''' This feature is only available with a Zimbra Premium account. If you wish to use this feature and you do not have a Premium account, please contact our sales department. | |||
===Creating Briefcase Folders=== | |||
#Go to Briefcase>Folders. | |||
#Click the gear icon and select New Briefcase. | |||
#Enter a Name for the new briefcase folder. | |||
#*The briefcase folder name must be unique within the hierarchy of your all of mailbox folders. This name cannot match any top-level folder in your mailbox, calendar, or address book. For example, if you have a calendar named Holidays, you cannot name a top-level briefcase Holidays. Holidays could be a name of a briefcase within another briefcase. | |||
#Select the Color of the new briefcase file. | |||
#Select the folder hierarchy, either under Folders or under another briefcase folder. You can create a new top-level briefcase, or you can place it under an existing briefcase. | |||
#Click OK. | |||
==== | ===Upload Files from Briefcase=== | ||
#Go to the Briefcase tab and select the Briefcase to save the file. | |||
#Click Upload File and Browse to find the file to upload. | |||
#In the Notes text field, add any information about the file. This information is displayed in the file list. | |||
#To add another file, click Add. | |||
#*You cannot upload a file with the same name to the same briefcase. If a file is uploaded that already exists in the folder, an Upload Conflict dialog displays. You can either click Yes to upload the file, overwriting the existing file, or click No. | |||
#*The version number is updated if a file is overwritten. | |||
#When all files are uploaded, click OK. | |||
'''Note:''' If you selected the wrong briefcase, you can use drag and drop to move the file to the correct Briefcase folder. | |||
*If the file is too large, a warning displays. Files that you upload impact your account quota. | |||
===Sharing Briefcase Files Externally=== | |||
You can share your XMission Zimbra files with other non-XMission users by uploading them to your Zimbra Briefcase. | |||
Select Briefcase tab inside your Zimbra webmail and create New Folder. | |||
Grant an external user access to the Briefcase by right-clicking on the new folder and select Share Folder. | |||
Select External guests (view only) and enter their email address for the shared Briefcase. | |||
The external user should receive an email containing the URL of the shared briefcase along with instructions | |||
[[Category:Zimbra]] | |||
Latest revision as of 14:17, 5 April 2023
Overview/Logging In
The Zimbra user interface is a browser-based utility that allows you to manage not only your email but the many collaborative tools available for your use.
To login to the Zimbra webmail interface, go to https://zimbra.xmission.com and login with your full email address and password.
The application tabs near the top of your screen indicate what areas of Zimbra you will be working with. Please note that only customers who have purchased Premium Hosted Email will see and be able to utilize all the application tabs. If you find that one of these application tabs is missing and would like to have it available, consider upgrading to a higher level of service! For more information, please contact our sales team.
The different application tabs have different features and tools available. They are as follows:
- Mail: Compose, delete, and manage your email.
- Contacts: Create, remove, share, and manage contacts for your email.
- Calendar: Create, remove, share, and manage deadlines, appointments, meetings, etc...(Only available in Standard and Premium packages)
- Tasks: Create, remove, share, and manage tasks, including task or project priorities and progress. (Only available in Standard and Premium packages)
- Briefcase: Create, remove, share, and manage items saved to your briefcase. (Only available in Standard and Premium packages)
- Preferences: Manage your user preferences.
Change Password
Changing your password through the Zimbra webmail interface is easy and we will show you how below. First, take a few seconds to read about password best practices.
Password requirements:
This blog post on email and password security is extremely informational: https://xmission.com/blog/2017/10/17/best-practices-for-zimbra-email-security
XMission recommends using secure passphrases consisting of multiple words and special characters since they can be much easier to remember.
- Ideally it is best to use longer, more complex pass phrases to properly protect yourself, and your company, from hackers. Our Zimbra system supports passwords up to 128 characters. We request a minimum password length of 12-15 characters.
- Shorter passwords require use of at least 1 of the following: UPPER CASE letter, lower case letter, special characters, and a numeral to meet minimum security requirements.
- Passwords expire after 1 year and must be changed at that time. Changing more frequently is advised.
- You can never re-use your current password.
- Please allow 15 minutes for your new password to propagate through the system.
- Write your password down in a secure location until you memorize it then destroy the note.
XMission Personal Premium accounts must change their password here: https://xmission.com/password
How to change your password in Zimbra webmail:
- Click the Preferences tab.
- Ensure General is selected in the left-hand column.
- Click the Change Password button.
- Complete the fields in the pop-up window and click Change password to complete.
Contact your Domain Administrator as they can perform password changes. XMission will not change end user mailbox passwords.
Quota
Near the upper-right corner of your window and to the right of the Search field, you will see your "Display Name" and a bar beneath. This bar will fill up and change color as your storage increases.
For more detailed information on your quota, simply hover your mouse cursor over your name and a window will pop up with detailed information regarding your account quota.
Zimbra quota measured as follows: 1 GB = 1024 MB
System Limits
XMission provide hosted Zimbra for business email needs. Certain limits apply per organization, domain, and user level.
- Recipients addressed per hosted email domain per day
- 100,000 recipients external to the organization, with no hard quota on recipients internal to the organization
- XMission Hosted Zimbra business email service is not intended for bulk email services.
- Maximum size of any hosted Zimbra mailbox
- 50 GB (51,200 MB)
- This is a hard quota and cannot be changed.
- Maximum aliases
- 50 aliases per user level mailbox
- There is no limit to suffix-support mailbox aliases user+suffix@example.com
- 10 domain aliases per organization domain
- Recipients addressed per user per day using on business domain
- 5,000 recipients external to the organization
- Internal domain email unlimited
- Number of recipients per message
- 500 - hard coded limit
- Bulk mailing should use external service
Dragging and Dropping
A powerful feature of the Zimbra user interface is the ability to "drag and drop" items. Not only can tags, contacts, and emails be dragged and dropped for easy organization, but you will find many features of Zimbra can be moved around via "dragging" and "dropping." For example, you can drag-and-drop emails into different folders, drag tags onto emails or contacts for easy filtering, or even drag and drop folders into other folders.
To drag an item, hold down the left mouse button on the item you wish to move. Then, move the mouse while continuing to hold down the left mouse button. When you wish to drop the item, release the left-mouse button.
Another powerful feature of the Zimbra user interface worth mentioning is multiple selections. You can often select multiples of items you wish to move or be tagged by simply playing a checkmark beside each item you want in your selection. Alternatively, you can even select multiple items by holding down your shift key, using your arrow keys to select anything in the list, and releasing the shift key to complete your selection. These selections can then be moved in giant "clumps," saving you time and energy and helping you to quickly organize items in exactly the way you want them.
Managing your Inbox
Video about managing your Inbox: https://help.zimbra.com/videos/8x/Managing_Your_Inbox.mp4
Compose email
It is very easy to create and compose a new email from within the Zimbra webmail interface. From within the Mail tab you can click on the "New Message" button in the left column. There are also several handy keyboard shortcuts that can be utilized to initiate a new email. The options are; 'c' for compose new, 'C' to compose in an external browser window, 'nm' for new message, 'r' for reply, and 'a' for reply-all.
Video on how to compose email from within Zimbra webmail: https://help.zimbra.com/videos/8x/Compose_an_Email.mp4
Viewing
Zimbra webmail offers multiple viewing options. To access these, cllick the View pull-down menu near the upper-right corner of your window.
You can choose to view By Conversation or By Message. Most prefer the conversation view as it groups email conversations together.
Zimbra also provides options on how email appears in the web browser. Choose from Reading Pane At The Bottom, Reading Pane On The Right, or Reading Pane Off. We suggest you try all 3 to see which option best meets your needs.
TIP: Reading Pane On The Right gives the look and feel of the Outlook mail client.
Zimbra video on Message Views: https://help.zimbra.com/videos/8x/Conversation_View.mp4
Tagging
Tagging allows you to quickly filter your mail, contacts, tasks, and documents according to your own parameters.
You can create up to seven different colored tags to help you organize your email, contacts, tasks, and documents. To create a new tag, simply click on the gear icon ![]() near the upper-right corner of Tags heading and then click New Tag.
near the upper-right corner of Tags heading and then click New Tag.
Alternatively, you can right-click in the Tags section in the left-hand column and select and then complete the following:
- Tag Name: This is a description of the tag.
- Color: Using the pull-down menu, select the color you want associated with this tag.
To finish, click .
You will now see the named tag you created beneath the Tags section in the left-hand column. To tag an email, simply drag the tag from the Tags section and drop it on the email you would like to tag.
You can even tag multiple messages at once. Just drag your selection of messages to the tag in the left-hand column, and the messages will be tagged accordingly.
Alternatively, you can tag an email by selecting the tag icon from the mail application toolbar.
Tagging is an extremely versatile tool for filtering your email. Once you have tagged a message or messages, you can filter to see only those tagged messages by clicking on the corresponding tag(s) under the Tags heading. This will show all messages you have tagged throughout all folders. You can even assign multiple tags to the same item!
For example, you may wish to create a tag for "Friends" and a contact for "Co-workers." Alternatively, you may wish to create a tag for "High Priority" and "Low Priority." Ultimately, the possibilities of tagging are limitless and can be created to suit virtually any need.
Searching
You can quickly search for an email or emails by typing in any text in the search field and clicking the Search icon ![]() . Be sure the pull-down menu beside the text field is set to Mail.
. Be sure the pull-down menu beside the text field is set to Mail.
Simple searches can be done by just entering a word into the search field.
More advanced searches can be done by specifying a search operator. A search operator is a special keyword followed by a colon, followed by some other parameter specific to that operator. For example:
- in:inbox: The operator is "in" and the parameter is "inbox" - this returns messages which are in the folder named "inbox"
- from:someone: The operator is "from" and the parameter is "someone" - this returns messages which have the word "someone" in their email address
Let's say you wanted to find a particular image your grandmother sent you, but you can't find the email in your inbox. To run a search that would essentially "find all messages from your grandmother that are in your inbox and have an attachment" you would run a search like this: "in:inbox from:grandma@internet.com has:attachment"
You can prefix any keyword with the word "not" to specify items that do not have that criterion -- for example not in:inbox. Search is case insensitive, meaning that "in:inbox" is the same as "in:Inbox".
The following is a list of common search operators:
- content: Specifies text that the message must contain. For example, content:bananas finds all items containing the word "bananas".
- from: Specifies a sender name or email address that is in the From header. This can be text, as in "John Smith III", an email address such as "joe@acme.com", or a domain such as "@zimbra.com".
- to: Same as from: except that it specifies one of the people to whom the email was addressed in the To: header.
- cc: Same as from: except that it specifies a recipient in the Cc: header of the message.
- subject: Specifies text that must appear in the subject header of the message. An example might be subject:"new vacation policy". Use quotes to search for exact match.
- in: Specifies a folder. For example, in:sent would show all items in your 'Sent' folder.
- has: Specifies an attribute that the message must have. The types of object you can specify are "attachment", "phone", or "url". For example, has:attachment would find all messages which contain one or more attachments of any type.
- filename: Specifies an attachment file name. For example, filename:query.txt would find messages with a file attachment named "query.txt".
- type: Specifies a search within attachments of a specified type. The types of attachment you can specify are "text", "word", "excel", and "pdf". For example, type:word "hello" finds messages with attachments that are Microsoft Word documents and searches within those attachments for the word "hello".
- attachment: Specifies any item with a certain type of attachment. For example, attachment:word would find all messages with Word attachments.
- is: Searches for messages with a certain status - for example, is: unread will find all unread messages. Allowable values are "unread", "read", "flagged", "unflagged", "sent", "draft", "received", "replied", "unreplied", "forwarded", unforwarded", "anywhere", "remote" (in a shared folder), "local", "sent", "invite", "solo" (no other messages in conversation), "tome", "fromme", "ccme", "tofromme". "fromccme", "tofromccme" (to, from cc me, including my aliases)
- date: Use this keyword to specify a date, using the format that is default for your browser's locale (for US English the format is mm/dd/yyyy). For example, date:2/1/2007 would find messages dated February 1, 2007. The greater than (>) or less than (<) symbols can be used instead of after or before. >= and <= are also allowed.
- after: Specifies mail sent after a certain date. For example, after:2/1/2007 specifies mail sent after February 1, 2007.
- before: Same as after: except specifies mail sent before the specified date.
- size: Specifies messages whose total size, including attachments, is a specified number of bytes, kilobytes, or megabytes For example, size:12 kb would find messages that are exactly 12K in size. The greater than (>) or less than (<) symbols can be used instead of bigger or smaller.
- larger: Similar to size: except specifies greater than the specified size.
- smaller: Similar to size: except specifies smaller than the specified size.
- tag: Finds messages which have been tagged with a specified tag. For example, tag:amber will find message that have a tag called "amber" applied.
The asterisk (*) can be used as a wildcard in a search to find content that contains words that have similar spellings.
Use the asterisk * as a wildcard after a prefix. For example, the search string do* returns items such as do, dog, door, etc....
Your searches can even be saved! To save a search, first run your search and then simply click on the search bar.
You will be prompted to give your search a name. Once you've named your search, you can look up saved searches in the advanced search mode and quickly run them. For example, let's say you often need to find emails you've exchanged with your grandmother. You would type "from:grandma@internet.com" in the search field, and click . You could name your search "Grandma's Emails" and quickly run that search whenever you like from the Advanced Search menu!
Video on Zimbra Search: https://help.zimbra.com/videos/8x/Searching_in_Zimbra.mp4
Folders
Creating new folders with the Zimbra user interface is easy. If you wish to create a a folder, simply click on the gear icon ![]() near the upper-right corner of the left-hand column and then click New Folder.
near the upper-right corner of the left-hand column and then click New Folder.
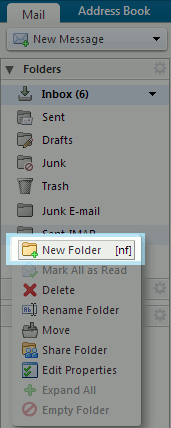
Alternatively, you can right click on the folder heading or any folder and choose New Folder. You will then be prompted to name your new folder. Once named, the folder will now be displayed along with your other folders in the left-hand column.
Once you have created a new folder, you may move the folder around by simply dragging and dropping it on the location you'd like it to be.
If you would like to rename, delete, or share a folder, simply right-click on that folder and choose the appropriate option from the pop-up menu.
Address Book
Adding Contacts
There are a few ways to add a new contact to your Contacts.
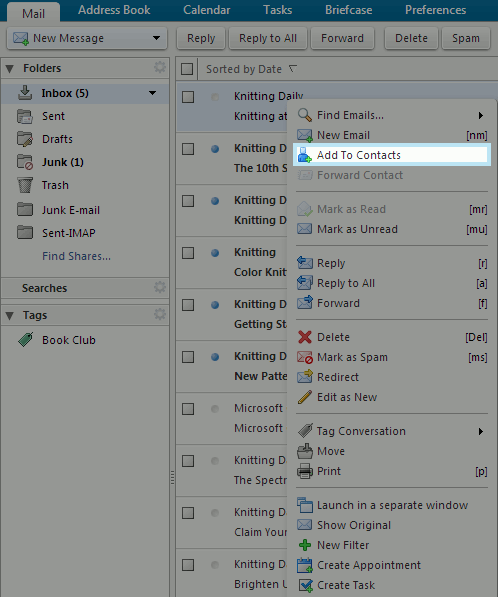
If you receive an email from someone you'd like to add as a contact, simply right-click on the email and choose from the pop-up menu.
This will automatically bring you to the contact creation screen, where you can define more information for the contact if you wish. Once you are happy with the contact info you've entered, click near the upper left corner of the window. You will see a box that says Contact Created.
If you'd like to create a contact from scratch, click on the Contacts tab near the top of your screen and click .
This will also present you with the contact creation screen. Enter all the information you would like, and then choose near the upper left corner of the window. You will see a box that says Contact Created.
Video on creating and managing Contacts in Zimbra: http://help.zimbra.com/videos/8x/Contacts.mp4
Contact Groups
Within your Contacts, you're not limited to single contacts. You can create multiple Contact Groups to help you keep organized.
For example, suppose some fellow coworkers and/or friends wanted to form a Book Club. These people are all in your Contacts, but you want to more easily find and email them. You would create a new Contact Group.
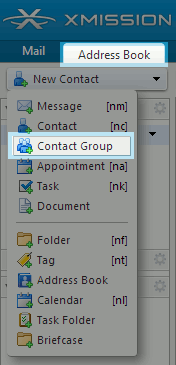
To create a new Contact Group, ensure you have selected the Contacts tab and click the arrow beside New Contact to open a new menu. Then, simply click New Contact Group.
Simply complete the following:
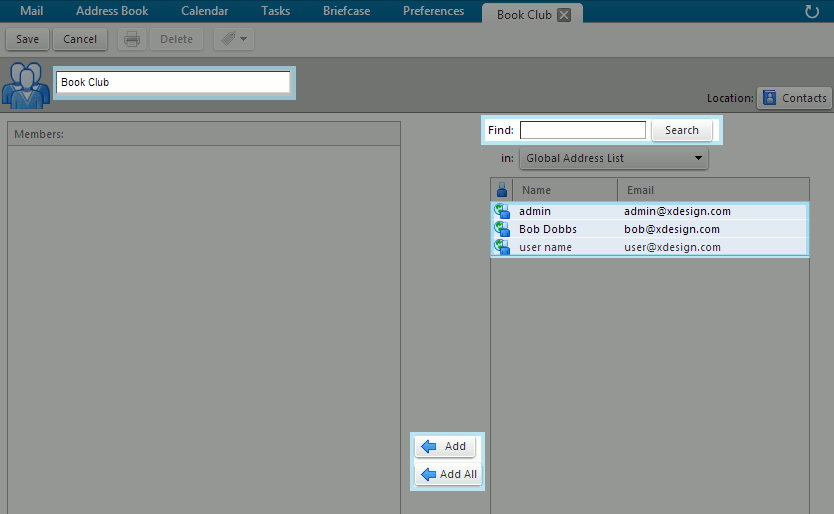
- Group Name: The name of your new contact group. In this example, our Contact Group would be named "Book Club."
- Group Members: You can search for individuals to add in the right-hand column Search field or add members immediately from your domain by selecting one ore more of them and clicking . Alternatively, if you wanted to add everyone in the right-hand column, you could just click .
You can also manually add email addresses using the box near the bottom right hand corner. Simply type the email address(es) you want to add, separate them with a comma, and click "Add."
Once you have all the members you want in your new Contact Group simply click along the application toolbar near the top.
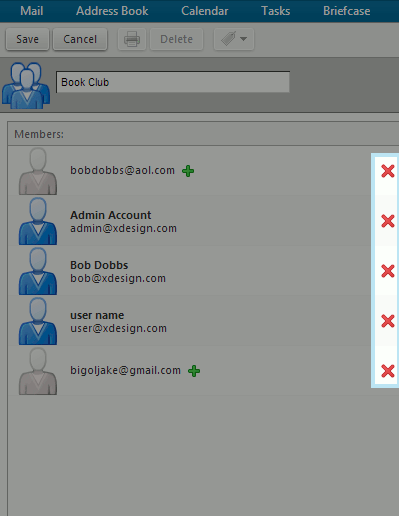
If you want to remove a member from your Contact Group simply click the red "X" alongside the contact's name.
Remember to click along the application toolbar near the top to apply your changes!
Video on creating a personal Contact Group in Zimbra: http://help.zimbra.com/videos/8x/Create_a_Contact_Group.mp4
Searching Contacts
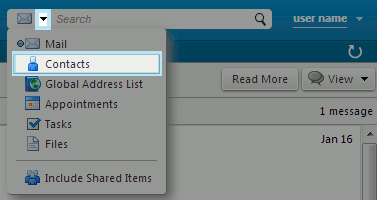
You can quickly search for a contact or contacts by typing in any text in the search field and clicking the Search icon ![]() . Be sure the pull-down menu beside the text field is set to Contacts.
. Be sure the pull-down menu beside the text field is set to Contacts.
Additional Address Books (Create, Add Contacts, Delete, etc...)
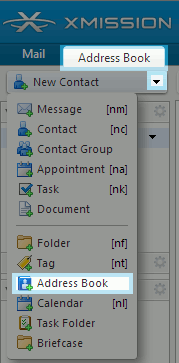
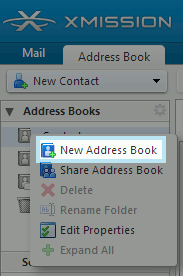
It is even possible to create multiple contact folders to help you manage your contacts. To create a new Contact Folder, ensure you have selected the Contacts tab and click the arrow beside New Contact to open a new menu. Then, simply click choose .
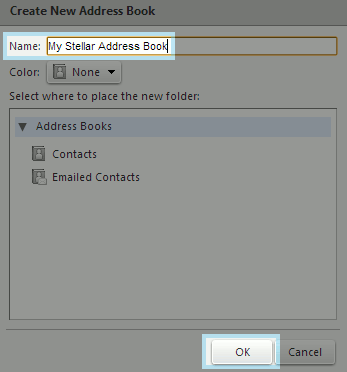
You will be prompted to name your new folder and select a location to store it. Once you click , you will see your new contact folder listed under the Contacts heading on the left-hand column.
Alternatively, to create a new contact folder you may right-click on the Contacts heading on the left-hand column and select .
Preferences
Auto-Reply or Vacation
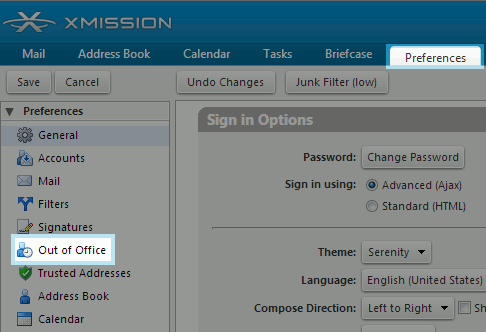
To set an "auto-reply" or "vacation" message, click on the Preferences tab and then select the Out of Office option.
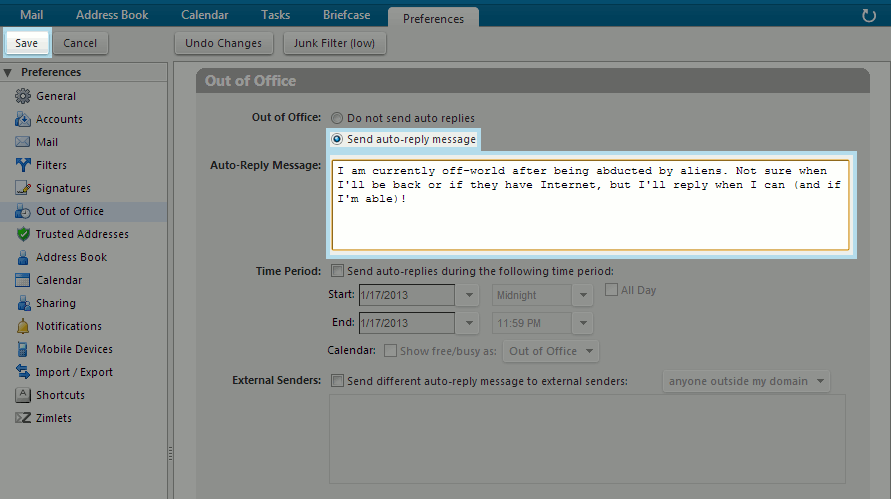
Then, be sure to enable your "away" message by ticking the option Send auto-reply message. In the box below that, type the message you would like sent when someone sends you an email.
If you like, you can set the span of dates for the auto-reply message to be sent. If you don't set this, remember to disable your auto-reply message when you no longer wish it sent.
You can also set a different message to be sent to "external senders." In this case, that would be anyone outside of your domain.
Be sure to click near the upper-left corner of the window to save your changes.
Note: The Zimbra auto responder feature only sends one response per address to prevent spam abuse.
Video reference: http://help.zimbra.com/videos/8x/Out_of_Office_Message.mp4
Filters
Junk/SPAM Filtering
The following option is only available for Premium Zimbra accounts. If you would like this functionality, please contact our Sales department.
Enabling and disabling Junk Filtering with the Zimbra web interface is quick and simple. First, click on the Preferences tab and then select Junk Filter.
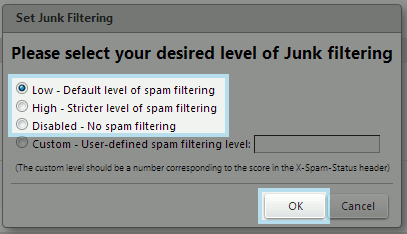
XMission has three template rules for you to choose from.
- Low - Default level of spam filtering
- High - Stricter level of spam filtering
- Disabled - No spam filtering
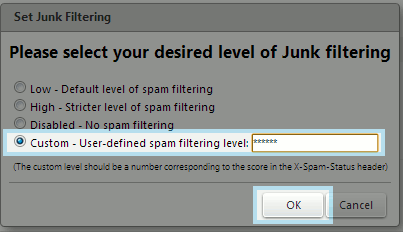
If you find you are getting too much SPAM, you may want to consider selecting the High option. Alternatively, if you don't want to risk losing legitimate messages you may want to choose the Low or even Disabled option. Be sure to click OK to apply your changes.
Unfortunately, the more strict your SPAM filter, the more likely you are to risk losing legitimate messages. However, if you have a lower setting, your risk of losing legitimate messages is not as great but you may receive more SPAM. Please remember you may check your "Junk" folder at any time. This will help you refine your filtering decisions, and also ensure you don't miss any legitimate messages.
XMission additionally allows you to customize your Spam Assassin scoring system. You can do this using the Custom field. Spam Assassin is a robust system that presses every messages through a variety of filters to determine it's "SPAM score." Essentially, however many asterisks you place in the Custom field increases or decreases the likelihood of SPAM. For example, 8 asterisks in this field (the default Low setting) permits any message that scores 8 or less to be received. Alternatively, 5 asterisks (the High setting) only permits message that score 5 or less to be received. Increasing the number of asterisks will permit higher scoring messages to be received whereas decreasing the number of asterisks will consider more messages "Junk"'.
It's important to remember that spammers make every effort to make messages look legitimate, and that many legitimate messages may have systemic problems that cause them to look like SPAM. Ultimately, in the immortal words of the great Grant Sperry, "Fighting SPAM is more of an art than a science."'
Zimbra Base Business mailboxes use the following method to configure unwanted mail settings.
https://wiki.xmission.com/Zimbra_Spam_Filtering#Zimbra_Base_Filtering
Signatures
Enabling Signatures with the Zimbra web interface is quick and simple. Here is how:
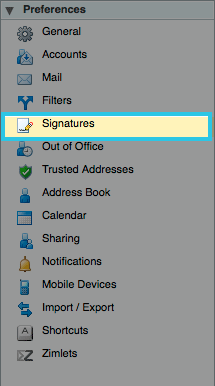
From your preferences, select Signatures as seen in the image below
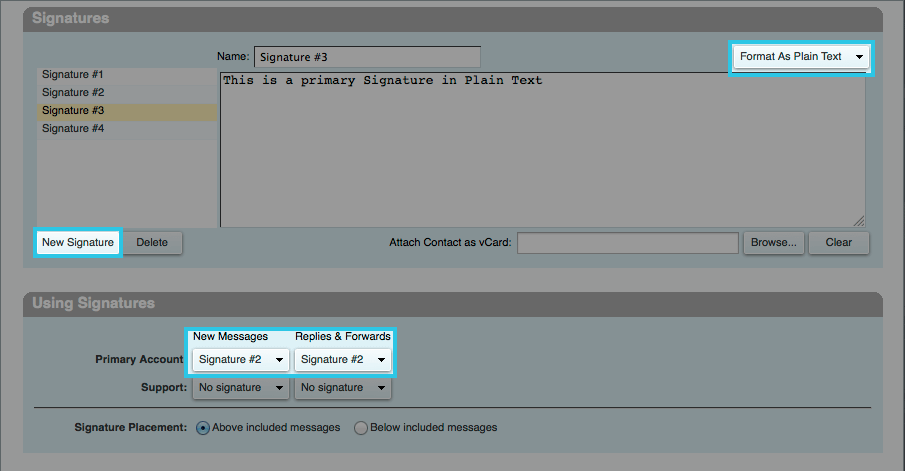
On the right side of the screen you can select New Signature and design your signature as seen below
- Format in Plain Text is just that a Plain Text signature. You can also choose Format in HTML and use Color and Images in your Signature.
- Using Signatures - Primary account - If you have multiple signatures you can select what signature you need for new emails or replies and forwards.
Document and File Sharing
Working in Briefcase
Briefcase can be used to share and manage documents that you create in Briefcase or documents and images that you upload to your Briefcase folders. Use Briefcase to save files in your account so that you can access these files whenever you log in to your account from any computer.
You can share your briefcases folders with others who can view and edit the files in the shared Briefcase.
You can create multiple briefcase folders and then upload any type of file from your computer or your computer network, save attachments sent with your email messages, and create new documents.
Files in Briefcase are copies of the original file, whether the file is on your computer or an attachment to your email. Changes you make to files in your briefcase do not change the original file.
Zimbra 8.X Briefcase video tutorial: http://help.zimbra.com/videos/8x/Briefcase.mp4
NOTE This feature is only available with a Zimbra Premium account. If you wish to use this feature and you do not have a Premium account, please contact our sales department.
Creating Briefcase Folders
- Go to Briefcase>Folders.
- Click the gear icon and select New Briefcase.
- Enter a Name for the new briefcase folder.
- The briefcase folder name must be unique within the hierarchy of your all of mailbox folders. This name cannot match any top-level folder in your mailbox, calendar, or address book. For example, if you have a calendar named Holidays, you cannot name a top-level briefcase Holidays. Holidays could be a name of a briefcase within another briefcase.
- Select the Color of the new briefcase file.
- Select the folder hierarchy, either under Folders or under another briefcase folder. You can create a new top-level briefcase, or you can place it under an existing briefcase.
- Click OK.
Upload Files from Briefcase
- Go to the Briefcase tab and select the Briefcase to save the file.
- Click Upload File and Browse to find the file to upload.
- In the Notes text field, add any information about the file. This information is displayed in the file list.
- To add another file, click Add.
- You cannot upload a file with the same name to the same briefcase. If a file is uploaded that already exists in the folder, an Upload Conflict dialog displays. You can either click Yes to upload the file, overwriting the existing file, or click No.
- The version number is updated if a file is overwritten.
- When all files are uploaded, click OK.
Note: If you selected the wrong briefcase, you can use drag and drop to move the file to the correct Briefcase folder.
- If the file is too large, a warning displays. Files that you upload impact your account quota.
Sharing Briefcase Files Externally
You can share your XMission Zimbra files with other non-XMission users by uploading them to your Zimbra Briefcase.
Select Briefcase tab inside your Zimbra webmail and create New Folder.
Grant an external user access to the Briefcase by right-clicking on the new folder and select Share Folder.
Select External guests (view only) and enter their email address for the shared Briefcase.
The external user should receive an email containing the URL of the shared briefcase along with instructions
