Hosted Email:Calendar Sync OSX: Difference between revisions
Jump to navigation
Jump to search
No edit summary |
m Added details for @xmission.com Personal Email with Zimbra ActiveSync |
||
| (One intermediate revision by the same user not shown) | |||
| Line 1: | Line 1: | ||
If you have a Zimbra Business Premium or | If you have a Zimbra Business Premium, Zimbra Business Standard, XMission.com Personal Premium, or XMission.com Personal Email with Zimbra ActiveSync account, these instructions will show you how to sync your iCal app and Notification Center by creating a CalDAV entry from the System Preferences panel in your Mac running OS X. | ||
'''Note:''' If you previously configured ActiveSync (or as Apple calls it "Microsoft Exchange") for Calendar support you need to disable the calendar functionality in those settings before proceeding. Once disabled please follow the instructions below. | '''Note:''' If you previously configured ActiveSync (or as Apple calls it "Microsoft Exchange") for Calendar support you need to disable the calendar functionality in those settings before proceeding. Once disabled please follow the instructions below. | ||
Latest revision as of 15:59, 28 January 2021
If you have a Zimbra Business Premium, Zimbra Business Standard, XMission.com Personal Premium, or XMission.com Personal Email with Zimbra ActiveSync account, these instructions will show you how to sync your iCal app and Notification Center by creating a CalDAV entry from the System Preferences panel in your Mac running OS X.
Note: If you previously configured ActiveSync (or as Apple calls it "Microsoft Exchange") for Calendar support you need to disable the calendar functionality in those settings before proceeding. Once disabled please follow the instructions below.
Calendar Sync
- Click on the APPLE ICON in the top menu bar
- Next click on SYSTEM PREFERENCE
- Choose INTERNET ACCOUNTS
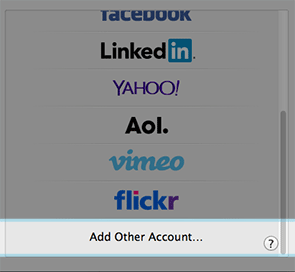
- Select Add Other Account you will have to scroll down to see it
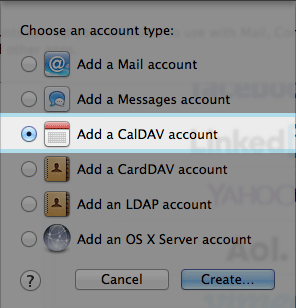
- Next Choose Add a CalDAV account
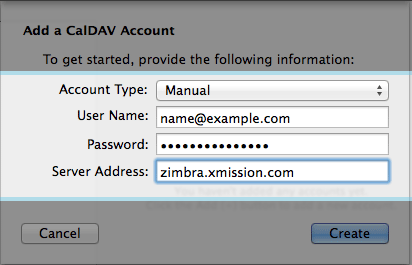
- Next Choose Manual from the Account Type: dropdown and fill in all fields
- Account Type: - Manual
- User Name: - your full email address
- Password: - your email password
- Server Address: - zimbra.xmission.com
- After you click Create - your iCal calendars and Notification Center will be start to sync. Be sure to adjust application settings to meet your preferred sync refresh increments.


