Installing DUN in 95/98: Difference between revisions
Jump to navigation
Jump to search
m Protected "Dialup Archives:Installing DUN in 95/98" [edit=sysop:move=sysop] |
No edit summary |
||
| Line 1: | Line 1: | ||
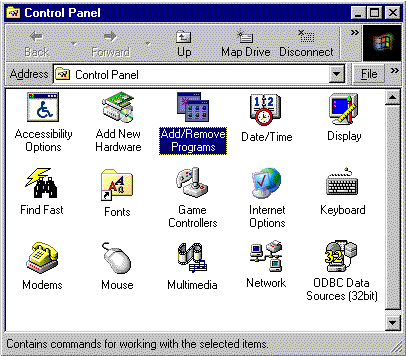
#Click <span class="button">Start</span>, go to <span class="button">Settings</span>, and select <span class="button">Control Panel</span>. | #Click <span class="button">Start</span>, go to <span class="button">Settings</span>, and select <span class="button">Control Panel</span>. | ||
#Double-click on the <span class="button">Add/Remove Programs</span> icon. | #Double-click on the <span class="button">Add/Remove Programs</span> icon. | ||
#: | #[[Image:Win9513.png]] | ||
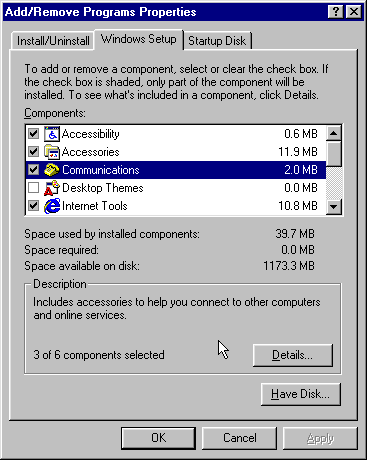
#Click on the <span class="button">Windows Setup</span> tab. | #Click on the <span class="button">Windows Setup</span> tab. | ||
#Double-click on <span class="button">Communications</span>. | #Double-click on <span class="button">Communications</span>. | ||
#: | #[[Image:Win9514.png]] | ||
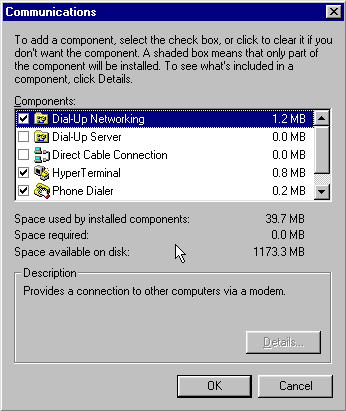
#Make sure that <span class="button">Dial-Up Networking</span> and <span class="button">HyperTerminal</span> are both checked. | #Make sure that <span class="button">Dial-Up Networking</span> and <span class="button">HyperTerminal</span> are both checked. | ||
#Click <span class="button">Ok</span>, then click <span class="button">Ok</span> again. | #Click <span class="button">Ok</span>, then click <span class="button">Ok</span> again. | ||
#: | #[[Image:Win9515.png]] | ||
#:<div class="messagebox metadata">'''Note''': You may be prompted to insert your Win95/98 installation disk(s). Do so and click <span class="button">Ok</span> when finished.</div> | #:<div class="messagebox metadata">'''Note''': You may be prompted to insert your Win95/98 installation disk(s). Do so and click <span class="button">Ok</span> when finished.</div> | ||
#When prompted, restart your computer. | #When prompted, restart your computer. | ||
[[Category:Dialup Archives|DUN]] | [[Category:Dialup Archives|DUN]] | ||


