Hosted Email:Outlook 2003: Difference between revisions
m Outlook 2003 moved to Hosted Email:Outlook 2003 |
No edit summary |
||
| Line 1: | Line 1: | ||
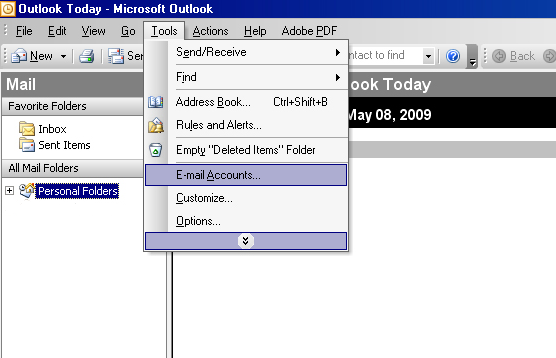
1. Open Outlook and goto the 'Tools' Menu and select 'Email Accounts...' | |||
:[[Image:2003-1_tools-accounts.png]] | |||
<br/> | |||
<br/> | |||
<br/> | |||
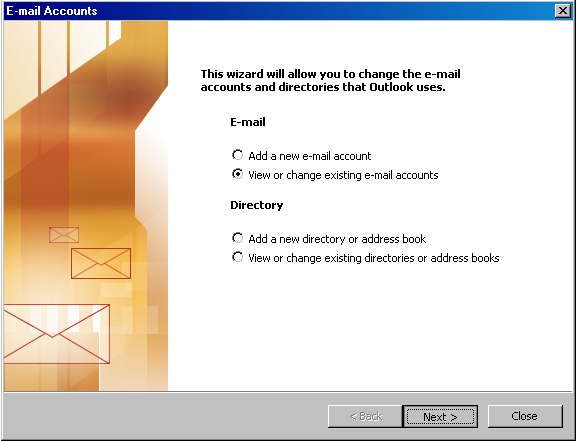
2. In the window that opens, select 'View or change existing email accounts' and click 'Next'. | |||
:[[Image:2003-2_add-vieworchange.png]] | |||
<br/> | |||
<br/> | |||
<br/> | |||
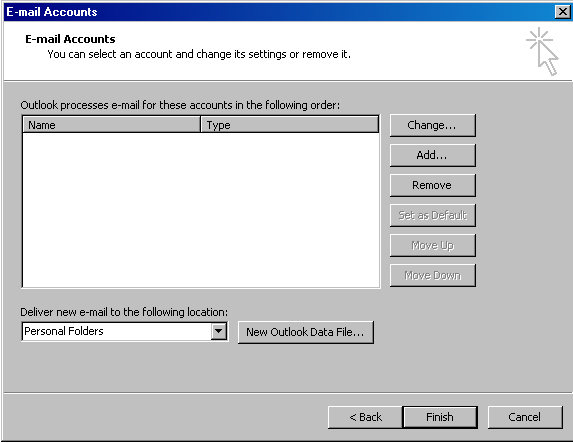
3. You should now be on the 'Email Accounts' window. Here click the 'Add...' button. | |||
:[[Image:2003-3_add-accounts.png]] | |||
<br/> | |||
<br/> | |||
<br/> | |||
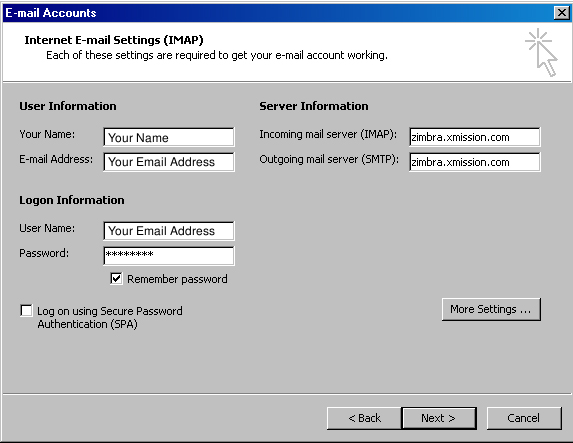
4. Fill this window out the information seen below. | |||
:[[Image:2003-4_add-general.png]] | |||
<br/> | |||
<br/> | |||
<br/> | |||
5. When finished filling out your information, click 'More Settings...' and select the 'Outgoing Server' tab. | |||
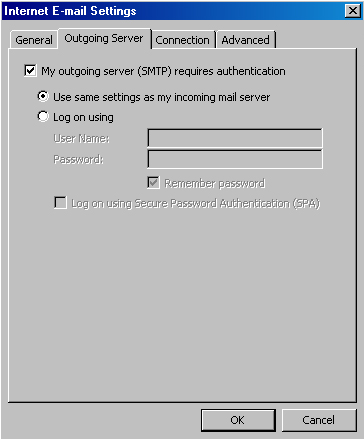
Check the Box that says 'My outgoing server (SMTP) requires authentication' and make sure 'Use same settings as my incoming mail server' is selected underneath that. | |||
:[[Image:2003-5_add-SMTPauth.png]] | |||
<br/> | |||
<br/> | |||
<br/> | |||
6.Hit the 'Ok' button when finished and that should take you back to the previous menu. Click 'Next' and then 'Finish'. You should now be able to send and receive mail. | |||
Revision as of 12:08, 19 January 2010
1. Open Outlook and goto the 'Tools' Menu and select 'Email Accounts...'
2. In the window that opens, select 'View or change existing email accounts' and click 'Next'.
3. You should now be on the 'Email Accounts' window. Here click the 'Add...' button.
4. Fill this window out the information seen below.
5. When finished filling out your information, click 'More Settings...' and select the 'Outgoing Server' tab.
Check the Box that says 'My outgoing server (SMTP) requires authentication' and make sure 'Use same settings as my incoming mail server' is selected underneath that.
6.Hit the 'Ok' button when finished and that should take you back to the previous menu. Click 'Next' and then 'Finish'. You should now be able to send and receive mail.
