Cloud Hosting/SSL: Difference between revisions
Jump to navigation
Jump to search
Created page with "==='''SSL Certificates'''=== To add a new SSL Certificate, choose the '''"Add SSL Certificate"''' button File:Addssl.png # Name your SSL Certificate # Paste your SSL Cer..." |
No edit summary |
||
| Line 13: | Line 13: | ||
After adding your SSL Certificate, you will want to apply it. You will want to choose the SSL Certificate you just created from the SSL Certificate drop down box. | After adding your SSL Certificate, you will want to apply it. You will want to choose the SSL Certificate you just created from the SSL Certificate drop down box. | ||
* You can also choose to allow both HTTP and HTTPS traffic, or to force HTTPS traffic. | * You can also choose to allow both HTTP and HTTPS traffic, or to force HTTPS traffic. | ||
[[Category: Control Panel]] | |||
Latest revision as of 15:42, 25 September 2018
SSL Certificates
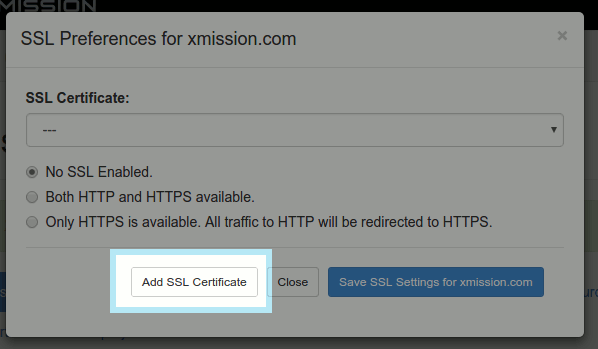
To add a new SSL Certificate, choose the "Add SSL Certificate" button
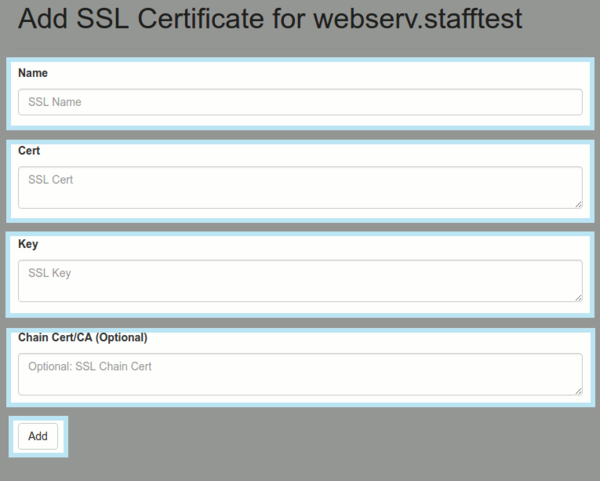
- Name your SSL Certificate
- Paste your SSL Certificate code
- Paste your SSL Key code
- Paste any chain or CA cert codes if applicable
After adding your SSL Certificate, you will want to apply it. You will want to choose the SSL Certificate you just created from the SSL Certificate drop down box.
- You can also choose to allow both HTTP and HTTPS traffic, or to force HTTPS traffic.

