Sonicwall Configuration for XMission Voice: Difference between revisions
Jump to navigation
Jump to search
| Line 30: | Line 30: | ||
# Under Network > Services click Add... | # Under Network > Services click Add... | ||
# Fill the popup as follows: | # Fill the popup as follows: | ||
:* Name: VoIP RTP | #:* Name: VoIP RTP | ||
:* Protocol: UDP | #:* Protocol: UDP | ||
:* Port Range: 3000 - 65000 | #:* Port Range: 3000 - 65000 | ||
:* Sub Type: None | #:* Sub Type: None | ||
# Click Add | # Click Add | ||
: | #: [[File:Custom_Voip.png|400px]] | ||
# Click on Service Groups > Add Group... | # Click on Service Groups > Add Group... | ||
# Name: VOIP Services | # Name: VOIP Services | ||
# Add the following services to the right box | # Add the following services to the right box | ||
:* SIP | #:* SIP | ||
:* VoIP RTP | #:* VoIP RTP | ||
:* Click Add | #:* Click Add | ||
[[File:Custom_Voip(2).png]] | #: [[File:Custom_Voip(2).png|400px]] | ||
== Create LAN > WAN Rule for Services == | == Create LAN > WAN Rule for Services == | ||
Revision as of 08:35, 17 August 2022
If you have a Sonicwall and are using XMission Business or HostedPBX Voice Service you may come into issues such as:
- Registration failure
- Slow to dial out
- Non-clear HD Voice quality
- and more.
We suggest that the following settings are set up in the Sonicwall Device.
NOTE: depending on the model and firmware, the images may not match.
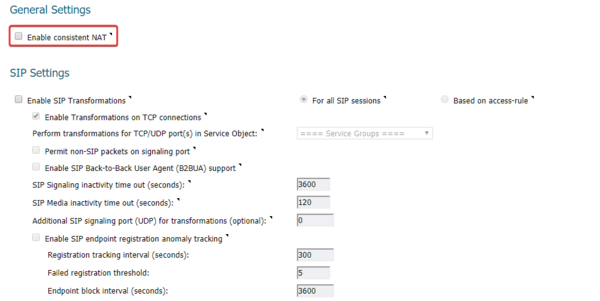
Consistent NAT
- Click on VoIP
- Click on Settings
- Select the checkbox for Enable consistent NAT
- Every other checkbox on this page should be unchecked
- Click Accept
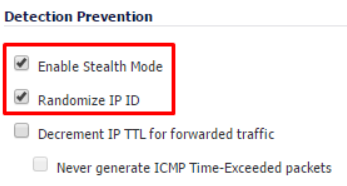
Advanced Firewall Settings
- Click on Firewall Settings
- Click on Advanced
- Select the check boxes for Enable Stealth Mode and Randomize IP ID
- Click Accept
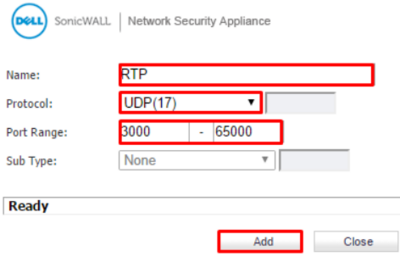
Create Custom VoIP Services
- Under Network > Services click Add...
- Fill the popup as follows:
- Name: VoIP RTP
- Protocol: UDP
- Port Range: 3000 - 65000
- Sub Type: None
- Click Add
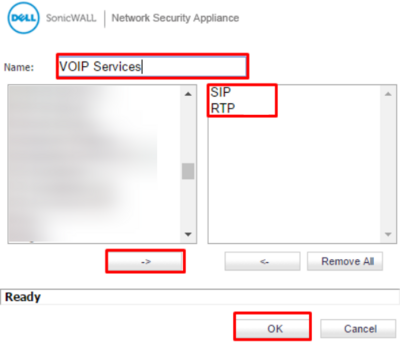
- Click on Service Groups > Add Group...
- Name: VOIP Services
- Add the following services to the right box
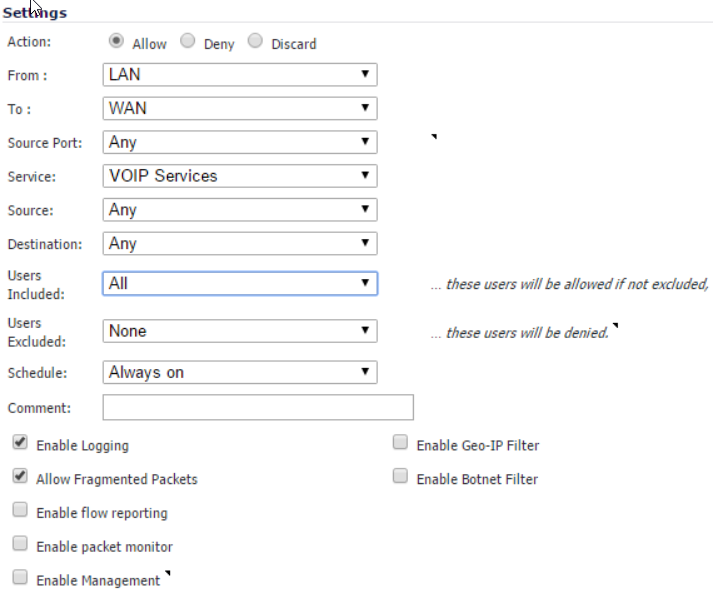
Create LAN > WAN Rule for Services
- Navigate to Firewall > Access Rules
- Click on Matrix
- Click on the arrow under LAN > WAN
- Click on Add...
- Source Port: Any
- Service: VOIP Services
- Source: Any
- Destination: Any
- Users Included: All
- Users Excluded: None
- Schedule: Always On
- Comment: QoS for VoIP Phones
- Enable Logging: True
- Allow Fragmented Packets: True
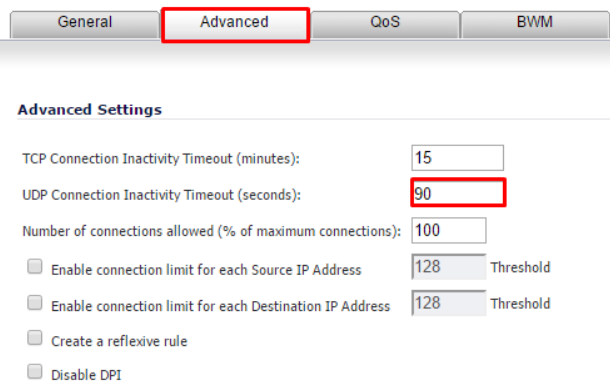
- Click on the Advanced tab
- UDP Connection Inactivity Timeout (seconds): 90
Create Address Group for Voice Services
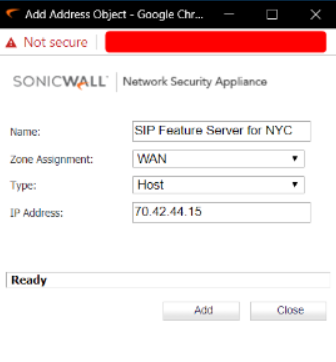
- Click Firewall > Address Objects > Add
- Fill out the following:
- Name: Name of the Assignment
- Zone Assignment: WAN
- Type: Host
- IP Address:
- (SLC) SUMOFIBER colocation: 198.91.51.90
- (SLC) XMISSION colocation: 208.83.224.245
- (LAS) SWITCH colocation: 162.252.224.11
- Add each IP Address for Voice Services as an Address Object
- Create an Address Group and add the address objects that were created
- Name: Voice Services
Excluding Voice Services IPs under Security Services (if applicable)
- Click Security Services
- Check each Service and see if it is enabled
- If so, you need to enable the Exclusion List on each service and set it to Voice Services
- Example: Content Filter
- Once you exclude it, click Accept
