IChat: Difference between revisions
Jump to navigation
Jump to search
ichat draft |
ichat initial |
||
| Line 1: | Line 1: | ||
* | *Start iChat. The Mac icon for iChat looks like this: | ||
:[[Image:iChatIcon.png|128px|iChat icon]] | |||
* | *If you have already been running iChat for other Instant Messaging accounts follow these initial instructions | ||
[[Image: | #Pull down the menu labeled ''iChat'' by the Apple menu in the upper left of your screen. | ||
#Select ''Preferences''. | |||
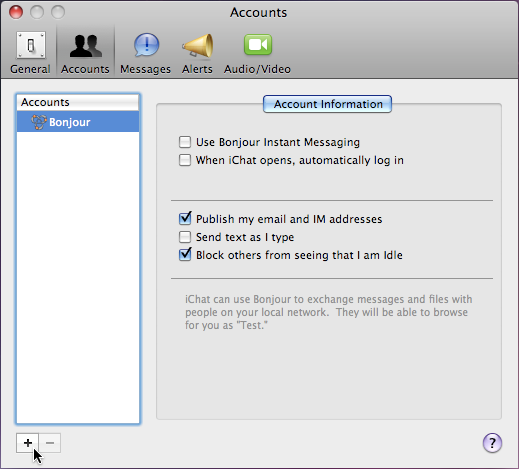
#Press the <span class="button">Accounts</span> tab on the Preferences window that comes up | |||
#Press the <span class="button">+</span> button at the bottom left corner of the window: | |||
:[[Image:IchatPreferences.png|iChat Preferences]] | |||
* | *A window will appear asking you to setup an account. This is the same window that will appear if you are running iChat for the first time. | ||
[[Image:IchatAccountSetup.png|iChat Account Setup]] | :[[Image:IchatAccountSetup.png|iChat Account Setup]] | ||
#Pull down <span class="button">Account Type</span> and select <span class="button">Jabber Account</span> | #Pull down <span class="button">Account Type</span> and select <span class="button">Jabber Account</span> | ||
#In the ''Account Name'' field enter '''your email address@xmission.com'''. | #In the ''Account Name'' field enter '''your email address@xmission.com'''. | ||
# | #In the ''Password'' field enter your XMission email password. | ||
#Press the <span class="button">Server Options</span> arrow and make it point down to reveal further options. | #Press the <span class="button">Server Options</span> arrow and make it point down to reveal further options. | ||
# | #In the ''Server:'' field enter '''xmission.com'''. | ||
# | #In the ''Port:'' field enter '''5223'''. | ||
#Click the <span class="button">Use SSL</span> check box and make certain it is checked. | #Click the <span class="button">Use SSL</span> check box and make certain it is checked. | ||
#The <span class="button">Use Kerberos v5 for authentication</span> check box should be unchecked. | #The <span class="button">Use Kerberos v5 for authentication</span> check box should be unchecked. | ||
| Line 19: | Line 24: | ||
# | #Pull down the menu labeled ''iChat'' by the Apple menu in the upper left of your screen. | ||
# | #Select ''Preferences''. | ||
# | #Press the <span class="button">Accounts</span> tab on the Preferences window that appears. | ||
#In the ''Accounts'' box, you will now have your newly created ''XMission'' account listed with a small lightbulb icon next to it. Click this line. | |||
:[[Image:IchatAccountInfo.png|iChat Account Information]] | |||
# | #Press the <span class="button">Account Information</span> in the middle of the window. | ||
#Check the <span class="button">Use this account</span> box. | |||
#In the '' | #Check the <span class="button">When iChat opens, automatically log in</span> box. | ||
#In the ''Description'' field enter '''XMission'''. | |||
# | #The ''Jabber ID:'' and ''Password:'' fields should already have what you put in when you setup the account. | ||
# | #Press the <span class="button">Server Settings</span> tab. | ||
# | |||
:[[Image:IchatServerSettings.png|iChat Server Settings]] | |||
# | #The ''Server:'' field should have '''xmission.com'''. | ||
#The ''Port:'' field should have '''5223'''. | |||
#: | #The <span class="button">Use SSL</span> box should be checked. | ||
#<span class="button>Automatically discover server & port</span> should not be checked. | |||
#<span class="button>Warn before password is sent insecurely</span> should not be checked. | |||
#<span class="button>Use Kerberos v5 for authentication</span> should not be checked. | |||
#The ''Location:'' field can have whatever you want it to say, such as '''Home''', '''Work''', '''Mobile''', or you can simply check the <span class="button">Use my machine name</span> box. | |||
#Pull down the ''Window'' menu from the top bar. | |||
#Select ''Jabber List''. | |||
#A ''Jabber List'' window will appear with your newly created account. The menu beneath your name determines your status. | |||
#You can add friends on the Jabber network with the plus button in the lower left. | |||
#Additional configuration via ''Preferences'' may be required for video and audio chat. | |||
{{footer}} | {{footer}} | ||
Revision as of 08:24, 16 May 2008
- Start iChat. The Mac icon for iChat looks like this:
- If you have already been running iChat for other Instant Messaging accounts follow these initial instructions
- Pull down the menu labeled iChat by the Apple menu in the upper left of your screen.
- Select Preferences.
- Press the tab on the Preferences window that comes up
- Press the button at the bottom left corner of the window:
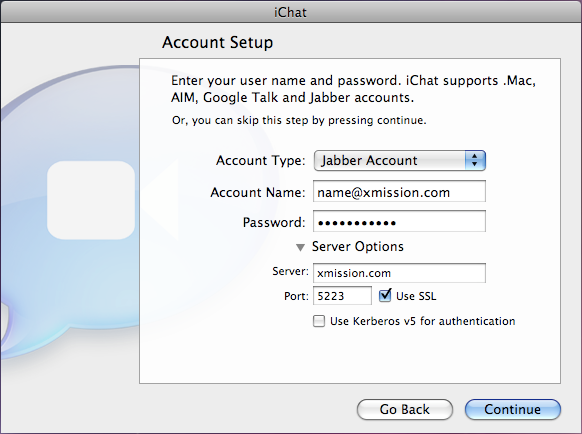
- A window will appear asking you to setup an account. This is the same window that will appear if you are running iChat for the first time.
- Pull down and select
- In the Account Name field enter your email address@xmission.com.
- In the Password field enter your XMission email password.
- Press the arrow and make it point down to reveal further options.
- In the Server: field enter xmission.com.
- In the Port: field enter 5223.
- Click the check box and make certain it is checked.
- The check box should be unchecked.
- Click the button.
- Pull down the menu labeled iChat by the Apple menu in the upper left of your screen.
- Select Preferences.
- Press the tab on the Preferences window that appears.
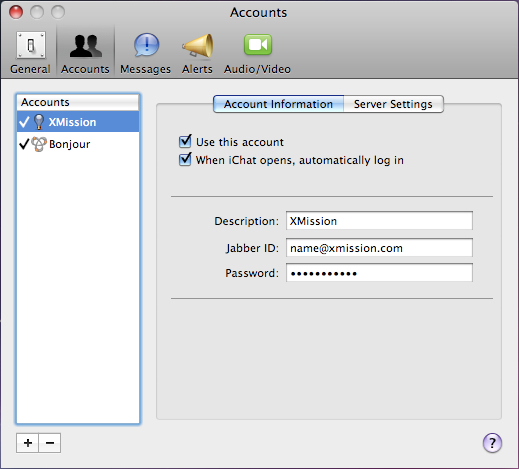
- In the Accounts box, you will now have your newly created XMission account listed with a small lightbulb icon next to it. Click this line.
- Press the in the middle of the window.
- Check the box.
- Check the box.
- In the Description field enter XMission.
- The Jabber ID: and Password: fields should already have what you put in when you setup the account.
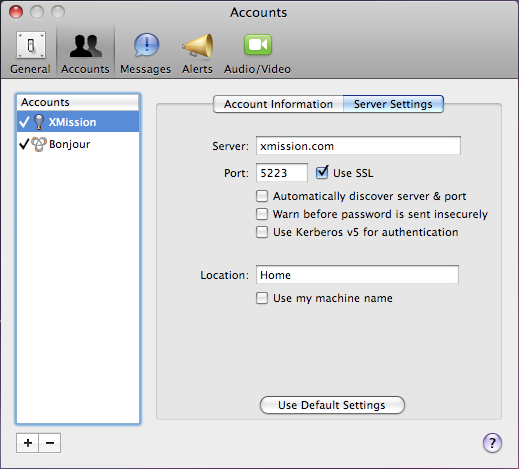
- Press the tab.
- The Server: field should have xmission.com.
- The Port: field should have 5223.
- The box should be checked.
- should not be checked.
- should not be checked.
- should not be checked.
- The Location: field can have whatever you want it to say, such as Home, Work, Mobile, or you can simply check the box.
- Pull down the Window menu from the top bar.
- Select Jabber List.
- A Jabber List window will appear with your newly created account. The menu beneath your name determines your status.
- You can add friends on the Jabber network with the plus button in the lower left.
- Additional configuration via Preferences may be required for video and audio chat.


