Linux kPPP Setup: Difference between revisions
Jump to navigation
Jump to search
mNo edit summary |
No edit summary |
||
| Line 1: | Line 1: | ||
kppp Dialup Setup | kppp Dialup Setup | ||
#Click <span class="button">Setup</span>. | #Click <span class="button">Setup</span>. | ||
#: | #[[Image:Linuxkppp1.jpg]] | ||
#On the <span class="button">Accounts</span> tab, click <span class="button">New...</span>. | #On the <span class="button">Accounts</span> tab, click <span class="button">New...</span>. | ||
#: | #[[Image:Linuxkppp2.jpg]] | ||
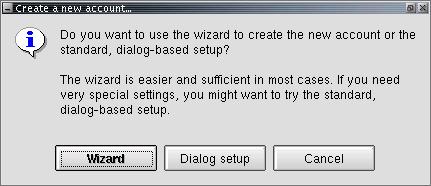
#Click <span class="button">Dialog Setup</span>. | #Click <span class="button">Dialog Setup</span>. | ||
#: | #[[Image:Linuxkppp3.jpg]] | ||
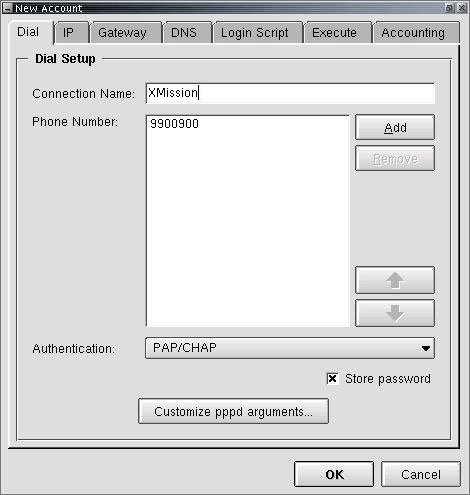
#On the <span class="button">Dial</span> tab, next to <span class="button">Connection Name:</span>, enter <tt>XMission</tt>. | #On the <span class="button">Dial</span> tab, next to <span class="button">Connection Name:</span>, enter <tt>XMission</tt>. | ||
#Click <span class="button">Add</span>. | #Click <span class="button">Add</span>. | ||
#In the space provided, enter your local XMission access number. | #In the space provided, enter your local XMission access number. | ||
#: | #[[Image:Linuxkppp4.jpg]] | ||
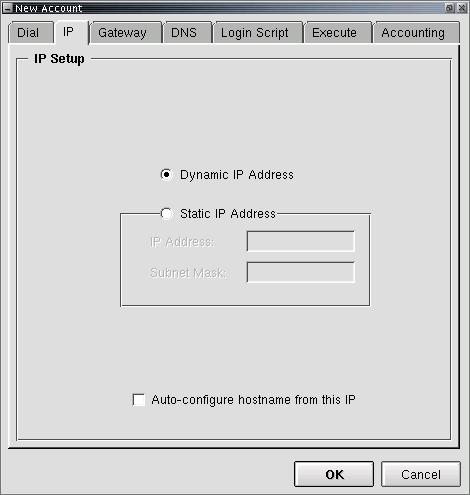
#Click on the <span class="button">IP</span> tab and check that <span class="button">Dynamic IP Address</span> is selected. | #Click on the <span class="button">IP</span> tab and check that <span class="button">Dynamic IP Address</span> is selected. | ||
#: | #[[Image:Linuxkppp5.jpg]] | ||
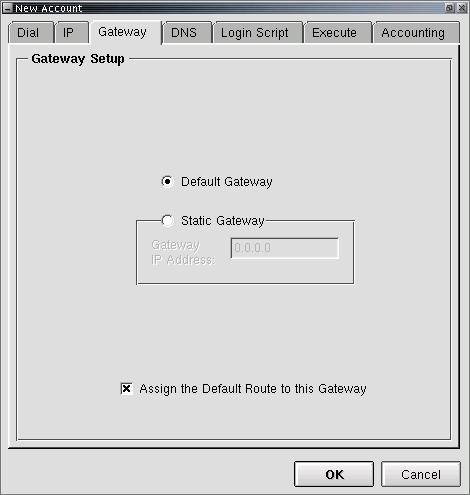
#Click on the <span class="button">Gateway</span> tab and check that <span class="button">Default Gateway</span> is selected. | #Click on the <span class="button">Gateway</span> tab and check that <span class="button">Default Gateway</span> is selected. | ||
#: | #[[Image:Linuxkppp6.jpg]] | ||
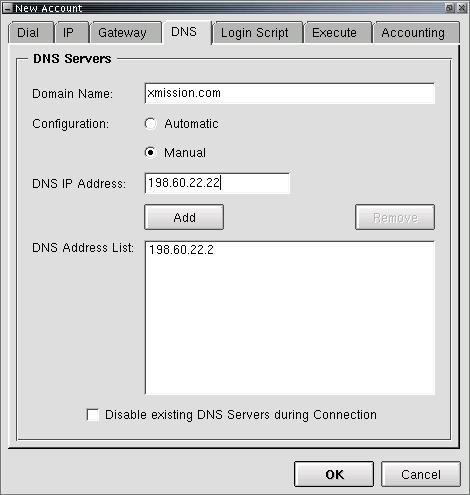
#Click on the <span class="button">DNS</span> tab. | #Click on the <span class="button">DNS</span> tab. | ||
#In the field labeled <span class="button">Domain Name:</span>, enter <tt>xmission.com</tt>. | #In the field labeled <span class="button">Domain Name:</span>, enter <tt>xmission.com</tt>. | ||
| Line 24: | Line 23: | ||
#Click <span class="button">Add</span>. | #Click <span class="button">Add</span>. | ||
#Click <span class="button">OK</span>. | #Click <span class="button">OK</span>. | ||
#: | #[[Image:Linuxkppp7.jpg]] | ||
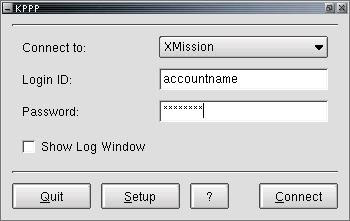
#To connect, click <span class="button">Connect</span>. | #To connect, click <span class="button">Connect</span>. | ||
#: | #[[Image:Linuxkppp8.jpg]] | ||
[[Category:Dialup Archives|KPPP]] | [[Category:Dialup Archives|KPPP]] | ||
[[Category:Linux|KPPP]]] | [[Category:Linux|KPPP]]] | ||
Revision as of 10:31, 9 June 2009
kppp Dialup Setup
- Click .

- On the tab, click .

- Click .
- On the tab, next to , enter XMission.
- Click .
- In the space provided, enter your local XMission access number.
- Click on the tab and check that is selected.
- Click on the tab and check that is selected.
- Click on the tab.
- In the field labeled , enter xmission.com.
- For , select .
- In the field labeled , enter 198.60.22.2.
- Click .
- In the same place, enter 198.60.22.22.
- Click .
- Click .
- To connect, click .
 ]
]


