Hosted Email:MacMail 3: Difference between revisions
No edit summary |
|||
| Line 1: | Line 1: | ||
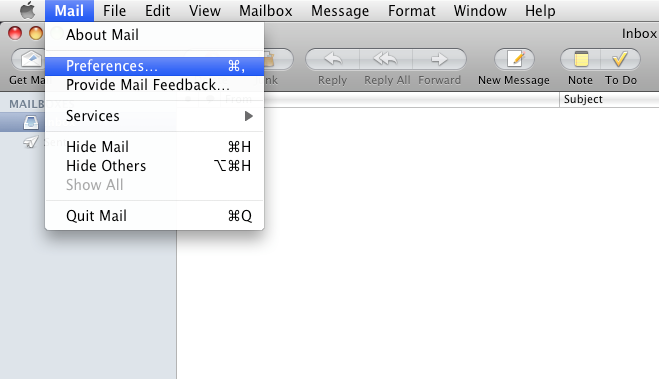
1. Goto the 'Mail' menu and select 'Preferences'. | 1. Goto the 'Mail' menu and select 'Preferences'. | ||
:[[Image:mm1_mail-preferences.png]] | :[[Image:mm1_mail-preferences.png]] | ||
</ | <br/> | ||
</ | <br/> | ||
</ | <br/> | ||
</ | <br/> | ||
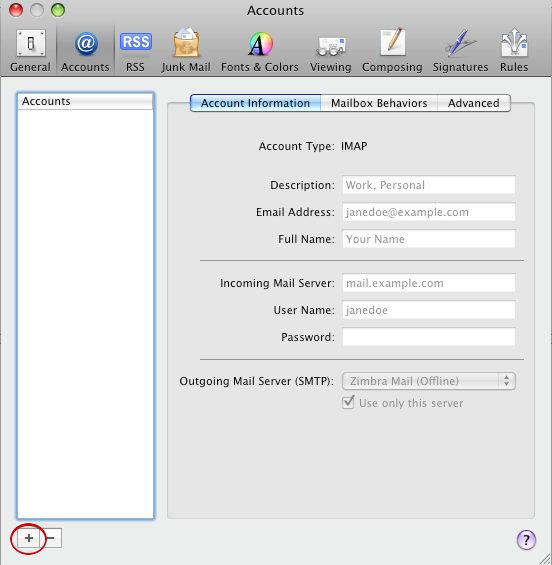
2. Click on the accounts tag and click the '+' in the lower left corner. Circled in red in the image below. | 2. Click on the accounts tag and click the '+' in the lower left corner. Circled in red in the image below. | ||
:[[Image:mm2_Preferences-accounts.png]] | :[[Image:mm2_Preferences-accounts.png]] | ||
</ | <br/> | ||
</ | <br/> | ||
</ | <br/> | ||
</ | <br/> | ||
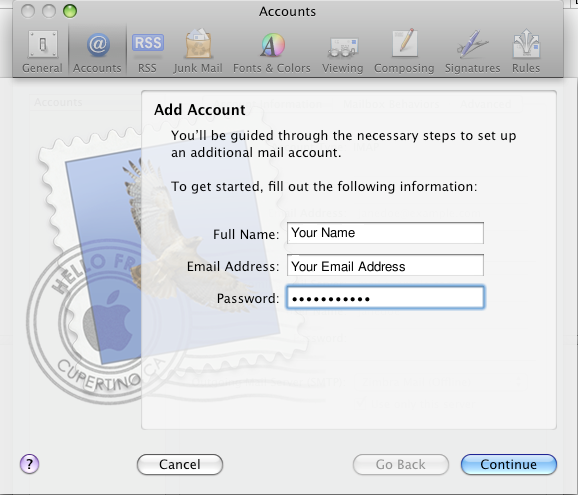
3. In the window that opens type in your name, email address, and password, then click 'Continue'. | 3. In the window that opens type in your name, email address, and password, then click 'Continue'. | ||
:[[Image:mm3_add_general.png]] | :[[Image:mm3_add_general.png]] | ||
</ | <br/> | ||
</ | <br/> | ||
</ | <br/> | ||
</ | <br/> | ||
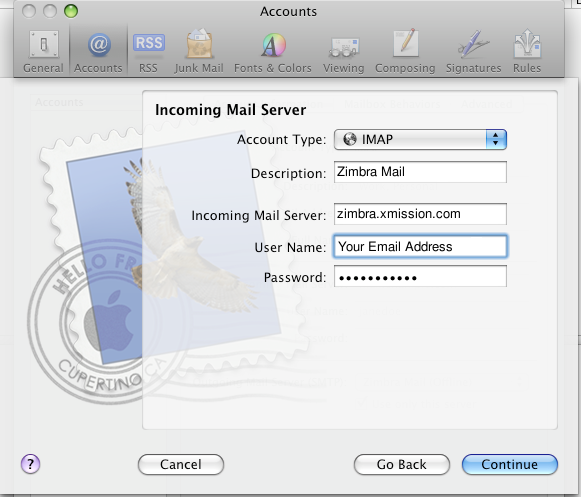
4. The next window asks for your Incoming Mail Server information fill it out as shown below. The account type can be set to either IMAP or POP depending on your preference. When you are finished click 'Continue'. | 4. The next window asks for your Incoming Mail Server information fill it out as shown below. The account type can be set to either IMAP or POP depending on your preference. When you are finished click 'Continue'. | ||
:[[Image:mm4_add_incoming.png]] | :[[Image:mm4_add_incoming.png]] | ||
</ | <br/> | ||
</ | <br/> | ||
</ | <br/> | ||
</ | <br/> | ||
5. Here, select 'Password' from the 'Authentication' drop down menu. 'Use Secure Sockets Layer(SSL)' can be turned on or off depending on your preference. When you are finished click 'Continue'. | 5. Here, select 'Password' from the 'Authentication' drop down menu. 'Use Secure Sockets Layer(SSL)' can be turned on or off depending on your preference. When you are finished click 'Continue'. | ||
:[[Image:mm5_add_security1.png]] | :[[Image:mm5_add_security1.png]] | ||
</ | <br/> | ||
</ | <br/> | ||
</ | <br/> | ||
</ | <br/> | ||
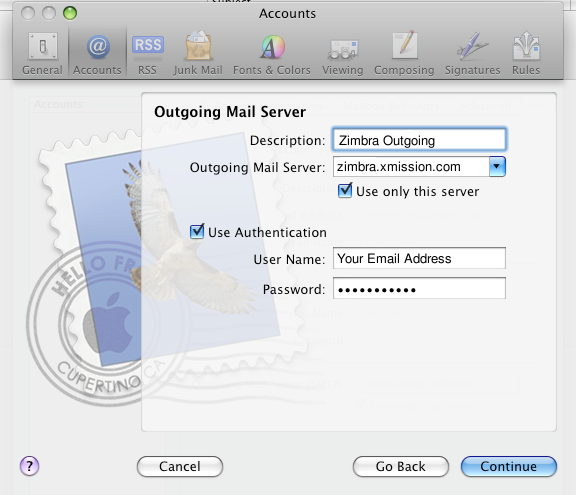
6. This next window asks for your Outgoing Mail Server settings. Fill it out as shown below and click 'Continue'. | 6. This next window asks for your Outgoing Mail Server settings. Fill it out as shown below and click 'Continue'. | ||
:[[Image:mm6_add_outgoing.png]] | :[[Image:mm6_add_outgoing.png]] | ||
</ | <br/> | ||
</ | <br/> | ||
</ | <br/> | ||
</ | <br/> | ||
7. Here, select 'Password' from the 'Authentication' drop down menu. Again, 'Use Secure Sockets Layer(SSL)' can be turned on or off depending on your preference. When you are finished click 'Continue'. | 7. Here, select 'Password' from the 'Authentication' drop down menu. Again, 'Use Secure Sockets Layer(SSL)' can be turned on or off depending on your preference. When you are finished click 'Continue'. | ||
:[[Image:mm7_add_security2.png]] | :[[Image:mm7_add_security2.png]] | ||
</ | <br/> | ||
</ | <br/> | ||
</ | <br/> | ||
</ | <br/> | ||
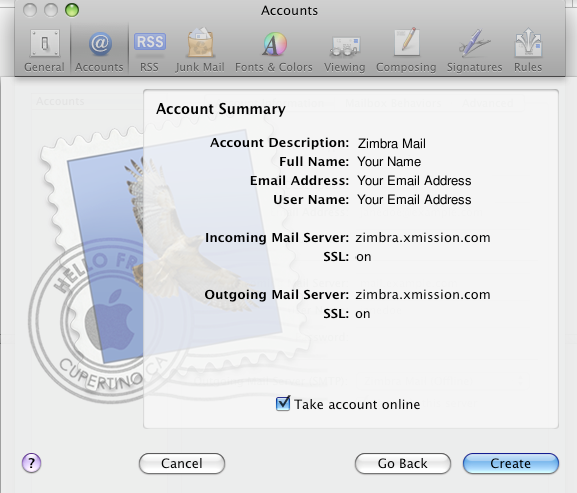
8. The Account Summary window will now appear. Make sure the information shown is correct, check the box 'Take account online', and then click 'Create' You are now finished and should be able to start sending and receiving mail. | 8. The Account Summary window will now appear. Make sure the information shown is correct, check the box 'Take account online', and then click 'Create' You are now finished and should be able to start sending and receiving mail. | ||
[[Image:mm8_add_summary.png]] | |||
Revision as of 17:13, 15 January 2010
1. Goto the 'Mail' menu and select 'Preferences'.
2. Click on the accounts tag and click the '+' in the lower left corner. Circled in red in the image below.
3. In the window that opens type in your name, email address, and password, then click 'Continue'.
4. The next window asks for your Incoming Mail Server information fill it out as shown below. The account type can be set to either IMAP or POP depending on your preference. When you are finished click 'Continue'.
5. Here, select 'Password' from the 'Authentication' drop down menu. 'Use Secure Sockets Layer(SSL)' can be turned on or off depending on your preference. When you are finished click 'Continue'.
6. This next window asks for your Outgoing Mail Server settings. Fill it out as shown below and click 'Continue'.
7. Here, select 'Password' from the 'Authentication' drop down menu. Again, 'Use Secure Sockets Layer(SSL)' can be turned on or off depending on your preference. When you are finished click 'Continue'.
8. The Account Summary window will now appear. Make sure the information shown is correct, check the box 'Take account online', and then click 'Create' You are now finished and should be able to start sending and receiving mail.
