Hosted Email: Admin Panel: Difference between revisions
| Line 91: | Line 91: | ||
==Creating a Distribution List== | ==Creating a Distribution List== | ||
Select '''Manage''' and then ''' | Select '''Manage''' and then '''Distribution Lists''' section. Click on the gear icon [[Image:gear_icon.png]] and select '''New'''. This will open a dialogue asking for information about the distribution list you wish to create. Enter the following required information: | ||
* '''List Name''': This will be the email address for the mailing list. | * '''List Name''': This will be the email address for the mailing list. | ||
Revision as of 13:43, 9 January 2013
Overview/Logging In
The Zimbra domain administration console is the browser-based user interface used to centrally manage user accounts and most settings.
As a domain administrator, you will be able to create and maintain the following:
- Accounts
- Aliases
- Distribution lists
- Calendar resources
To login to the domain administration console, go to https://zimbra.xmission.com:7071/ and login with your administrative username and password.
About the Administrative Console
The area above the Content pane includes the Search and Help functions.
Search allows you to quickly find accounts, aliases, distribution lists and resources for editing.
Help utilizes Zimbra’s wiki, forums, and documentation. This is a powerful unified search to quickly find answers to common questions.
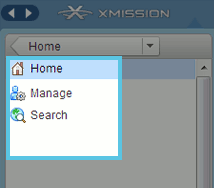
The Navigation pane on the left includes the following sections:
- Home: At any time, clicking here will return you to the administrative Home options.
- Manage: Clicking here will permit you to create and edit any accounts, aliases, distribution lists, and resources for your domain(s).
- Help: utilizes Zimbra’s wiki, forums, and documentation. This is a powerful unified search to quickly find answers to common questions.
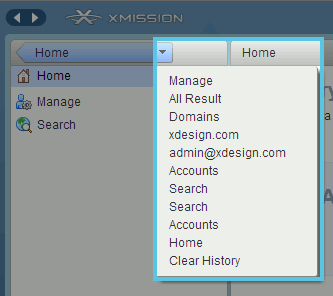
Alternatively, you can also click on the arrow beside the "Home" button. This will give you the same options listed above, as well as recent searches and the options available under "Manage." In this example, the recent search was for "xdesign.com."
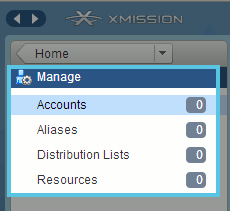
Clicking on "Manage" either way will permit you to make changes to your existing accounts, aliases, distribution lists, and resources.
- Accounts: Lists all accounts. In the Accounts folder, you create and manage end-user accounts, setting options, class of service, passwords and aliases for an account.
- Aliases: Lists all aliases that have been created in Accounts. You can use the Move Alias feature from the toolbar to move an alias from one account to another.
- Distribution Lists: Lists all distribution lists. You can create new distribution lists and add or delete members of a distribution list.
- Resources: Lists location or equipment that can be scheduled for a meeting. You can create new resources and set the scheduling policy for the resource.
Importing Accounts from Exchange
Select the Downloads button in the top right of the browser window. This will take you to the Zimbra Utilities Downloads area. Under Downloads For Administrators you will find a link to ZCS Migration Wizard for Exchange. This Windows application performs a server to server migration of mail, calendar, and contacts from Microsoft Exchange to ZCS. Simply download this file and follow the instructions to migrate mail to XMission's Zimbra service.
Premium accounts can use the Outlook Connector found in the Downloads for End-Users area. This enables your end-user's Outlook to synchronize calendar, contacts, and mail with the XMission Zimbra servers.
Creating an Account
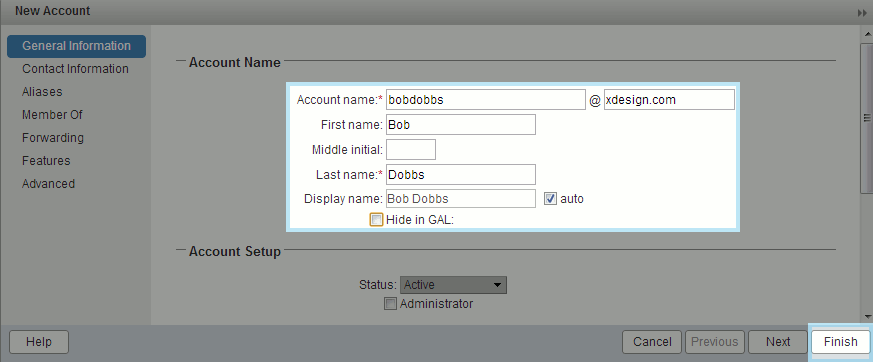
Select Manage and then Accounts section. Click on the gear icon ![]() and select New. This will open a dialogue asking for information about the email account you are about to create. Enter the following required information:
and select New. This will open a dialogue asking for information about the email account you are about to create. Enter the following required information:
- Account Name: This will be the email address that you are about to create. In this example, we are creating "bobdobbs@xmission.com."
- First Name: The first name of the email user.
- Last Name: The last name of the email user.
Click the "Finish" button. You will be returned to the main admin screen, and the new account will have been created.
Updating Account information
To add, change, or remove information from an account, simply double-click the account you want to edit. Alternatively, you can right-click the account you wish to update and choose "Edit" from the pop-up menu.
Creating an Alias
Select Manage and then Aliases section. Click on the gear icon ![]() and select New. This will open a dialogue asking for information about the email alias you wish to create. Enter the following required information:
and select New. This will open a dialogue asking for information about the email alias you wish to create. Enter the following required information:
- Alias: This is the aliased address you will create. In this example, we are adding "bob.dobbs@xdesign.com."
- Target Account: This is the actual email box that will receive any emails directed to the aliases address.
Click "Ok" to add your new alias.
Updating Alias information
To add, change, or remove information from an alias, simply double-click the alias you want to edit. Alternatively, you can right-click the alias you wish to update and choose "Edit" from the pop-up menu.
Creating a Distribution List
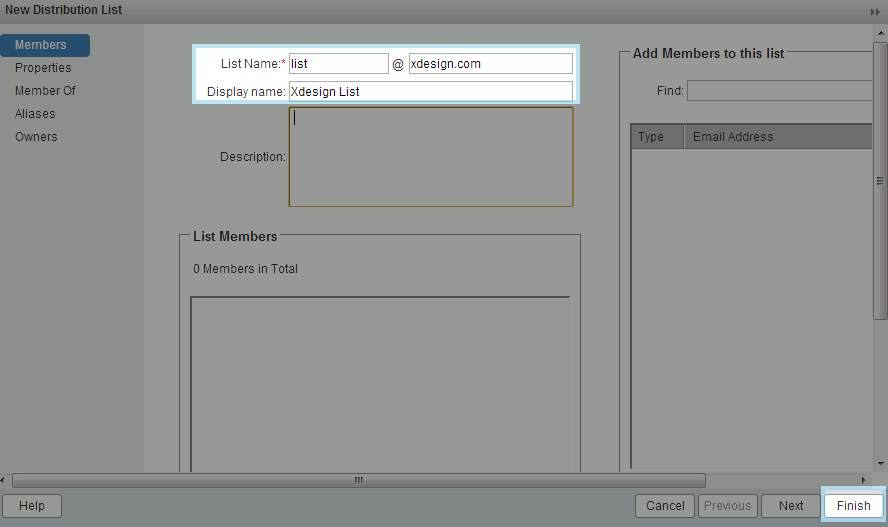
Select Manage and then Distribution Lists section. Click on the gear icon ![]() and select New. This will open a dialogue asking for information about the distribution list you wish to create. Enter the following required information:
and select New. This will open a dialogue asking for information about the distribution list you wish to create. Enter the following required information:
- List Name: This will be the email address for the mailing list.
- Display Name: This can be a descriptive name for the list.
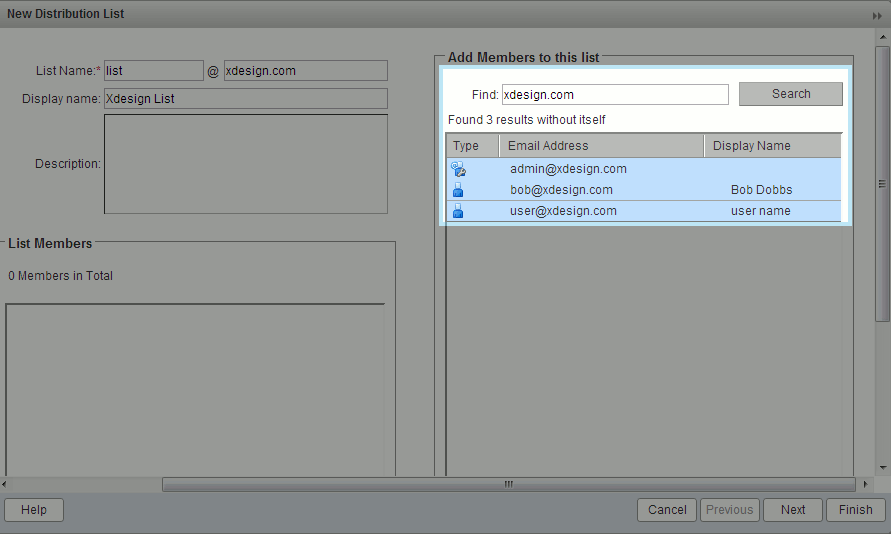
To add email addresses to the list, scroll a bit to the right and you will see a "Search" button below the Add Members to this list section. If you want add email addresses that are withing your Zimbra package, search for the appropriate domain name(s). In this case, we searched for "xdesign.com." Highlight any results you would like to be added to the list.
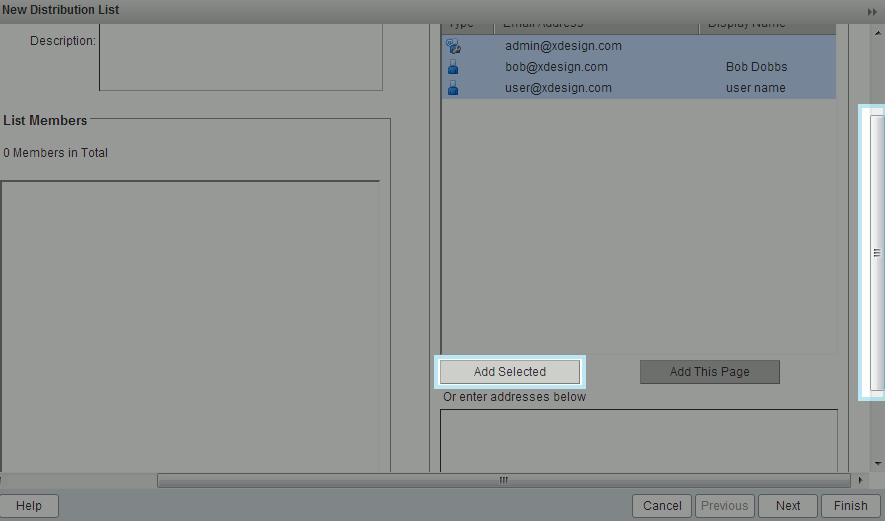
Using the scroll bar on the right, scroll down and click the "Add Selected" button.
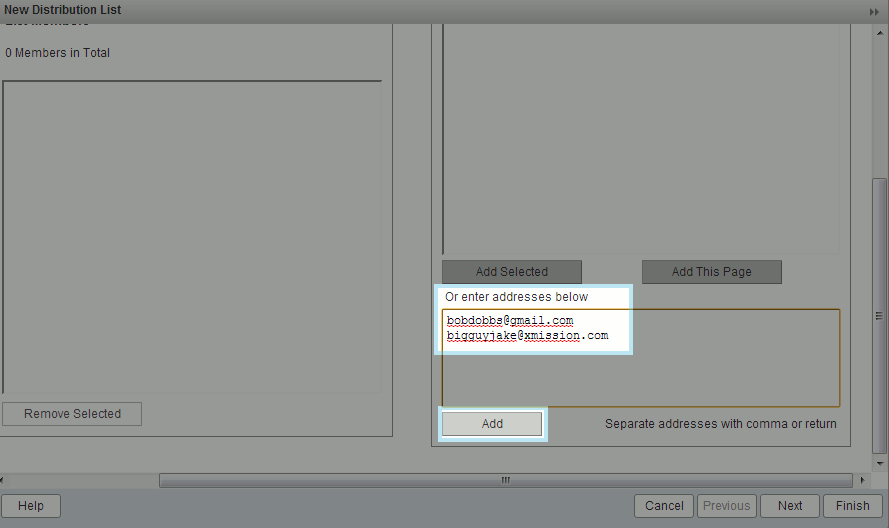
If you want to manually add addresses or need to add addresses that are not within Zimbra's search function, you can type the email addresses in the box pictured below. In this case, we are adding two email addresses to the list -- "bobdobbs@gmail.com" and "bigguyjake@xmission.com." Once you've typed in the email addresses you want added to your list, simply click the "Add" button below.
Notes:
You can make lists members of other lists. This is a handy way to create umbrella lists. For example, if you wanted a staff list, but had various departments, you could add your employees to the departmental list, and then subscribe the departmental lists to the staff lists. This way, an account is only entered once, rather than adding an account to each list individually.
Distribution Lists can also be used to forward domain based emails. For example, you may need to forward project@yourdomain.com to address@someotherdomain.com. This does not require a Zimbra account for the primary domain email address.
Updating Distribution List information
To add, change, or remove information from a distribution list, simply highlight the list and click the button. Alternatively, you can right-click the list you wish to update and choose from the pop-up menu
Forwarding Email to Another Address
If you wish to forward emails sent to your hosted email to another email address, first select the account you wish to edit from the Accounts menu on the left-hand side of the screen. Highlight the account you wish to add a forward for and click . Alternatively, you can right-click the account and choose from the pop-up menu.
You should see the following tabs: General Information, Contact Information, Member Of, Aliases, and Forwarding.
To add a forward, click on the Forwarding tab. Enter the following required information:
- User-specified forwarding address: This will be the email account that emails are forwarded to that the account owner is aware of.
- Forwarding addresses hidden from the user: This can be a list of email accounts that emails are forwarded to that the account owner is unaware of.
NOTE: You may also use Distribution Lists to forward domain based emails without needing an account for the specific address. For example, you may need to forward project@mydomain.com to johndoe@someotheremail.com. The advantage of using a Distribution List is that you eliminate the costs associated with maintaining an account just for forwarding.

