Hosting Control Panel/Mail
Hosting Control Panel / Mail
You have access to basic email for use with your XM Cloud Service. First, ensure you are logged into your account at https://<your domain name> or https://<your IP address>.
- From the Control Panel, click on the "Mail" tab near the top of the screen.
- Click create E-mail Address
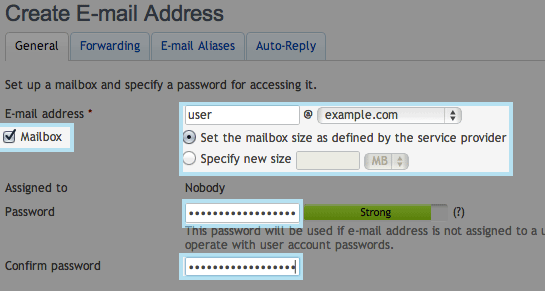
- On this screen you will need to fill in the following highlighted pieces of information. A brief description of ecah follows the image.
- E-mail address: Fill in the left part of the e-mail address before the @ sign, if you have multiple domains you can select the domain under which the e-mail address will be created.
- Mailbox: Leave this checked - Clearing this checkbox makes sense only if you want to use this address as a mail forwarder, wich will forward all incoming mail to another address.
- Mailbox Size: Specify the mailbox size of use the default size defined by your server.
- Password: Enter a password that is strong, consisting of letters, numbers and symbols.
Click OK and you have set up your email box - to learn how to set up your email client see Hosting Control Panel/Mail Setup
Cloud

