Difference between revisions of "FreePPP 2.5 Setup"
From XMission Wiki
(New page: Mac FreePPP 2.5 Setup #Open your Apple menu, go to <span class="button">Control Panels</span>, and select <span class="button">FreePPP</span>. #Click on the small blue arrow on the bottom...) |
|||
| (7 intermediate revisions by 3 users not shown) | |||
| Line 1: | Line 1: | ||
| + | {{archived}} | ||
| + | |||
Mac FreePPP 2.5 Setup | Mac FreePPP 2.5 Setup | ||
| Line 4: | Line 6: | ||
#Click on the small blue arrow on the bottom left of the window to show the configuration tabs. | #Click on the small blue arrow on the bottom left of the window to show the configuration tabs. | ||
#Uncheck every option under <span class="button">General</span>. | #Uncheck every option under <span class="button">General</span>. | ||
| − | #: | + | #[[Image:Macfree251.png]] |
#Click <span class="button">Modem Setup...</span>. | #Click <span class="button">Modem Setup...</span>. | ||
#Make sure the only boxes checked are <span class="button">Modem speaker on while connecting</span> and <span class="button">Hangup on disconnect</span>. | #Make sure the only boxes checked are <span class="button">Modem speaker on while connecting</span> and <span class="button">Hangup on disconnect</span>. | ||
#Click <span class="button">OK</span>. | #Click <span class="button">OK</span>. | ||
| − | #: | + | #[[Image:Macfree252.png]] |
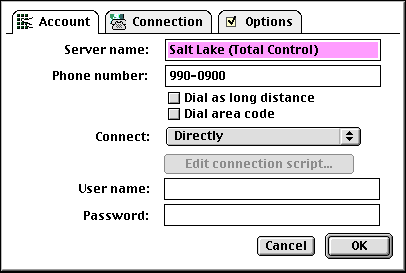
#Click on the <span class="button">Accounts</span> tab. | #Click on the <span class="button">Accounts</span> tab. | ||
#If you don't see your area listed, click <span class="button">New...</span>. | #If you don't see your area listed, click <span class="button">New...</span>. | ||
#:<div class="messagebox metadata">'''Note''': If you do see your area listed, select it and click <span class="button">Edit...</span>. Some of the steps that follow will already be completed for you.</div> | #:<div class="messagebox metadata">'''Note''': If you do see your area listed, select it and click <span class="button">Edit...</span>. Some of the steps that follow will already be completed for you.</div> | ||
| − | #: | + | #[[Image:Macfree253.png]] |
| − | #In the <span class="button">Server name:</span> field, enter <tt>XMission</tt>. | + | #In the <span class[[Category:Dialup|Free PPP 2.5]]="button">Server name:</span> field, enter <tt>XMission</tt>. |
#Enter the phone number for the XMission location you will be dialing in the <span class="button">Phone number:</span> field. | #Enter the phone number for the XMission location you will be dialing in the <span class="button">Phone number:</span> field. | ||
#:<div class="messagebox metadata">'''Note''': Do not click <span class="button">Dial area code</span> or <span class="button">Dial as long distance</span> unless you are intentionally calling a location that isn't a local call. XMission is not responsible for long distance charges.</div> | #:<div class="messagebox metadata">'''Note''': Do not click <span class="button">Dial area code</span> or <span class="button">Dial as long distance</span> unless you are intentionally calling a location that isn't a local call. XMission is not responsible for long distance charges.</div> | ||
| Line 20: | Line 22: | ||
#In the field labeled <span class="button">Password:</span>, enter your XMission password. You can leave this blank if you'd like to be prompted for your password when you connect. | #In the field labeled <span class="button">Password:</span>, enter your XMission password. You can leave this blank if you'd like to be prompted for your password when you connect. | ||
#:<div class="messagebox metadata">'''Note''': Your account name and password are case-sensitive.</div> | #:<div class="messagebox metadata">'''Note''': Your account name and password are case-sensitive.</div> | ||
| − | #: | + | #[[Image:Macfree254.png]] |
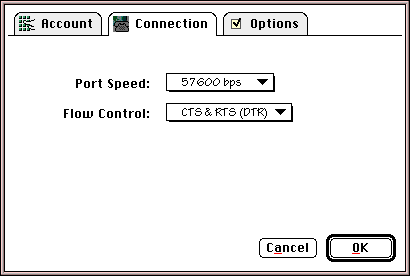
#Click on the <span class="button">Connection</span> tab. | #Click on the <span class="button">Connection</span> tab. | ||
#<div class="messagebox metadata">'''Note''': These settings should be left as default. However, if you have a Global Village modem, <span class="button">Flow Control:</span> needs to be set to '''CTS'''.</div> | #<div class="messagebox metadata">'''Note''': These settings should be left as default. However, if you have a Global Village modem, <span class="button">Flow Control:</span> needs to be set to '''CTS'''.</div> | ||
#Click on <span class="button">OK</span>. | #Click on <span class="button">OK</span>. | ||
| − | #: | + | #[[Image:Macfree255.png]] |
| + | |||
| − | [[Category:Dialup]] | + | [[Category:Dialup Archives]] |
| − | [[Category: | + | [[Category:Archives]] |
Latest revision as of 10:18, 4 February 2014
![]()
Mac FreePPP 2.5 Setup
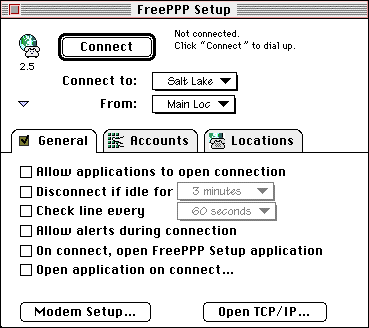
- Open your Apple menu, go to , and select .
- Click on the small blue arrow on the bottom left of the window to show the configuration tabs.
- Uncheck every option under .
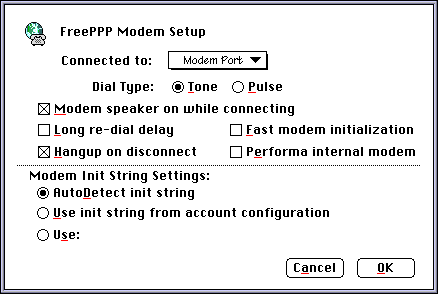
- Click .
- Make sure the only boxes checked are and .
- Click .
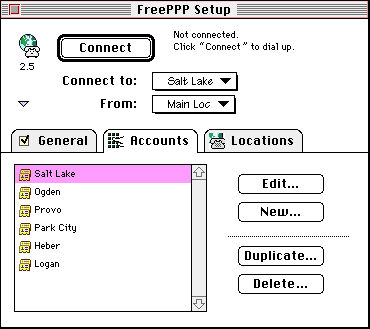
- Click on the tab.
- If you don't see your area listed, click .
- In the Server name: field, enter XMission.
- Enter the phone number for the XMission location you will be dialing in the field.
- In the menu next to , select .
- In the field labeled , enter your XMission account name.
- In the field labeled , enter your XMission password. You can leave this blank if you'd like to be prompted for your password when you connect.
- Click on the tab.
- Click on .