Difference between revisions of "Hosted Email:Contacts Sync OSX"
From XMission Wiki
(Created page with "If you have a Zimbra Business Premium or a Personal Premium account, these instructions will show you how to sync your contacts ==Contacts Sync== * Click on the '''APPLE ICO...") |
|||
| Line 1: | Line 1: | ||
| − | If you have a Zimbra Business Premium or a Personal Premium account, these instructions will show you how to sync your | + | If you have a Zimbra Business Premium or a Personal Premium account, these instructions will show you how to sync your Zimbra "Contacts" folder with Apple desktop applications using CardDAV. |
| + | NOTES: | ||
| + | |||
| + | * There is an available option to utilize ActiveSync (what Apple calls "Exchange" in their configuration options) which requires use of EWS licensing. This is available for an small additional fee per month from XMission. Contact an XMission representative to add this feature. | ||
| + | |||
| + | * Apple will only sync your primary "Contacts" folder from Zimbra via CardDAV. So if you have shared Contacts folders to see them on your Mac desktop it will require the addition of the EWS licensing above or use of [https://zimbra.xmission.com Zimbra webmail]. | ||
==Contacts Sync== | ==Contacts Sync== | ||
Revision as of 09:08, 27 July 2015
If you have a Zimbra Business Premium or a Personal Premium account, these instructions will show you how to sync your Zimbra "Contacts" folder with Apple desktop applications using CardDAV.
NOTES:
- There is an available option to utilize ActiveSync (what Apple calls "Exchange" in their configuration options) which requires use of EWS licensing. This is available for an small additional fee per month from XMission. Contact an XMission representative to add this feature.
- Apple will only sync your primary "Contacts" folder from Zimbra via CardDAV. So if you have shared Contacts folders to see them on your Mac desktop it will require the addition of the EWS licensing above or use of Zimbra webmail.
Contacts Sync
- Click on the APPLE ICON in the top menu bar
- Next click on SYSTEM PREFERENCE
- Choose INTERNET ACCOUNTS
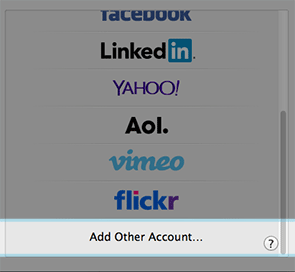
- Select Add Other Account you will have to scroll down to see it
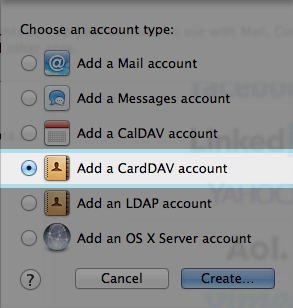
- Next Choose Add a CardDAV account
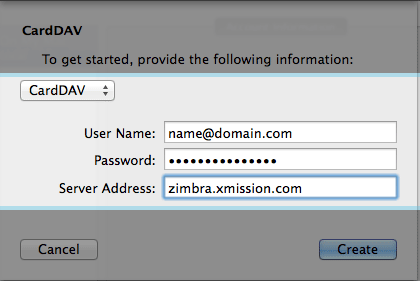
- Next Choose CardDAV from the dropdown and fill in all the fields
- User Name: - your full email address
- Password: - your email password
- Server Address: - zimbra.xmission.com
- Once you click on Create your contact will now start to sync.


