Difference between revisions of "Hosted Email:Outlook Express"
From XMission Wiki
| Line 1: | Line 1: | ||
| − | + | 1. Open Outlook Express, then go to the ''Tools'' menu and select ''Accounts'' | |
| − | + | :[[Image:Winole1.png]] | |
| − | + | <br/> | |
| − | + | <br/> | |
| − | + | <br/> | |
| − | + | 2. Click ''Add''and select ''Mail'' | |
| − | + | :[[Image:Winole2.png]] | |
| − | + | <br/> | |
| − | + | <br/> | |
| − | + | <br/> | |
| − | + | 3. In the field labeled ''Display Name'', type in the name you wish to appear on your outgoing email messages, then click ''Next''. | |
| + | :[[Image:Winole3.png]] | ||
| + | <br/> | ||
| + | <br/> | ||
| + | <br/> | ||
| + | 4. In the field labeled ''Email Address'' type your XMission email address. | ||
| + | :[[Image:Winole4.png]] | ||
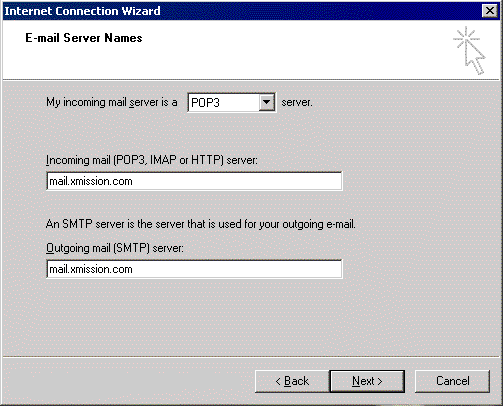
#In the field labeled <span class="button">Incoming mail <span class="button">POP3 or IMAP</span> server:</span>, type <tt>mail.xmission.com</tt>. | #In the field labeled <span class="button">Incoming mail <span class="button">POP3 or IMAP</span> server:</span>, type <tt>mail.xmission.com</tt>. | ||
#In the field labeled <span class="button">Outgoing mail <span class="button">SMTP</span> server:</span>, type <tt>mail.xmission.com</tt>. | #In the field labeled <span class="button">Outgoing mail <span class="button">SMTP</span> server:</span>, type <tt>mail.xmission.com</tt>. | ||
Revision as of 13:31, 29 January 2010
1. Open Outlook Express, then go to the Tools menu and select Accounts

2. Click Addand select Mail

3. In the field labeled Display Name, type in the name you wish to appear on your outgoing email messages, then click Next.

4. In the field labeled Email Address type your XMission email address.

- In the field labeled , type mail.xmission.com.
- In the field labeled , type mail.xmission.com.
- Click .
- In the field, type your XMission username.
- In the field, type the password for your XMission account.
- Click .
- Click .
- Click on go to , and select .


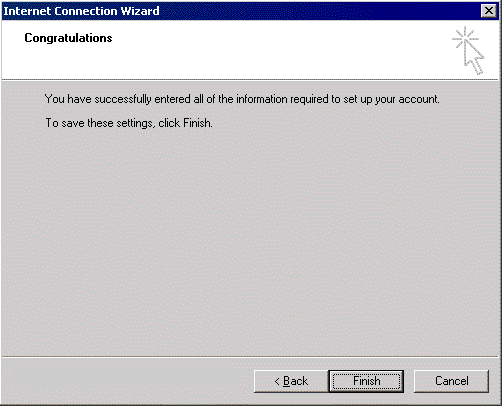
Congratulations! You should now see your Inbox. You're ready to start sending and receiving email.