Difference between revisions of "Hosting Control Panel/Mail Setup Apple Mail"
From XMission Wiki
(Created page with "== Hosting Control Panel / Mail Setup - Apple Mail == *Run Apple Mail. *If you run it for the first time and do not have any mail accounts configured in it, skip the next ste...") |
(→Configure Mac Mail 10.X for XMission Email) |
||
| (6 intermediate revisions by 2 users not shown) | |||
| Line 1: | Line 1: | ||
| − | = | + | = Configure Mac Mail 10.X for XMission Email = |
| − | * | + | * Click on '''MAIL''' in the top menu bar |
| − | + | * Next choose '''Add Mail Account''' | |
| − | * | + | <br> |
| − | + | [[File:MAC_account.png]] | |
| − | + | <br><br> | |
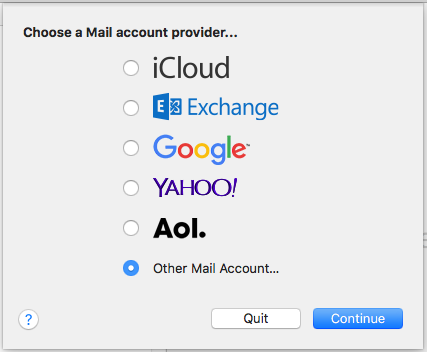
| − | + | * Select '''Add Other Account''' followed by '''Continue''' | |
| − | + | <br> | |
| − | + | [[File:Mac_Provider.png]] | |
| − | [[File: | + | <br><br> |
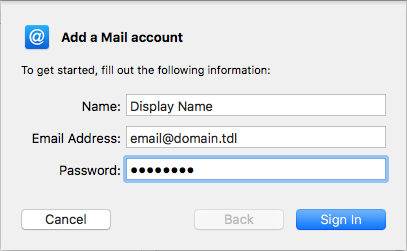
| − | * | + | * Next add your Name, Full Email Address, and your Email Password |
| − | + | <br> | |
| − | + | [[File:Mac_IMAP.png]] | |
| − | + | <br><br> | |
| − | + | * Sign in | |
| − | + | <br><br> | |
| − | + | [[File:MAC_Servers.png]] | |
| − | [[File: | + | <br> |
| − | + | * Next you will want to fill in both Incoming and Outgoing Mail servers to "mail.domain.tld" followed by clicking "Sign In" | |
| − | + | ** <i>''Account Type:''</i> - We suggest IMAP | |
| − | * | + | ** <i>''Incoming and Outgoing Mail Server:''</i> - '''mail.domain.tld''' |
| − | + | ** <i>''User Name:''</i> - your user name is your full email address. Example, johnsmith@example.com | |
| − | + | ** <i>''Password:''</i> - your email password | |
| − | * | + | * PleskMail requires you to accept a wild-card certificate. When you see this message click '''Continue'''. |
| − | + | <br> | |
| − | + | [[File:MAC_Cert.png]] | |
| − | + | <br><br> | |
| − | [[File: | + | * Your XMission email account has now been successfully added! |
| − | * | ||
| − | |||
| − | ** | ||
| − | ''' | ||
| − | |||
| − | * | ||
| − | |||
| − | |||
| − | |||
| − | |||
| − | * Outgoing Mail Server: '' | ||
| − | |||
| − | * | ||
| − | |||
| − | ** Password: '' | ||
| − | |||
| − | |||
| − | |||
| − | |||
| − | [[File: | ||
| − | * | ||
<br><br> | <br><br> | ||
| − | {{: | + | [[Category: Shared Hosting]] |
| + | [[Category: Archives]] | ||
| + | {{:Shared Hosting}} | ||
Latest revision as of 14:47, 1 August 2017
Configure Mac Mail 10.X for XMission Email
- Click on MAIL in the top menu bar
- Next choose Add Mail Account
- Select Add Other Account followed by Continue
- Next add your Name, Full Email Address, and your Email Password
- Sign in
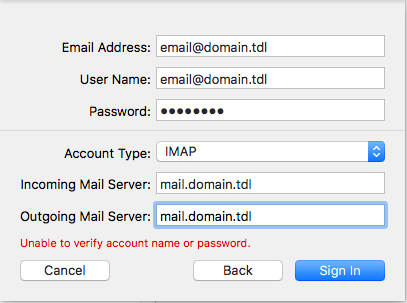
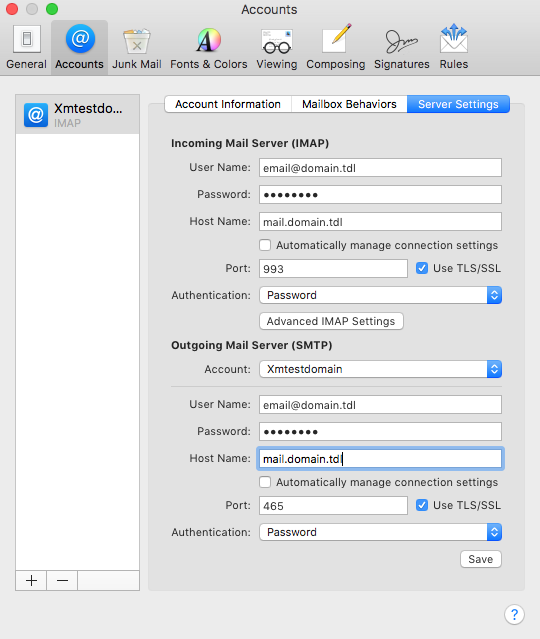
- Next you will want to fill in both Incoming and Outgoing Mail servers to "mail.domain.tld" followed by clicking "Sign In"
- Account Type: - We suggest IMAP
- Incoming and Outgoing Mail Server: - mail.domain.tld
- User Name: - your user name is your full email address. Example, johnsmith@example.com
- Password: - your email password
- PleskMail requires you to accept a wild-card certificate. When you see this message click Continue.
- Your XMission email account has now been successfully added!
- Administration/Logging in
- Adding a Domain
- Adding MySQL Databases
- Adding/Managing DNS Records
- Managing Domain/Users
- Managing FTP Access/Users
- PHP Settings
- Previewing the Website
- Secure Your Sites
- Web Statistics
Additional Development Help
Applications
Domain Management


