Difference between revisions of "Installing RAS in NT"
From XMission Wiki
m |
|||
| (3 intermediate revisions by 3 users not shown) | |||
| Line 1: | Line 1: | ||
{{archived}} | {{archived}} | ||
| + | |||
#Click <span class="button">Start</span>, go to <span class="button">Settings</span>, and select <span class="button">Control Panel</span>. | #Click <span class="button">Start</span>, go to <span class="button">Settings</span>, and select <span class="button">Control Panel</span>. | ||
#Double-click on <span class="button">Network</span>. | #Double-click on <span class="button">Network</span>. | ||
| Line 5: | Line 6: | ||
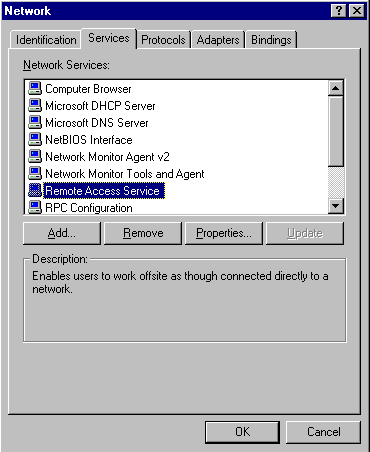
#In the <span class="button">Network Services</span> box, check for <span class="button">Remote Access</span>. | #In the <span class="button">Network Services</span> box, check for <span class="button">Remote Access</span>. | ||
#:<div class="messagebox metadata">'''Note''': If you DO see <span class="button">Remote Access</span> in the <span class="button">Network Services</span> box, highlight it, click <span class="button">Properties</span>, and jump to step 9.</div> | #:<div class="messagebox metadata">'''Note''': If you DO see <span class="button">Remote Access</span> in the <span class="button">Network Services</span> box, highlight it, click <span class="button">Properties</span>, and jump to step 9.</div> | ||
| − | #: | + | #[[Image:Winnt09.png]] |
#Click <span class="button">Add</span>. | #Click <span class="button">Add</span>. | ||
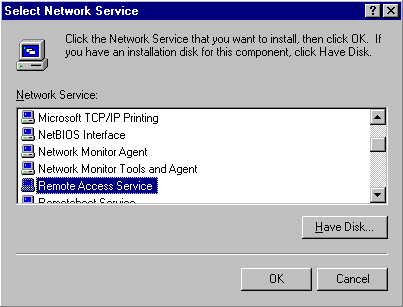
#Scroll down to <span class="button">Remote Access Service</span> and highlight it. | #Scroll down to <span class="button">Remote Access Service</span> and highlight it. | ||
#Click <span class="button">OK</span>. | #Click <span class="button">OK</span>. | ||
| − | #: | + | #[[Image:Winnt10.png]] |
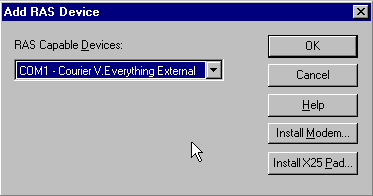
#Insert the Windows NT disk and click <span class="button">Continue</span>. | #Insert the Windows NT disk and click <span class="button">Continue</span>. | ||
#Select your modem from the menu. | #Select your modem from the menu. | ||
#Click <span class="button">OK</span>. | #Click <span class="button">OK</span>. | ||
| − | #: | + | #[[Image:Winnt11.png]] |
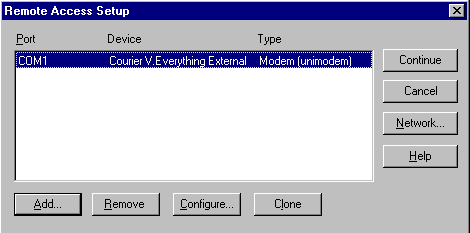
#Click <span class="button">Configure</span>. | #Click <span class="button">Configure</span>. | ||
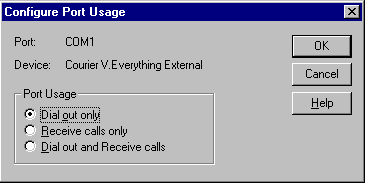
| − | #: | + | #[[Image:Winnt12.png]] |
#Select <span class="button">Dial out only</span>. | #Select <span class="button">Dial out only</span>. | ||
#Click <span class="button">OK</span>. | #Click <span class="button">OK</span>. | ||
| − | #: | + | #[[Image:Winnt13.png]] |
#Click <span class="button">Network</span>. | #Click <span class="button">Network</span>. | ||
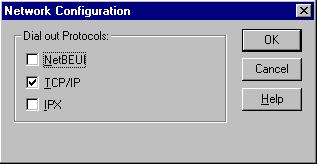
#Make sure <span class="button">TCP/IP</span> is the only protocol selected. | #Make sure <span class="button">TCP/IP</span> is the only protocol selected. | ||
#Click <span class="button">OK</span>. | #Click <span class="button">OK</span>. | ||
| − | #: | + | #[[Image:Winnt14.png]] |
#Click <span class="button">Continue</span>. | #Click <span class="button">Continue</span>. | ||
#Click <span class="button">Close</span>. | #Click <span class="button">Close</span>. | ||
| Line 29: | Line 30: | ||
[[Category:Dialup Archives|RAS]] | [[Category:Dialup Archives|RAS]] | ||
| − | |||
| − | |||
| − | |||
Latest revision as of 15:35, 4 February 2014
![]()
- Click , go to , and select .
- Double-click on .
- Select the tab.
- In the box, check for .
- Click .
- Scroll down to and highlight it.
- Click .
- Insert the Windows NT disk and click .
- Select your modem from the menu.
- Click .
- Click .
- Select .
- Click .
- Click .
- Make sure is the only protocol selected.
- Click .
- Click .
- Click .
- Click to reboot your computer.


