Difference between revisions of "Mac OSX:Leopard"
(Created page with ''''Mac Leopard PPPoE procedure:''' :''Before you begin, ensure that an Ethernet cable is connected from the appropriately provisioned port on your UTOPIA equipment to your comp…') |
|||
| (5 intermediate revisions by 2 users not shown) | |||
| Line 2: | Line 2: | ||
:''Before you begin, ensure that an Ethernet cable is connected from the appropriately provisioned port on your UTOPIA equipment to your computer.'' | :''Before you begin, ensure that an Ethernet cable is connected from the appropriately provisioned port on your UTOPIA equipment to your computer.'' | ||
| + | |||
Click the Apple icon [[File:Apple_icon.png]] on your task bar. This will pop open a menu, as seen below. Click on "System Preferences." | Click the Apple icon [[File:Apple_icon.png]] on your task bar. This will pop open a menu, as seen below. Click on "System Preferences." | ||
| Line 20: | Line 21: | ||
:Fill out the fields as indicated below. You may name the connection whatever you like, but we recommend you simply use "XMission." After that, click "Create." | :Fill out the fields as indicated below. You may name the connection whatever you like, but we recommend you simply use "XMission." After that, click "Create." | ||
| − | :[[File: | + | :[[File:4macleopardpppoe.png]] |
| Line 34: | Line 35: | ||
Your Internet connection is now ready to use! | Your Internet connection is now ready to use! | ||
| + | |||
| + | |||
| + | [[Category:UTOPIA Troubleshooting|Mac OSX Leopard]] | ||
| + | [[Category:UTOPIA]] | ||
| + | [[Category:PPPoE]] | ||
Latest revision as of 15:21, 15 January 2014
Mac Leopard PPPoE procedure:
- Before you begin, ensure that an Ethernet cable is connected from the appropriately provisioned port on your UTOPIA equipment to your computer.
Click the Apple icon ![]() on your task bar. This will pop open a menu, as seen below. Click on "System Preferences."
on your task bar. This will pop open a menu, as seen below. Click on "System Preferences."

- Below the "Internet and Network" section, click on "Network."

Along the left hand-column which displays your connection types, locate and click the small "+" sign as indicated below:

- Fill out the fields as indicated below. You may name the connection whatever you like, but we recommend you simply use "XMission." After that, click "Create."

You will now see the new connection listed in the left-hand column. Make sure it is selected, and then enter your XMission username in the "Account Name" field and the corresponding password in the "Password" field. In the example below, we have used "bobdobbs" as a username. You would replace this with your own, unique XMission username. Remember that passwords are case-sensitive! You will also likely want to check the two box to "Remember this password." After you've finished that, click "Advanced."

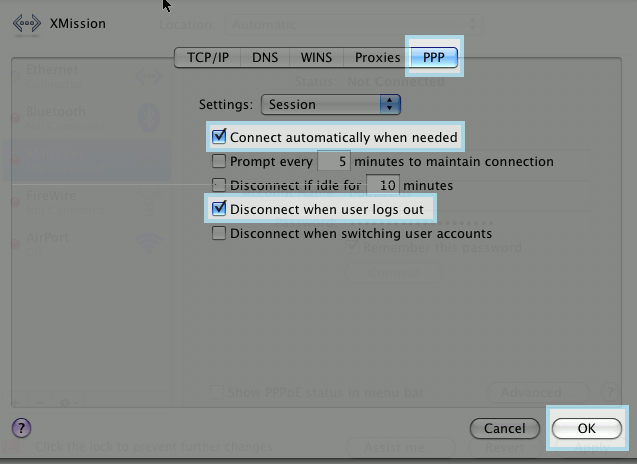
- Select the "PPP" tab and check the boxes indicated below. After that, click "Ok."

Your Internet connection is now ready to use!