Difference between revisions of "Mail 1.2 Setup"
From XMission Wiki
m |
|||
| Line 1: | Line 1: | ||
| − | |||
#Open your hard drive icon. | #Open your hard drive icon. | ||
#Double-click on <span class="button">Applications</span>. | #Double-click on <span class="button">Applications</span>. | ||
#Open <span class="button">Mail</span>. | #Open <span class="button">Mail</span>. | ||
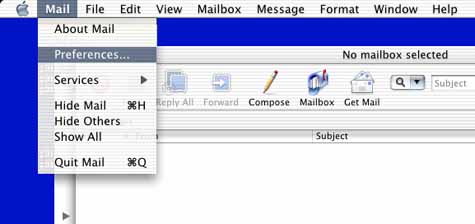
#Click on <span class="button">Mail</span> and select <span class="button">Preferences</span>. | #Click on <span class="button">Mail</span> and select <span class="button">Preferences</span>. | ||
| − | #: | + | #[[Image:Macosxmail1101.jpg]] |
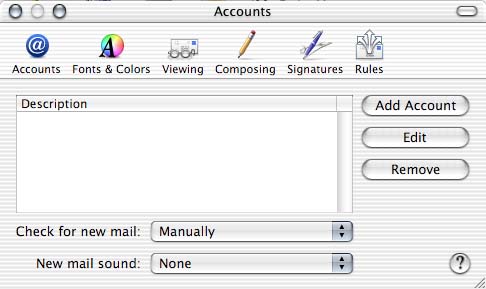
#Click on <span class="button">Add Account</span>. | #Click on <span class="button">Add Account</span>. | ||
| − | #: | + | #[[Image:Macosxmail1202.jpg]] |
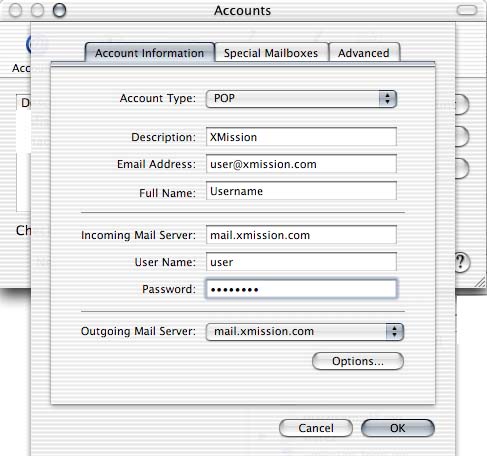
#Next to <span class="button">Account Type:</span>, select <span class="button">POP Account</span>. | #Next to <span class="button">Account Type:</span>, select <span class="button">POP Account</span>. | ||
#In the <span class="button">Description</span> field, enter <tt>XMission</tt>. | #In the <span class="button">Description</span> field, enter <tt>XMission</tt>. | ||
| Line 16: | Line 15: | ||
#:<div class="messagebox metadata">'''Note''': You may leave the password field blank if you'd like to be prompted to enter it every time you check your mail.</div> | #:<div class="messagebox metadata">'''Note''': You may leave the password field blank if you'd like to be prompted to enter it every time you check your mail.</div> | ||
#In the <span class="button">Outgoing Mail Server:</span> field, enter <tt>mail.xmission.com</tt>. | #In the <span class="button">Outgoing Mail Server:</span> field, enter <tt>mail.xmission.com</tt>. | ||
| − | #: | + | #[[Image:Macosxmail1203.jpg]] |
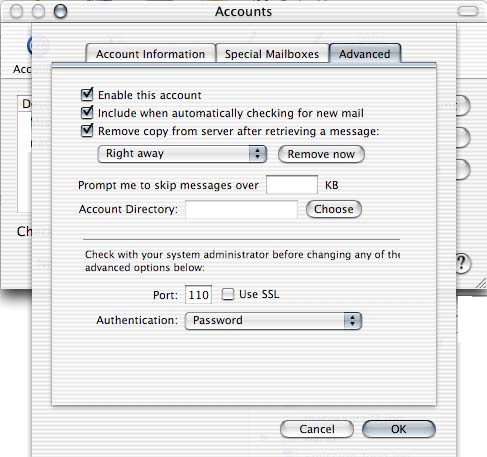
#In the <span class="button">Advanced</span> tab at the top of the window. | #In the <span class="button">Advanced</span> tab at the top of the window. | ||
#Make sure that there is a check mark next to <span class="button">Remove copy from server after retrieving a message</span> and select "Right away" from the list menu. | #Make sure that there is a check mark next to <span class="button">Remove copy from server after retrieving a message</span> and select "Right away" from the list menu. | ||
#Click on <span class="button">OK</span>. | #Click on <span class="button">OK</span>. | ||
| − | #: | + | #[[Image:Macosxmail1204.jpg]] |
[[Category:XMission Email Archives|Mail 1.2]] | [[Category:XMission Email Archives|Mail 1.2]] | ||
| − | |||
| − | |||
| − | |||
Revision as of 09:29, 9 June 2009
- Open your hard drive icon.
- Double-click on .
- Open .
- Click on and select .
- Click on .
- Next to , select .
- In the field, enter XMission.
- In the field, enter your XMission email address.
- In the field, enter the name that you would like to appear on your outgoing messages. (e.g.: John Doe or Johnny D.)
- In the field, enter mail.xmission.com.
- In the field, enter your XMission username.
- In the password field, enter your XMission password.
- In the field, enter mail.xmission.com.
- In the tab at the top of the window.
- Make sure that there is a check mark next to and select "Right away" from the list menu.
- Click on .