Difference between revisions of "OS X 10.4 Setup"
From XMission Wiki
| Line 5: | Line 5: | ||
#In the Telephone Number field, enter the appropriate telephone number for [http://www.xmission.com/about/dialup/ your location]. | #In the Telephone Number field, enter the appropriate telephone number for [http://www.xmission.com/about/dialup/ your location]. | ||
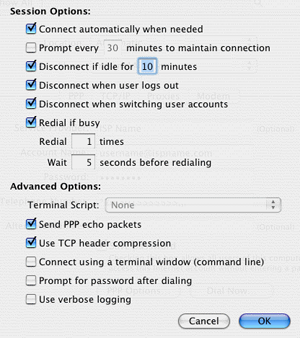
#Click the <span class="button">PPP Options</span> button, check the boxes as show in the screenshot below the, click <span class="button">OK</span>. | #Click the <span class="button">PPP Options</span> button, check the boxes as show in the screenshot below the, click <span class="button">OK</span>. | ||
| − | #: | + | #[[Image:Osx104du.png]] |
#Click the <span class="button">Apply Now</span> button, then close the window. | #Click the <span class="button">Apply Now</span> button, then close the window. | ||
Revision as of 09:22, 2 June 2009
- Click on the Apple menu, then select Network Preferences.
- Under Location, select New Location, enter XMission for the location name.
- Click on the PPP tab. In the Service Provider field, enter XMission.
- In the Account Name field, enter your XMission user name, in the Password field, enter your XMission password.
- In the Telephone Number field, enter the appropriate telephone number for your location.
- Click the button, check the boxes as show in the screenshot below the, click .
- Click the button, then close the window.

When you open your Web Browser, you should be prompted to establish the Dial Up connection.