Difference between revisions of "SMTP Authentication"
From XMission Wiki
m |
|||
| Line 1: | Line 1: | ||
| − | |||
==Introduction== | ==Introduction== | ||
| Line 13: | Line 12: | ||
#Click <span class="button">Next</span>. | #Click <span class="button">Next</span>. | ||
#Highlight your account and click <span class="button">Change...</span>. | #Highlight your account and click <span class="button">Change...</span>. | ||
| − | #: | + | #[[Image:Winolxpsmtp1.png]] |
#Click <span class="button">More Settings...</span>. | #Click <span class="button">More Settings...</span>. | ||
#Put a check in <span class="button">My outgoing server (SMTP) requires authentication. If necessary, specify a username and password.</span>. | #Put a check in <span class="button">My outgoing server (SMTP) requires authentication. If necessary, specify a username and password.</span>. | ||
| − | #: | + | #[[Image:Winolxpsmtp2.png]] |
#Click <span class="button">OK</span>. | #Click <span class="button">OK</span>. | ||
#Click <span class="button">Next</span>. | #Click <span class="button">Next</span>. | ||
| Line 27: | Line 26: | ||
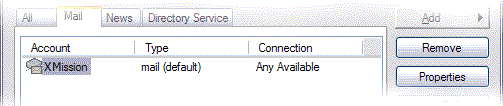
#Click on the <span class="button">Mail</span> tab. | #Click on the <span class="button">Mail</span> tab. | ||
#Highlight your account, and click <span class="button">Properties</span>. | #Highlight your account, and click <span class="button">Properties</span>. | ||
| − | #: | + | #[[Image:Winolesmtp1.png]] |
#Click on the <span class="button">Servers</span> tab | #Click on the <span class="button">Servers</span> tab | ||
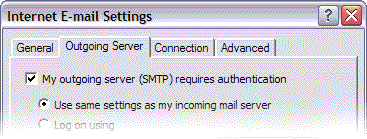
#Under <span class="button">Outgoing Mail Server</span>, put a check in <span class="button">My server requires authentication</span>. | #Under <span class="button">Outgoing Mail Server</span>, put a check in <span class="button">My server requires authentication</span>. | ||
| − | #: | + | #[[Image:Winolesmtp2.png]] |
#Click <span class="button">OK</span> | #Click <span class="button">OK</span> | ||
| Line 40: | Line 39: | ||
#Check <span class="button">Use name and password</span>. | #Check <span class="button">Use name and password</span>. | ||
#Enter your username where specified. | #Enter your username where specified. | ||
| − | #: | + | #[[Image:Winns6smtp.png]] |
#Click <span class="button">OK</span>. | #Click <span class="button">OK</span>. | ||
| Line 50: | Line 49: | ||
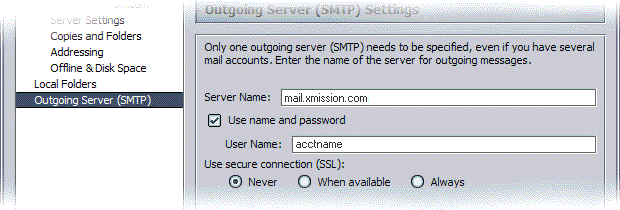
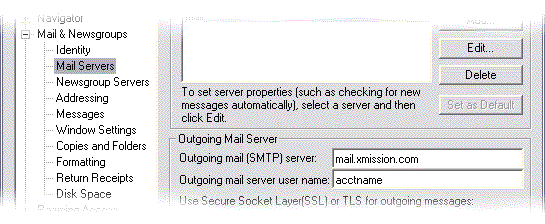
#click <span class="button">Mail Servers</span>. | #click <span class="button">Mail Servers</span>. | ||
#Type your username in the field labeled <span class="button">Outgoing mail server username</span>. | #Type your username in the field labeled <span class="button">Outgoing mail server username</span>. | ||
| − | #: | + | #[[Image:Winns4smtp.png]] |
#Click <span class="button">OK</span>. | #Click <span class="button">OK</span>. | ||
| Line 59: | Line 58: | ||
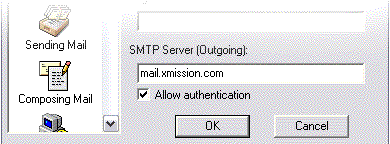
#In the <span class="button">Getting Started</span> category, put a check in <span class="button">Allow Authentication</span>. | #In the <span class="button">Getting Started</span> category, put a check in <span class="button">Allow Authentication</span>. | ||
#Click <span class="button">OK</span>. | #Click <span class="button">OK</span>. | ||
| − | #: | + | #[[Image:Wineu4smtp.png]] |
| − | |||
[[Category:XMission Email Archives|SMTP Authentication]] | [[Category:XMission Email Archives|SMTP Authentication]] | ||
Revision as of 09:33, 12 May 2009
Contents
Introduction
When you're connected to XMission via dial-up, ISDN, DSL, T1, or any other means, you've been able to send email with ease. However, if you've attempted to use your email account from a location not connected to XMission, you've probably gotten an error saying "Relaying Denied". This is because XMission's mail server is protected against people who aren't subscribers using it to send outgoing email. It does this by checking to see if the computer sending the email is connected to XMission.
However, if you've attempted to use your email account from a location not connected to XMission, you probably received an error saying "Relaying Denied."
Instructions for Outlook XP
- Click on and select .
- Select .
- Click .
- Highlight your account and click .

- Click .
- Put a check in .
- Click .
- Click .
- Click .


Instructions for Outlook Express
- Click on and select .
- Click on the tab.
- Highlight your account, and click .
- Click on the tab
- Under , put a check in .

- Click


Instructions for Netscape 6.x
- Click and select .
- Click on .
- Check .
- Enter your username where specified.
- Click .

Instructions for Netscape 4.x
- Click and select .
- Click the plus sign by .
- click .
- Type your username in the field labeled .
- Click .

Instructions for Eudora
- Click and select .
- In the category, put a check in .
- Click .