Difference between revisions of "Windows 98/95 Setup"
From XMission Wiki
(New page: Windows 95/98 Dialup Setup #Double-click on the <span class="button">My Computer</span> icon on your desktop. #Double-click the <span class="button">Dial-Up Networking</span> icon. #:<div...) |
|||
| (6 intermediate revisions by 3 users not shown) | |||
| Line 1: | Line 1: | ||
| + | {{archived}} | ||
| + | |||
| + | |||
Windows 95/98 Dialup Setup | Windows 95/98 Dialup Setup | ||
| Line 4: | Line 7: | ||
#Double-click the <span class="button">Dial-Up Networking</span> icon. | #Double-click the <span class="button">Dial-Up Networking</span> icon. | ||
#:<div class="messagebox metadata">'''Note''': If there is no <span class="button">Dial-up Networking</span> folder in <span class="button">My Computer</span>, you will need to install Dial-up Networking.</div> | #:<div class="messagebox metadata">'''Note''': If there is no <span class="button">Dial-up Networking</span> folder in <span class="button">My Computer</span>, you will need to install Dial-up Networking.</div> | ||
| − | #: | + | #[[Image:Win9511.png]] |
#Double-click <span class="button">Make New Connection</span>, or click <span class="button">next</span> if prompted. | #Double-click <span class="button">Make New Connection</span>, or click <span class="button">next</span> if prompted. | ||
| − | #: | + | #[[Image:Win9512.png]] |
#Enter <tt>XMission</tt>" for the <span class="button">Name of the computer you are dialing</span>. | #Enter <tt>XMission</tt>" for the <span class="button">Name of the computer you are dialing</span>. | ||
#Be sure your modem is selected in the <span class="button">Select a Modem</span> field. If not, select it now. | #Be sure your modem is selected in the <span class="button">Select a Modem</span> field. If not, select it now. | ||
#Click <span class="button">Next</span>. | #Click <span class="button">Next</span>. | ||
| − | #: | + | #[[Image:Win951.png]] |
#Enter your local XMission access number here. | #Enter your local XMission access number here. | ||
#Click <span class="button">Next</span>. | #Click <span class="button">Next</span>. | ||
| − | #: | + | #[[Image:Win952.png]] |
#Click <span class="button">Finish</span>. | #Click <span class="button">Finish</span>. | ||
#:<div class="messagebox metadata">'''Note''': Depending on your current system configuration, you may be promted to install the <span class="button">Dial-Up Network Adapter</span>. If so, click <span class="button">OK</span> to install. (You may be prompted to insert your Win95/98 disk.)</div> | #:<div class="messagebox metadata">'''Note''': Depending on your current system configuration, you may be promted to install the <span class="button">Dial-Up Network Adapter</span>. If so, click <span class="button">OK</span> to install. (You may be prompted to insert your Win95/98 disk.)</div> | ||
| − | #: | + | #[[Image:Win953.png]] |
#Click once on the <span class="button">XMission</span> icon now showing in your <span class="button">Dial-Up Networking</span> folder. | #Click once on the <span class="button">XMission</span> icon now showing in your <span class="button">Dial-Up Networking</span> folder. | ||
#Select the <span class="button">File</span> menu, then select <span class="button">Properties</span>. | #Select the <span class="button">File</span> menu, then select <span class="button">Properties</span>. | ||
| Line 22: | Line 25: | ||
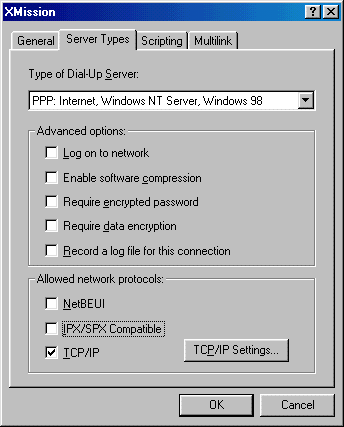
#Under both <span class="button">Advanced Options</span> and <span class="button">Allowed Network Protocols</span> UNCHECK everything but <span class="button">TCP/IP</span>. | #Under both <span class="button">Advanced Options</span> and <span class="button">Allowed Network Protocols</span> UNCHECK everything but <span class="button">TCP/IP</span>. | ||
#Click <span class="button">TCP/IP Settings</span>. | #Click <span class="button">TCP/IP Settings</span>. | ||
| − | #: | + | #[[Image:Win955.png]] |
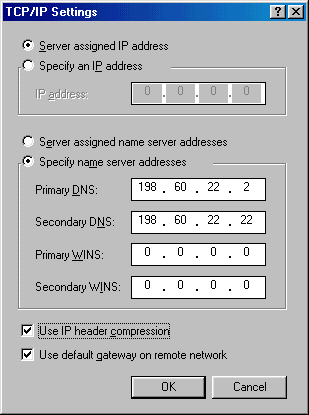
#Select <span class="button">Specify name server addresses</span>. | #Select <span class="button">Specify name server addresses</span>. | ||
#In the spaces now available next to <span class="button">Primary DNS</span>, enter <tt>198.60.22.2</tt>. | #In the spaces now available next to <span class="button">Primary DNS</span>, enter <tt>198.60.22.2</tt>. | ||
#In the spaces available next to <span class="button">Secondary DNS</span>, enter <tt>198.60.22.22</tt>. | #In the spaces available next to <span class="button">Secondary DNS</span>, enter <tt>198.60.22.22</tt>. | ||
#Click <span class="button">OK</span> until you're back to the <span class="button">Dial-up Networking</span> folder. | #Click <span class="button">OK</span> until you're back to the <span class="button">Dial-up Networking</span> folder. | ||
| − | #: | + | #[[Image:Win956.png]] |
#To dial, double-click the <span class="button">XMission</span> icon, enter your XMission username in the space labeled <span class="button">User Name</span>, enter your password in the space labeled <span class="button">Password</span>, then click <span class="button">Dial</span>. | #To dial, double-click the <span class="button">XMission</span> icon, enter your XMission username in the space labeled <span class="button">User Name</span>, enter your password in the space labeled <span class="button">Password</span>, then click <span class="button">Dial</span>. | ||
| − | [[Category:Dialup | + | [[Category:Dialup Archives|Windows 95/98]] |
| − | |||
Latest revision as of 15:56, 14 January 2020
![]()
Windows 95/98 Dialup Setup
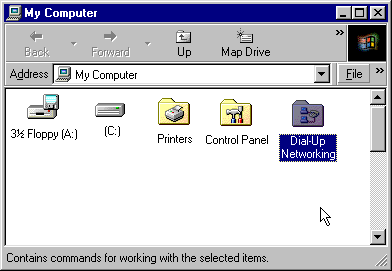
- Double-click on the icon on your desktop.
- Double-click the icon.
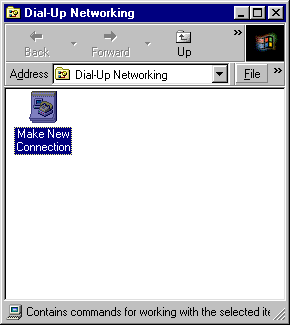
- Double-click , or click if prompted.
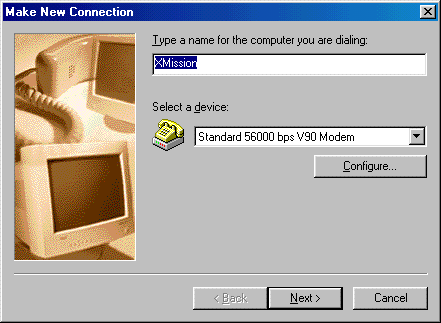
- Enter XMission" for the .
- Be sure your modem is selected in the field. If not, select it now.
- Click .
- Enter your local XMission access number here.
- Click .

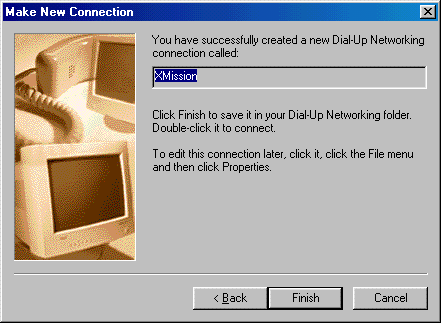
- Click .
- Click once on the icon now showing in your folder.
- Select the menu, then select .
- Click on the tab.
- Under both and UNCHECK everything but .
- Click .
- Select .
- In the spaces now available next to , enter 198.60.22.2.
- In the spaces available next to , enter 198.60.22.22.
- Click until you're back to the folder.
- To dial, double-click the icon, enter your XMission username in the space labeled , enter your password in the space labeled , then click .


