Difference between revisions of "Windows NT Setup"
From XMission Wiki
m (Protected "Dialup Archives:Windows NT Setup" [edit=sysop:move=sysop]) |
|||
| Line 1: | Line 1: | ||
| − | |||
Windows NT Dialup Setup | Windows NT Dialup Setup | ||
| Line 5: | Line 4: | ||
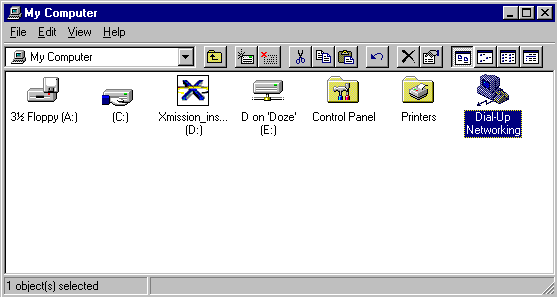
#Double-click the <span class="button">Dial-Up Networking</span> icon. | #Double-click the <span class="button">Dial-Up Networking</span> icon. | ||
#:<div class="messagebox metadata">'''Note''': If there is no <span class="button">Dial-up Networking</span> folder in <span class="button">My Computer</span>, you will need to install Dial-Up Networking.</div> | #:<div class="messagebox metadata">'''Note''': If there is no <span class="button">Dial-up Networking</span> folder in <span class="button">My Computer</span>, you will need to install Dial-Up Networking.</div> | ||
| − | #: | + | #[[Image:Winnt01.png]] |
#A <span class="button">Dial-Up Networking</span> window will appear. Choose <span class="button">Ok</span> to add an entry | #A <span class="button">Dial-Up Networking</span> window will appear. Choose <span class="button">Ok</span> to add an entry | ||
#:<div class="messagebox metadata">'''Note''': If you already have entries configured, click <span class="button">New</span>.</div> | #:<div class="messagebox metadata">'''Note''': If you already have entries configured, click <span class="button">New</span>.</div> | ||
| Line 19: | Line 18: | ||
#Click <span class="button">Finish</span>. | #Click <span class="button">Finish</span>. | ||
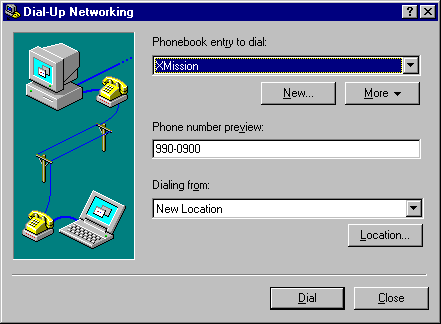
#Click <span class="button">More</span>. | #Click <span class="button">More</span>. | ||
| − | #: | + | #[[Image:Winnt02.png]] |
#Select <span class="button">Edit entry and modem properties</span>. | #Select <span class="button">Edit entry and modem properties</span>. | ||
#Select the <span class="button">Server</span> tab. | #Select the <span class="button">Server</span> tab. | ||
| Line 25: | Line 24: | ||
#Uncheck <span class="button">Enable software compression</span>. | #Uncheck <span class="button">Enable software compression</span>. | ||
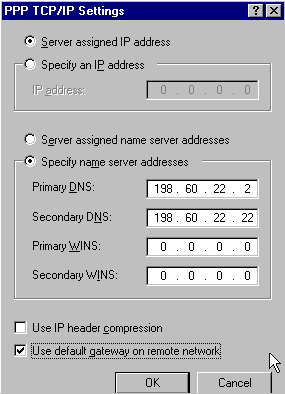
#Click <span class="button">TCP/IP Settings</span>. | #Click <span class="button">TCP/IP Settings</span>. | ||
| − | #: | + | #[[Image:Winnt03.png]] |
#Select <span class="button">Specify name server addresses</span>. | #Select <span class="button">Specify name server addresses</span>. | ||
#Check and Edit the following entries: | #Check and Edit the following entries: | ||
| Line 32: | Line 31: | ||
#Uncheck <span class="button">Use IP header compression</span>. | #Uncheck <span class="button">Use IP header compression</span>. | ||
#Click <span class="button">OK</span>. | #Click <span class="button">OK</span>. | ||
| − | #: | + | #[[Image:Winnt04.png]] |
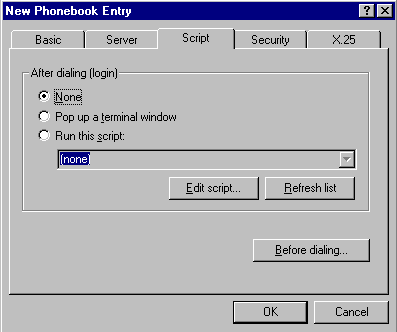
#Select the <span class="button">Script</span> tab. | #Select the <span class="button">Script</span> tab. | ||
#Make sure <span class="button">After Dialing (login)</span> is set to <span class="button">None</span>. | #Make sure <span class="button">After Dialing (login)</span> is set to <span class="button">None</span>. | ||
| − | #: | + | #[[Image:Winnt05.png]] |
#Select the <span class="button">Security</span> tab. | #Select the <span class="button">Security</span> tab. | ||
#Select <span class="button">Accept any authentication including clear text</span>. | #Select <span class="button">Accept any authentication including clear text</span>. | ||
#Click <span class="button">OK</span>. | #Click <span class="button">OK</span>. | ||
| − | #: | + | #[[Image:Winnt06.png]] |
#To log on to XMission; | #To log on to XMission; | ||
##Open <span class="button">My Computer</span> | ##Open <span class="button">My Computer</span> | ||
| Line 51: | Line 50: | ||
[[Category:Dialup Archives|Windows NT]] | [[Category:Dialup Archives|Windows NT]] | ||
| − | |||
| − | |||
| − | |||
Revision as of 12:11, 30 April 2009
Windows NT Dialup Setup
- Double-click on the icon on your desktop.
- Double-click the icon.
- A window will appear. Choose to add an entry
- Enter XMission for the .
- Click
- Check ALL of the following boxes:
- Click .
- Enter in the XMission dial-up number for your area in the entry field
- Click .
- Click .
- Click .
- Select .
- Select the tab.
- Uncheck any protocols other than .
- Uncheck .
- Click .
- File:Winnt03.png
- Select .
- Check and Edit the following entries:
- 198.60.22.2
- 198.60.22.22
- Uncheck .
- Click .
- Select the tab.
- Make sure is set to .
- Select the tab.
- Select .
- Click .

- To log on to XMission;
- Open
- Open
- Highlight the "XMission" entry and click
- Enter your XMission username
- Enter your password
- Click


