Difference between revisions of "Windows XP Setup"
From XMission Wiki
m |
m |
||
| Line 1: | Line 1: | ||
#Click on the <span class="button">Start</span> button, go to <span class="button">All Programs</span>, <span class="button">Accessories</span>, <span class="button">Communications</span>, and select <span class="button">New Connection Wizard</span>. | #Click on the <span class="button">Start</span> button, go to <span class="button">All Programs</span>, <span class="button">Accessories</span>, <span class="button">Communications</span>, and select <span class="button">New Connection Wizard</span>. | ||
| − | #[[Image:Winxp30.png]] | + | #:[[Image:Winxp30.png]] |
#On the <span class="button">New Connection Wizard</span> screen, click <span class="button">Next</span>. | #On the <span class="button">New Connection Wizard</span> screen, click <span class="button">Next</span>. | ||
| − | #[[Image:Winxp7.png]] | + | #:[[Image:Winxp7.png]] |
#Select <span class="button">Connect to the Internet</span>. | #Select <span class="button">Connect to the Internet</span>. | ||
#Click <span class="button">Next</span>. | #Click <span class="button">Next</span>. | ||
| − | #[[Image:Winxp8.png]] | + | #:[[Image:Winxp8.png]] |
#Select <span class="button">Setup my connection manually</span>. | #Select <span class="button">Setup my connection manually</span>. | ||
#Click <span class="button">Next</span>. | #Click <span class="button">Next</span>. | ||
| − | #[[Image:Winxp9.png]] | + | #:[[Image:Winxp9.png]] |
#Select <span class="button">Connect using a dial-up modem</span>. | #Select <span class="button">Connect using a dial-up modem</span>. | ||
#Click <span class="button">Next</span>. | #Click <span class="button">Next</span>. | ||
| − | #[[Image:Winxp10.png]] | + | #:[[Image:Winxp10.png]] |
#In the field labeled <span class="button">ISP Name</span>, type in <tt>XMission</tt>. | #In the field labeled <span class="button">ISP Name</span>, type in <tt>XMission</tt>. | ||
#Click <span class="button">Next</span>. | #Click <span class="button">Next</span>. | ||
| − | #[[Image:Winxp11.png]] | + | #:[[Image:Winxp11.png]] |
#In the field labeled <span class="button">Phone Number:</span>, enter your local XMission access number. | #In the field labeled <span class="button">Phone Number:</span>, enter your local XMission access number. | ||
#Click <span class="button">Next</span>. | #Click <span class="button">Next</span>. | ||
| − | #[[Image:Winxp12.png]] | + | #:[[Image:Winxp12.png]] |
#In the field labeled <span class="button">User name:</span>, enter your username as user@xmission.com. ('''Note:"@xmission.com" is required''') | #In the field labeled <span class="button">User name:</span>, enter your username as user@xmission.com. ('''Note:"@xmission.com" is required''') | ||
#In the field labeled <span class="button">Password:</span>, enter your password. | #In the field labeled <span class="button">Password:</span>, enter your password. | ||
| Line 23: | Line 23: | ||
#Click <span class="button">Next</span>. | #Click <span class="button">Next</span>. | ||
#If you'd like a shortcut added to your desktop, click <span class="button">Add a shortcut to this connection to my desktop</span> and click <span class="button">Finish</span>. | #If you'd like a shortcut added to your desktop, click <span class="button">Add a shortcut to this connection to my desktop</span> and click <span class="button">Finish</span>. | ||
| − | #[[Image:Winxp14.png]] | + | #:[[Image:Winxp14.png]] |
#Click <span class="button">Start</span>, go to <span class="button">Connect To</span>, and select <span class="button">XMission</span>. (You can also double-click the <span class="button">XMission</span> icon on your desktop if you chose to add it.) | #Click <span class="button">Start</span>, go to <span class="button">Connect To</span>, and select <span class="button">XMission</span>. (You can also double-click the <span class="button">XMission</span> icon on your desktop if you chose to add it.) | ||
| − | #[[Image:Winxp15.png]] | + | #:[[Image:Winxp15.png]] |
#Click the <span class="button">Properties</span> button. | #Click the <span class="button">Properties</span> button. | ||
| − | #[[Image:Winxp16.png]] | + | #:[[Image:Winxp16.png]] |
#:<div class="messagebox metadata">'''Note''': On the <span class="button">General</span> tab that appears next, you must check <span class="button">Use dialing rules</span> if you have to dial a number to access an outside line, have call waiting disabled, need to dial long distance, or have a calling card set up.</div> | #:<div class="messagebox metadata">'''Note''': On the <span class="button">General</span> tab that appears next, you must check <span class="button">Use dialing rules</span> if you have to dial a number to access an outside line, have call waiting disabled, need to dial long distance, or have a calling card set up.</div> | ||
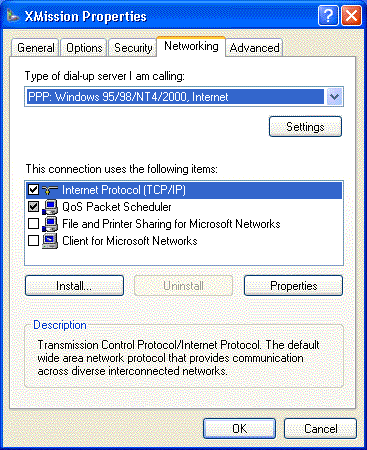
#Click on the <span class="button">Networking</span> tab. | #Click on the <span class="button">Networking</span> tab. | ||
Revision as of 15:43, 2 July 2009
- Click on the button, go to , , , and select .
- On the screen, click .
- Select .
- Click .
- Select .
- Click .
- Select .
- Click .
- In the field labeled , type in XMission.
- Click .
- In the field labeled , enter your local XMission access number.
- Click .
- In the field labeled , enter your username as user@xmission.com. (Note:"@xmission.com" is required)
- In the field labeled , enter your password.
- In the field labeled , enter your password again.
- Click .
- If you'd like a shortcut added to your desktop, click and click .
- Click , go to , and select . (You can also double-click the icon on your desktop if you chose to add it.)
- Click the button.
- Click on the tab.
- If isn't highlighted, click once to highlight it and then click on the button.
- Select .
- In the space provided next to , enter 198.60.22.2
- In the space provided next to , enter 198.60.22.22
- Click , then again.
- Click to connect.


