Difference between revisions of "WordPress Toolkit/Copy WordPress"
From XMission Wiki
(→Sync WordPress Sites) |
(→To synchronize your data) |
||
| Line 52: | Line 52: | ||
#** Highly recommended to keep this box checked. | #** Highly recommended to keep this box checked. | ||
# Click '''Start'''. | # Click '''Start'''. | ||
| − | |||
| − | |||
#: | #: | ||
| − | #:[[File: | + | #:[[File:PleskWPtoolkit-sync-3.png]] |
| − | |||
| − | |||
| − | |||
| − | |||
#: | #: | ||
Latest revision as of 15:49, 8 December 2022
Copy/Clone a website
- Go to Websites & Domains and click WordPress in the menu on the left.
- Click the Clone button to the name of the WordPress installation you want to clone.
-
- Click new subdomain to select the destination where your WordPress site will be cloned.
-
- Select one of the available options:
- New subdomain - WordPress Toolkit suggests creating a new subdomain with the default staging prefix. You can use it or type in a desired subdomain prefix.
- Existing domain or subdomain - use an existing domain or subdomain on the same or another subscription. Select the desired domain or subdomain from the list.
-
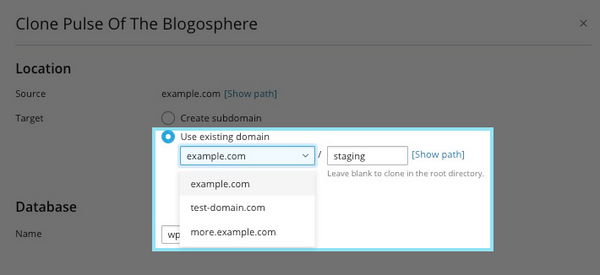
- Note: Make sure that the domain or subdomain selected is not being used. During cloning, website data existing on the destination will be overwritten.
- During cloning, a database will be created for the WordPress installation being created. Click the automatically generated database name (for example, wordpress_9) to change it.
- When you are satisfied with the selected destination and the database name, click OK.
- When the cloning is finished, the new clone will be displayed in the list of WordPress installations.


Sync WordPress Sites
With the Toolkit you can You can synchronize the content of one website with another WordPress site. This will allow you to maintain a staging version of a site and a production version. This is a common practice allowing you to make changes in staging and not affect the site your customers see. Once you are ready to make the changes in production you may want to synchronize your WordPress sites.
To synchronize your data
- Go to Websites & Domains and click WordPress in the menu on the left.
- Click on Copy Data from the dashboard of the website you want to sync.
-
- Under "Destination WordPress Installation", select the destination website.
- Location - Target should indicate the destination domain, this would be your staging domain if you are copying from your main site to your staging.
- Data to Copy
- Files Only - would only copy files.
- Database Only - would only copy the database.
- Files and Database - would copy all files and database info.
- Replace Files modified on target - would overwrite any files that have the same.
- Database Tables
- All tables - would replace all tables.
- New tables only - would only add any new tables created.
- Selected Tables - would allow you to choose the tables you wish to copy over.
- Restore
- Highly recommended to keep this box checked.
-
- Click Start.


