WordPress Toolkit/Copy WordPress
Copy/Clone a website
- Go to Websites & Domains and click WordPress in the menu on the right.
- Click the Clone button next to the name of the WordPress installation you want to clone.
-
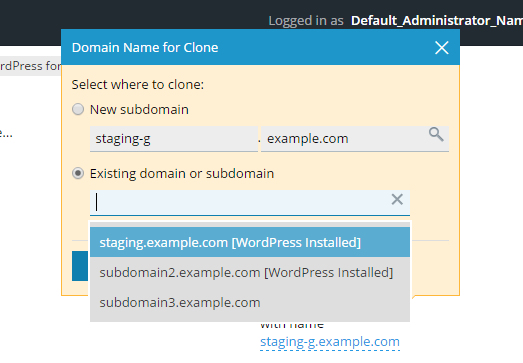
- Click new subdomain to select the destination where your WordPress site will be cloned.
-
- Select one of the available options:
- New subdomain - WordPress Toolkit suggests creating a new subdomain with the default staging prefix. You can use it or type in a desired subdomain prefix.
- Existing domain or subdomain - use an existing domain or subdomain on the same or another subscription. Select the desired domain or subdomain from the list.
-
- Note: Make sure that the domain or subdomain selected is not being used. During cloning, website data existing on the destination will be overwritten.
- During cloning, a database will be created for the WordPress installation being created. Click the automatically generated database name (for example, wordpress_9) to change it.
- When you are satisfied with the selected destination and the database name, click OK.
- When the cloning is finished, the new clone will be displayed in the list of WordPress installations.


Sync WordPress Sites
With the Toolkit you can You can synchronize the content of one website with another WordPress site. This will allow you to maintain a staging version of a site and a production version. This is a common practice allowing you to make changes in staging and not affect the site your customers see. Once you are ready to make the changes in production you may want to synchronize your WordPress sites.
To synchronize your data
- Go to Websites & Domains and click WordPress in the menu on the right.
- Click the Sync button next to the name of the WordPress installation you want to synchronize.
-
- Under "Destination WordPress Installation", select the destination WordPress installation you want to synchronize the data with. This WordPress installation may be related to the same or another subscription.
- Under “Select Content to be Copied”, select which data you want to synchronize with the destination WordPress site:
- “Files Only” - synchronize only the website files, including the WordPress core files and the files related to themes and plugins.
- “Database Only” - synchronizes only the database. You can select to import all, new, or selected database tables.
- “Files and Database” - synchronizes both the website files and the database. You can choose to import all, new, or selected database tables by selecting the corresponding option.
- When you are satisfied with the selected destination and the content to be synchronized, click OK.
- Before synchronizing WordPress instances, WordPress Toolkit suggests creating a restore point. You can use it to roll back the changes made during synchronization.
- Caution: Every WordPress instance can only have a single restore point. Creating a restore point overwrites the existing restore point, if any.
- Click Start to begin synchronization.

The synchronization of WordPress instances has started.
15
When the synchronization is finished, you will see a page displaying the settings of the source WordPress instance. On the page, you can see the last time synchronization was performed. You can click the “Visit the target instance.” link to see the target instance page opened in a new tab.
sync2
Database synchronization When you choose to synchronize databases (that is, you have selected either the Database Only or the Files and Database option), you need to specify which database tables you want to synchronize:
"All Tables" (the default option) "New tables" "Selected tables" - if you select this option, you can see the list of available database tables and select which ones you want to synchronize. If you want to synchronize all changes except for pages, posts, and users, you can select all database tables except the tables with the _postmeta, _posts, _username, and _users suffixes, by clicking the corresponding link. 7