Difference between revisions of "WordPress Toolkit/Updating WordPress"
From XMission Wiki
(→Updating WordPress Instances) |
|||
| Line 1: | Line 1: | ||
== Updating WordPress Instances == | == Updating WordPress Instances == | ||
| − | You can do this either automatically | + | Keeping your website(s) secure, you will need to update the WordPress core, as well as plugins and themes. You can do this either manually or automatically. |
| + | |||
* '''Manual updates''' you control when updates are installed. For example, you can wait and see if installing a particular update can create issues for other WordPress users. However, it is recommended to update regularly to avoid falling behind. | * '''Manual updates''' you control when updates are installed. For example, you can wait and see if installing a particular update can create issues for other WordPress users. However, it is recommended to update regularly to avoid falling behind. | ||
* '''Automatic updates''' will give you peace of mind by keeping your WordPress instance up-to-date. However, updates can sometimes break your instance, and with automatic updates, you may not learn about it right away. | * '''Automatic updates''' will give you peace of mind by keeping your WordPress instance up-to-date. However, updates can sometimes break your instance, and with automatic updates, you may not learn about it right away. | ||
| Line 8: | Line 9: | ||
# Go to WordPress | # Go to WordPress | ||
| − | # Click “View” next to | + | # Click “View” next to “Updates" |
| − | #: ''Note: If an update of a WordPress core is available, you will see the “Restore Point” checkbox. | + | #: Wait for WordPress Toolkit to load the list of available updates |
| + | # Select the updates you want to install. | ||
| + | #: ''Note: If an update of a WordPress core is available, you will see the “Restore Point” checkbox. We recommend to create a restore point in case a roll back is needed.'' | ||
#: | #: | ||
#:[[File:WP_Updates.png|600px]] | #:[[File:WP_Updates.png|600px]] | ||
| Line 19: | Line 22: | ||
# Go to WordPress and choose the WordPress instance that you want to update automatically. | # Go to WordPress and choose the WordPress instance that you want to update automatically. | ||
# Click “View” next to “Updates”, and then click “Settings”. | # Click “View” next to “Updates”, and then click “Settings”. | ||
| − | # Choose the desired automatic update settings. You can configure automatic updates separately for WordPress core, plugins, and themes | + | # Choose the desired automatic update settings. |
| − | #:* Selecting | + | #: You can configure automatic updates separately for WordPress core, plugins, and themes |
| − | #:* If your | + | #:* Selecting “Yes, all(minor and major)updates” next to “Update WordPress automatically”. |
| − | + | #:* If your are concerned that applying updates automatically may break your website , select “Yes, but only minor (security) updates”. | |
# Click OK. | # Click OK. | ||
Latest revision as of 12:44, 31 December 2018
Contents
Updating WordPress Instances
Keeping your website(s) secure, you will need to update the WordPress core, as well as plugins and themes. You can do this either manually or automatically.
- Manual updates you control when updates are installed. For example, you can wait and see if installing a particular update can create issues for other WordPress users. However, it is recommended to update regularly to avoid falling behind.
- Automatic updates will give you peace of mind by keeping your WordPress instance up-to-date. However, updates can sometimes break your instance, and with automatic updates, you may not learn about it right away.
Manually update WordPress
- Go to WordPress
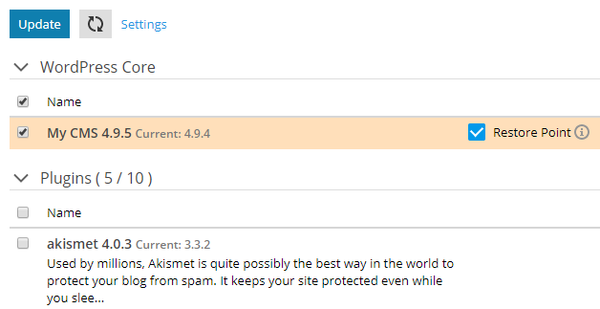
- Click “View” next to “Updates"
- Wait for WordPress Toolkit to load the list of available updates
- Select the updates you want to install.
- Note: If an update of a WordPress core is available, you will see the “Restore Point” checkbox. We recommend to create a restore point in case a roll back is needed.
- Select your updates and Click Update.

Automatic update WordPress
- Go to WordPress and choose the WordPress instance that you want to update automatically.
- Click “View” next to “Updates”, and then click “Settings”.
- Choose the desired automatic update settings.
- You can configure automatic updates separately for WordPress core, plugins, and themes
- Selecting “Yes, all(minor and major)updates” next to “Update WordPress automatically”.
- If your are concerned that applying updates automatically may break your website , select “Yes, but only minor (security) updates”.
- You can configure automatic updates separately for WordPress core, plugins, and themes
- Click OK.
WordPress Themes and Plugins
WordPress Toolkit, you can install and manage themes and plugins on one or more WordPress instances.
Installing Themes and Plugins
You can search for and install themes and plugins found in the wordpress.org plugins repository. You can also upload custom themes and plugins, which is useful if:
- You cannot find a suitable plugin in the wordpress.org repository.
- You need to install your own plugin.
To install themes or plugins on a particular WordPress instance:
- Go to WordPress, go to the appropriate tab of an instance card, and then click Install.
-
- Search for desired item, and then click Install next to the theme or plugin you want to install.

Upload a theme or plugin
- Go to WordPress > The appropriate tab, and then click “Upload”.
- Click Choose File and browse to the location of the ZIP file you want to upload.
- Click Upload.
Activate Theme and Plugins
- Go to WordPress > The appropriate tab, and then click Install.
- Search for themes or plugins, and then select what you want to install.
- Note:Selecting one or more and then performing a new search without installing the selected plugins resets the selection.
- By default, newly installed plugins are activated immediately. You can prevent this by clearing the “Activate after installation” checkbox.
- Click Install on all ... instances.
Removing Themes and Plugins
You can remove themes and plugins from a particular instance or from all instances hosted on the server.
- Go to WordPress, and then go to the appropriate tab of an instance card.
- To remove, click the X icon next to it. To remove several items, select them and click Remove.
- Click Yes.
Updating Themes and Plugins
If a plugin needs updating, you will see “Updates” next to the plugin on the “Plugins” tab of an instance card.

You can do the following:
- Update themes or plugins for one particular instance.
- Update themes or plugins installed on multiple instances.
- Configure automatic updates for plugins.