Difference between revisions of "XMission Email:Android"
m (Jab moved page Android to XMission Email:Android: formatting) |
(Overhaul updating Android webmail config) |
||
| Line 1: | Line 1: | ||
| − | |||
| − | + | == Introduction == | |
| − | + | These setup instructions apply to Android versions 5.0 through 5.1.1 using the Gmail app from Google. Google recently changed the default app away from the standard "Email" app on Android 4.4.4 and earlier with their Gmail app. Despite the name, the Gmail app allows you to configure additional personal IMAP and POP3 accounts with the Gmail account. | |
| − | |||
| − | |||
| − | |||
| − | |||
| − | |||
| − | |||
| − | |||
| − | |||
| − | |||
| − | |||
| − | |||
| − | |||
| − | |||
| − | |||
| − | |||
| − | |||
| − | |||
| − | |||
| − | |||
| − | |||
| − | |||
| − | |||
| − | |||
| − | |||
| − | |||
| − | |||
| + | == Configuration == | ||
| + | |||
| + | # Tap your Gmail app to bring up the interface. Tap the stacked menu icon, next to the text "Inbox" in the upper left corner. | ||
| + | # Scroll to the bottom of pane, and tap "Settings". | ||
| + | # Under "Settings", tap "Add account". | ||
| + | # Tap "Personal (IMAP/POP)" to set up a new personal email account. Tap "Next" | ||
| + | # Add your XMission email address. This is typically you XMission username with "@xmission.com" appended. Tap "Manual setup". | ||
| + | # Tap "Personal (IMAP)" for retrieving your email. Tap "Next". | ||
| + | # Provide your XMission account password. Tap "Next". | ||
| + | # Under "Incoming server settings": | ||
| + | ## Set "SERVER" as "mail.xmission.com | ||
| + | ## Set "SECURITY TYPE" as "SSL/TLS". The "PORT" should automatically change to "993". | ||
| + | ## Tap "Next". | ||
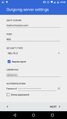
| + | # Under "Outgoing server settings" | ||
| + | ## Set "SECURITY TYPE" to "SSL/TLS". The "PORT" should automatically change to "465". | ||
| + | ## Set "USERNAME" to just your XMission username without the "@xmission.com" address appended. | ||
| + | ## Tap "Next". | ||
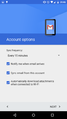
| + | # Verify "Account options" for sync frequency, notifications, and attachments. Tap "Next". | ||
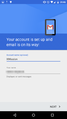
| + | # Give the "Account name (optional)" something meaningful, like "XMission". Also, provide your name as you want it displayed to recipients. Tap "Next". | ||
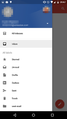
| + | # You should be able to verify the new account, and access the inbox, and other folders. | ||
| + | |||
| + | == Screenshots == | ||
| + | <gallery> | ||
| + | File:Android-email-to-gmail.png|0. Migration from Email to Gmail. | ||
| + | File:Android-webmail-0.png|1. Early setup of webmail. | ||
| + | File:Android-webmail-1.png|2. Accessing the settings. | ||
| + | File:Android-webmail-2.png|3. Adding a new account. | ||
| + | File:Android-webmail-3.png|4. Creating a personal account. | ||
| + | File:Android-webmail-4.png|5. Adding an XMission address. | ||
| + | File:Android-webmail-5.png|6. Enabling IMAP email retrieval. | ||
| + | File:Android-webmail-6.png|7. Adding an XMission account password. | ||
| + | File:Android-webmail-7.png|8. Configuring IMAP settings. | ||
| + | File:Android-webmail-8.png|9. Configuring SMTP settings. | ||
| + | File:Android-webmail-9.png|10. Verifying sync and notification settings. | ||
| + | File:Android-webmail-10.png|11. Providing a meaningful account name. | ||
| + | File:Android-webmail-11.png|12. Successfully navigating the email folders. | ||
| + | </gallery> | ||
[[Category:Client Email Configuration|XMission Email|Android]] | [[Category:Client Email Configuration|XMission Email|Android]] | ||
[[Category:XMission Email|Android]] | [[Category:XMission Email|Android]] | ||
Revision as of 15:50, 26 August 2015
Introduction
These setup instructions apply to Android versions 5.0 through 5.1.1 using the Gmail app from Google. Google recently changed the default app away from the standard "Email" app on Android 4.4.4 and earlier with their Gmail app. Despite the name, the Gmail app allows you to configure additional personal IMAP and POP3 accounts with the Gmail account.
Configuration
- Tap your Gmail app to bring up the interface. Tap the stacked menu icon, next to the text "Inbox" in the upper left corner.
- Scroll to the bottom of pane, and tap "Settings".
- Under "Settings", tap "Add account".
- Tap "Personal (IMAP/POP)" to set up a new personal email account. Tap "Next"
- Add your XMission email address. This is typically you XMission username with "@xmission.com" appended. Tap "Manual setup".
- Tap "Personal (IMAP)" for retrieving your email. Tap "Next".
- Provide your XMission account password. Tap "Next".
- Under "Incoming server settings":
- Set "SERVER" as "mail.xmission.com
- Set "SECURITY TYPE" as "SSL/TLS". The "PORT" should automatically change to "993".
- Tap "Next".
- Under "Outgoing server settings"
- Set "SECURITY TYPE" to "SSL/TLS". The "PORT" should automatically change to "465".
- Set "USERNAME" to just your XMission username without the "@xmission.com" address appended.
- Tap "Next".
- Verify "Account options" for sync frequency, notifications, and attachments. Tap "Next".
- Give the "Account name (optional)" something meaningful, like "XMission". Also, provide your name as you want it displayed to recipients. Tap "Next".
- You should be able to verify the new account, and access the inbox, and other folders.
Screenshots
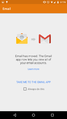
0. Migration from Email to Gmail.

1. Early setup of webmail.
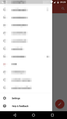
2. Accessing the settings.
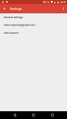
3. Adding a new account.
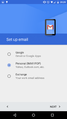
4. Creating a personal account.
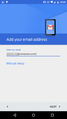
5. Adding an XMission address.
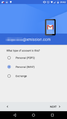
6. Enabling IMAP email retrieval.
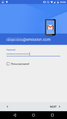
7. Adding an XMission account password.
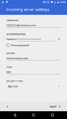
8. Configuring IMAP settings.
9. Configuring SMTP settings.
10. Verifying sync and notification settings.
11. Providing a meaningful account name.
12. Successfully navigating the email folders.


