DNS
What is DNS?
Overview
DNS (Domain Name System) is the protocol computers use to look up domain names to find servers on the Internet. Simply put, it translates a recognizable name like xmission.com into an IP address like 198.60.22.4. In the background your computer connects to a DNS Server (i.e., Name Server) which manages a database that maps domain names to IP addresses.
When you connect your computer to the Internet, it automatically assigns an IP address that comes from a DHCP (Dynamic Host Configuration Protocol) server on your network. The job of this DHCP server is to make sure your computer has a IP address and other network configurations it needs to give you access online. Under normal circumstances, XMission connectivity customers will use XMission's DNS. This is handled automatically when you connect. You can refer to this as your Primary DNS.
If you run a business we know that having a reliable connection to the internet is essential since downtime can cause a loss of sales and unhappy customers. In a perfect world we would never have an outage; however outages can and do occur. Therefore, configuring your network for redundancy can be important to mitigate the risk of an outage. DNS resilience is determined by the steps you take to ensure your business, or home network is available to the Internet should your primary DNS service with XMission experience any interruption. Setting up both primary and secondary DNS servers can help keep you online.
Many alternative DNS providers, like OpenDNS and Google's Public DNS, allow you to use their free service as a primary or secondary DNS. Setting them up will take a little configuration on your side but help mitigate issues during an outage: if your primary DNS is unavailable then your secondary name service can be available for redundancy. More technically savvy customers might choose to run a DNS caching server.
XMission DNS
Overview
XMission provides basic and advanced name service options, depending on customer needs.
Basic DNS Setup
XMissions DNS: 198.60.22.2, 198.60.22.22.
All XMission connectivity customers should automatically obtain these two IP addresses when connecting to the Internet. If you need assistance adding these to your connection, contact support.
Advanced DNS Configuration Options
While XMission's name service is very reliable we encourage businesses and individuals who prioritize always being online to consider some advanced configuration options including DNS caching and configuring additional offsite service like OpenDNS and Googles Public DNS for redundancy.
What is XMission's Primary DNS Server? XMissions Primary DNS server is 198.60.22.2. This server is responsible for any new entries and updates from DNS zones. It holds the "Master Copy" of all DNS records.
What is XMission's Secondary DNS Server? XMissions Secondary DNS server is 198.60.22.22. This server is mainly for redundancy. It will simulate what is on the Primary DNS server and relatively act the same as our Primary DNS server.
What is XMission's authoritative name server? XMission's authoritative name server is ns.xmission.com, with ns1.xmission.com, ns2.xmission.com and ns3.xmission.com configured for redundancy.
What are tertiary, quaternary, quinary, etc. DNS Servers? Additional name servers are for pure redundancy. You can have many other DNS servers for your connections. Often these servers are located offsite, whereas primary DNS servers are onsite. If both of XMission's Primary and Secondary DNS servers go down, additional DNS servers can help mitigate some aspects of an outage (i.e., ns2.xmission.com and ns3.xmission.com are located in separate cities on the West coast of the US for this purpose).
Adding and Editing DNS Zone Files
Adding DNS
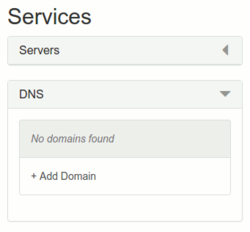
Adding DNS for your domain is a very simple process in your XMission Control Panel. You will need to navigate to the services tab, and expand the DNS tab. Here, you can Add Domain if it is your first domain being added, or edit existing domain zone files.
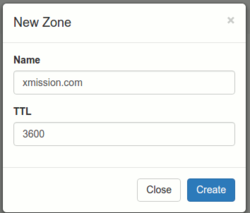
When you are adding a new domain to have DNS hosting for, you will be prompted to enter the FQDN (Frequently queried domain name) and the TTL (Time to live).
Zone Files
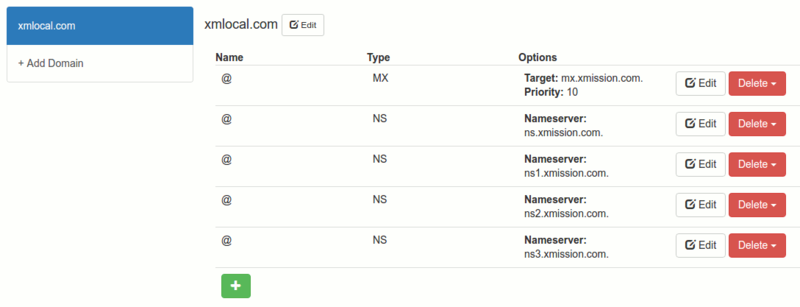
After successfully adding the domain to your DNS hosting services, you will see a basic template of the zone file which will include the nameservers and MX record.
Adding a New Record
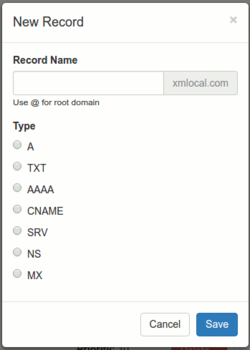
If you need to expand upon your zone file by adding new records, clicking on the green '+' will open a new window in which you can choose what record you want to add.
Domain Alias
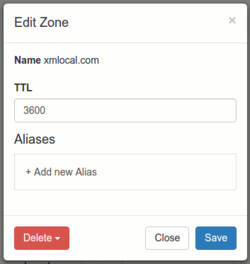
If you need to add an Alias to your FQDN, you can click the Edit button next to your domain name, and add as many alias' as are needed.
DNS Caching
Overview
A DNS cache is a local database copy of all domain names translated to IP addresses which runs on server software at your office, for instance. As such, it can temporarily mitigate most issues related to a DNS outage.
DNS Caching Server
A DNS caching server can be the most reliable way to create redundancy for your office and hosting servers. Although it does require some technical know-how, running a DNS caching server is easier to setup and maintain than a full fledged name server. Popular open source software BIND is often used for DNS caching. Since we only recommend technically savvy customers run a caching server, we'll forgo including further details in this overview document.
Note that an on site caching server can also speed up DNS queries for other software like mail servers. Occasionally, there may be issues with a DNS server caching information that is no longer valid. A DNS flush on your server software will update the information to be valid.
DNS Cache Flushing on Your Computer
Sometimes, the DNS cache on your computer might also need to be flushed. If rebooting your computer doesn't resolve the issue, try to flush your cache as per these instructions below.
Windows DNS FLush
Windows Vista/7
Click the start button on the bottom left of your screen and navigate to the command prompt (Start > All Programs > Accessories > Command Prompt)
Make sure that you right click on the command prompt application and choose "Run as Administrator"
Type in the command ipconfig /flushdns
Windows 8/8.1
Ensure that you're on the Windows 8 Start Screen.
Simply type cmd and the Windows search bar will appear on the right hand side with search results.
Right click on Command Prompt and click Run as administrator.
Type in the command ipconfig /flushdns
Windows 10
Click the start buttom on the bottom left of your screen, and type in "cmd".
Right click on the command prompt application and choose "Run as Administrator"
type in the command ipconfig /flushdns
Mac OSX DNS Flush
Yosemite
Mac OS X 10.10, you need to do the following:
Open up the command terminal.
Run the command sudo discoveryutil udnsflushcaches
Lion, Mountain Lion, Mavericks
Mac OS X 10.7, 10.8 or 10.9, you need to do the following:
Open up the command terminal.
Run the command sudo killall -HUP mDNSResponder
Snow Leopard
Mac OS X 10.6, you need to do the following:
Open up a command terminal.
Run the command sudo dscacheutil -flushcache
Leopard and below
Mac OS X 10.5.1 or below, you need to do the following:
Open a command terminal.
Run the command sudo lookupd -flushcache
Linux DNS Flush
Open up a command terminal
Run the command sudo /etc/init.d/nscd restart
Third Party DNS Options
Overview
Relying on a third party for redundant name service is by far the simplest option to add redundancy and hence resiliency for your office and any hosting services your business relies upon (PBX, Colocation, etc). The instructions below can be used to add one or more of these alternative name servers to the configuration for your server, network router, or workstation.
Note that XMission recommends you continue to use at least our primary name server but then augment that with one or more off site options for redundancy.
OpenDNS
Probably the oldest public DNS service still around. They offer a variety of free and paid services. Their IP address are 208.67.222.222 and 208.67.220.220
Google Public DNS
You may have see these number or heard of them and didn't know what they were. Well now you know Google Public DNS IP address are 8.8.8.8 and 8.8.4.4
Google Public DNS configuration guide
Account Home
Services
- Services
