Difference between revisions of "Hosted Email: Admin Panel"
(→Overview/Logging In) |
|||
| (61 intermediate revisions by 4 users not shown) | |||
| Line 4: | Line 4: | ||
As a domain administrator, you will be able to create and maintain the following: | As a domain administrator, you will be able to create and maintain the following: | ||
| − | * | + | *[https://wiki.xmission.com/Hosted_Email:_Admin_Panel#Creating_an_Email_Account Email accounts] |
| − | * | + | *[https://wiki.xmission.com/Hosted_Email:_Admin_Panel#Creating_an_Alias Mailbox aliases] |
| − | *Distribution lists | + | *[https://wiki.xmission.com/Hosted_Email:_Admin_Panel#Creating_a_Distribution_List Distribution lists] |
| − | * | + | *[https://wiki.xmission.com/Zimbra_Archive_and_Discovery#Zimbra_Archive_and_Discovery Zimbra Archive & Discovery] |
| + | *[https://wiki.xmission.com/Zimbra_Connect#Zimbra_Connect Zimbra Connect] | ||
| + | *Resources | ||
| − | To login to the domain administration console, go to https://zimbraadmin.xmission.com/ and login with your administrative username and password. | + | To login to the domain administration console, go to https://zimbraadmin.xmission.com/ and login with your administrative username and password. Domain administrators can also login from the dropdown menu next to your mailbox name in the top right corner of the webmail session. Click on 'Admin Console' to proceed. |
| + | ==Domain Administrator Responsibilities== | ||
| + | |||
| + | It is important to understand that as domain administrators you are responsible for changing passwords, creating distribution lists, setting email forwards, managing mailboxes, training on phishing, and etc. Our support policy for email is clearly outlined at: https://xmission.com/legal_policies#emlsup We require domain administrators be added as Technical contacts on your billing account in order to receive advanced assistance from our support staff. Please keep contacts up-to-date in the [https://xmission.com/control account management portal] or contact [https://xmission.com/contact XMission Billing] for assistance. | ||
| + | |||
| + | Phishing and email scams are on the rise. It is important to educate yourself and your mailbox holders on how to avoid it. Reference this guide on | ||
| + | [https://wiki.xmission.com/Phishing_and_Email_Scams understanding phishing]. | ||
| + | |||
| + | ==Email Domain Health== | ||
| + | |||
| + | An important part of effective business email mean protecting your domain with some simple settings to improve delivery and reduce fraud. | ||
| + | |||
| + | XMission advises implementing SPF and DKIM on domains. These are two simple methods domain owners have of "authorizing" specific email servers to send mail on their behalf and prevent abuse. [https://wiki.xmission.com/SPF_and_DKIM How to configure SPF and DKIM] | ||
==About the Administrative Console== | ==About the Administrative Console== | ||
| Line 50: | Line 64: | ||
*'''Distribution Lists:''' Lists all distribution lists. You can create new distribution lists and add or delete members of a distribution list. | *'''Distribution Lists:''' Lists all distribution lists. You can create new distribution lists and add or delete members of a distribution list. | ||
| − | *'''Resources:''' | + | *'''Resources:''' This lists locations or equipment that can be scheduled from your Calendar. Here is where you can create new resources and set the scheduling policy for the resource. |
[[Image:3zimbraadminpanel.png]] | [[Image:3zimbraadminpanel.png]] | ||
| − | ==Creating an Account== | + | ==Creating an Email Account== |
| − | Select '''Manage''' and then '''Accounts''' section. Click on the gear icon [[Image:gear_icon.png]] and select '''New'''. This will open a dialogue asking for information about the email | + | Select '''Manage''' and then '''Accounts''' section. Click on the gear icon [[Image:gear_icon.png]] and select '''New'''. This will open a dialogue asking for information about the email mailbox you are about to create. Enter the following required information: |
| − | * '''Account Name''': This will be the | + | * '''Account Name''': This will be the mailbox account that you are about to create. In this example, we are creating "bobdobbs@xdesign.com." |
* '''First Name''': The first name of the email user. | * '''First Name''': The first name of the email user. | ||
* '''Last Name''': The last name of the email user. | * '''Last Name''': The last name of the email user. | ||
[[Image:1zimbraaddaccount.png]] | [[Image:1zimbraaddaccount.png]] | ||
| + | When creating a new mailbox account you will set the Class of Service (CoS) under '''General Information / Account Setup / Class of Service'''. Don't forget to deselect the "[ ] auto" box to enter the class type. | ||
| + | |||
| + | You may mix and match Class of Service (CoS) for mailbox accounts in your domain to maximize benefits for your organization. Details below. | ||
| + | |||
| + | Something to note, XMission identifies a billable Zimbra account as mailbox with a physical email Inbox and typically belonging to one person. So even if it is not "active" but still provisioned, it will count toward billing. Example, a mailbox set to "closed" or "maintenance" status remains billable. | ||
| + | |||
| + | ==Class of Service== | ||
| + | |||
| + | To '''upgrade''' an existing account, or to change existing accounts, simply log in to the admin interface, click on '''"Manage"''' and select the user by double-clicking on the name. Inside the '''"General Information"''' pane you will see '''"Account Setup"''' in the middle of the page. In this area you will find '''"Class of Service"''' with an input box next to it and the "[x] auto" box checked. Deselect the "[ ] auto" box and type '''"xmpremium"''' or '''"xmbase"''' in the field and then hit '''"Save"''' towards the top right of the window. Your account is now set to the selected service level with all the features and storage associated with the account type. | ||
| − | Click the "Finish" button. You will be returned to the main admin screen, and the new account will have been created. | + | Click the '''"Finish"''' button. You will be returned to the main admin screen, and the new account will have been created at the established service level. |
| + | NOTE: If the "Class of Service" field is not available to you, you may need to add your admin account's email address to the "admins" distribution list on your domain and wait up to fifteen minutes. Some older accounts do not have this setup automatically. See [https://wiki.xmission.com/Zimbra_Hosting_Admin#Granting_Domain_Administrator_Access Granting Domain Administrator Access] for more details. | ||
| − | ==Updating Account | + | ==Updating Account Information== |
To add, change, or remove information from an account, simply double-click the account you want to edit. Alternatively, you can right-click the account you wish to update and choose "Edit" from the pop-up menu. | To add, change, or remove information from an account, simply double-click the account you want to edit. Alternatively, you can right-click the account you wish to update and choose "Edit" from the pop-up menu. | ||
| + | ==Change Password== | ||
| + | |||
| + | All Zimbra domain administrator should read this quick blog post on email security: https://xmission.com/blog/2017/10/17/best-practices-for-zimbra-email-security | ||
| + | |||
| + | Changing your end-user mailbox password through the Zimbra [https://zimbraadmin.xmission.com domain admin control panel] is easy, but first let's review XMission password best practices. | ||
| + | |||
| + | '''XMission Zimbra Password requirements:''' | ||
| + | |||
| + | XMission recommends secure passphrases consisting of five to six words, with a few special characters and numbers, since they can be much easier to remember. | ||
| + | |||
| + | * Ideally it is best to use longer, more complex passphrases to properly protect your mailboxes, and your company, from hackers. Our Zimbra system supports passwords up to 128 characters. We advise using a minimum passphrase length of 12-15 characters with 25-28 characters providing very reasonable security. | ||
| + | * Shorter passwords require use of at least 1 of the following: UPPER CASE letter, lower case letter, special characters, and a numeral to meet minimum security requirements. | ||
| + | * Passwords expire after 1 year and must be changed at that time. Changing more frequently is advised. | ||
| + | * You cannot re-use your current password. | ||
| + | * Please allow 15 minutes for the new password to propagate through the system. | ||
| + | * Write credentials down in a secure place until you memorize it then destroy the note. | ||
| + | * Here is a quick and easy to understand visual tutorial on password security: [https://xmission.com/blog/2017/10/17/best-practices-for-zimbra-email-security | https://xkcd.com/936/ ] | ||
| + | |||
| + | '''Three ways to change passwords from domain admin control panel:''' | ||
| + | * Inside the control panel main page click on "Manage" in left column. Right-mouse click on the mailbox name to reveal a drop down menu, select "Change password." | ||
| + | * Inside the control panel main page click on "Manage" in left column and highlight a mailbox. Now right-mouse click on the gear icon in the top right corner. Select "Change password". | ||
| + | * Inside the control panel main page click on "Manage" in left column and double click on the desired mailbox. When it opens the settings page of the mailbox use the "Password" area to change the password. | ||
| + | |||
| + | NOTE: XMission Zimbra servers will allow a password as short as 12 characters. Short passwords are poor security. Please take the time to protect your company email data buy using a passphrase in the 25-28 character length. | ||
| + | |||
| + | ==Password Expiration and Failed Login Attempts== | ||
| + | Please note the following details about XMission's email password expiration and failed login attempts policy. | ||
| + | |||
| + | Should you ever have an end-user mailbox that is not allowing login there are two primary reasons for this. | ||
| + | * The password has expired. | ||
| + | * There have been too many failed login attempts to the account causing it to be temporarily suspended. | ||
| + | |||
| + | ==== Expired Password ==== | ||
| + | |||
| + | All XMission email passwords must be changed once yearly. XMission sends email notices to the user mailbox 2 (two) weeks before expiration. Please ask your mailbox owners to change their password in a timely manner. | ||
| + | |||
| + | Domain administrators are *not* emailed about the user mailbox need to change their password. Repeat, domain administrators are not emailed about password expirations. | ||
| + | |||
| + | ==== Failed Login Attempt - Mailbox Access Suspension ==== | ||
| + | |||
| + | Failed login attempt account suspension practices are a way to safeguard mailboxes from brute force attacks where a bad actor is trying to access the sensitive information inside. XMission protects customer mailboxes by temporarily suspending mail accounts with too many failed login attempts. This prevents new logins and halts all access on active mail sessions. Incoming email is not restricted. | ||
| + | |||
| + | If you, or another entity, are trying to access the account with too many failed password attempts within the monitoring cycle, the system blocks access for a short period of time, after which you can again attempt to authenticate with correct credentials. | ||
| + | |||
| + | '''Failed login attempt definition:''' Improper entry of a password for a valid mailbox. | ||
| + | |||
| + | '''How failed login attempts are measured and enforced:''' When the first failed login attempt occurs, the monitoring cycle begins. Thereafter, each time a unique wrong password fails, that adds to the count. | ||
| + | |||
| + | It is important to note that when the ''same'' wrong password is used, from any number of IP addresses or devices, it only counts as one (1) failed login attempt. | ||
| + | |||
| + | During the monitoring cycle, if additional failed login attempts are made using a different password from the original attempt, it add to the failed login attempt total. IE: Bad password "A" activates monitoring period. A second unique password "B" is used bringing the total to two (2) failed attempts. If password "A" is used again, it counts as another new unique password totaling three (3) failed attempts. | ||
| + | |||
| + | Once the maximum number of failed attempts is reached, access to the mailbox is temporarily suspended. | ||
| + | |||
| + | ==== Troubleshooting ==== | ||
| + | |||
| + | Mailbox accounts having failed login issues appear to have the same symptoms as an expired password. The way to test is to access webmail, https://zimbra.xmission.com, with your credentials. If the password is expired it will prompt you to set a new password immediately. If the account is locked out, it will simply not validate with the credentials until the suspension period ends. | ||
| + | |||
| + | If an account is temporarily suspended for too many failed password attempts you need to either wait for the suspension period to pass, reset the mailbox status to active in the domain admin panel, or contact XMission Support to have the suspension manually removed. | ||
| + | |||
| + | Domain administrators can change mailbox status and passwords via the domain admin interface. | ||
| + | |||
| + | NOTE: Use of Two-Factor Authentication (2FA) does not prevent account suspension due to failed authentication attempts. | ||
| + | |||
| + | ==Mailbox locked for abuse== | ||
| + | |||
| + | A user mailbox can also be locked for abuse. This abuse can be due to any of the following reasons; | ||
| + | * Successfully compromised by a phishing attempt and shared their password with someone they shouldn't have. | ||
| + | * Use of a previously compromised password on another Internet site or service. | ||
| + | * Malware on a computer or device. | ||
| + | * Rootkit on the computer. | ||
| + | |||
| + | ''Symptoms of abuse:'' | ||
| + | |||
| + | Domain administrators often ask why a mailbox was locked for a spam run when they do not see evidence of malicious messages in the Sent folder. The primary reason for this is because the spammers use SMTP mail applications that do not sync the Sent mail folder. Only messages sent via the Zimbra webmail interface, via Outlook with the Zimbra Connector, or sent via ActiveSync (Exchange) configuration on mobile devices, will sync Sent messages to the mail system. So a bad actor can send copious amounts of unwanted email quickly and with no trace the end user can see. However, XMission has logs for all messages sent which we use to identify and lock accounts as well as to train system rules to prevent future abuse. | ||
| + | |||
| + | Determining why a mailbox has been locked for abuse can be difficult. XMission will do their best to provide data on what was compromised and how. In some cases this is possible, in others it is not. Most often phishing and re-used passwords are the primary attack vector resulting in a locked user mailbox. | ||
| + | |||
| + | "The remedy:" | ||
| + | |||
| + | Regardless of the "how" all compromised mailbox users are required to change their password immediately to continue using the service. It is imperative that domain administrators do not re-use passwords or set poor temporary passwords. | ||
| + | |||
| + | We strongly advise in the use of long passwords (pass phrases) and password managers such as BitWarden, Keepass, and similar. | ||
| + | |||
| + | Additional compromises of the same mailbox will result in a small fine which we hope is just enough to encourage proper mailbox security. You can read about this policy here: https://xmission.com/blog/2019/05/14/our-new-compromised-email-policy | ||
==Creating an Alias== | ==Creating an Alias== | ||
| Line 82: | Line 191: | ||
| − | ==Updating Alias | + | ==Updating Alias Information== |
To add, change, or remove information from an alias, simply double-click the alias you want to edit. Alternatively, you can right-click the alias you wish to update and choose "Edit" from the pop-up menu. | To add, change, or remove information from an alias, simply double-click the alias you want to edit. Alternatively, you can right-click the alias you wish to update and choose "Edit" from the pop-up menu. | ||
| Line 145: | Line 254: | ||
NOTE: You may also use Distribution Lists to forward domain based emails without needing an account for the specific address. For example, you may need to forward ''project@mydomain.com'' to ''johndoe@someotheremail.com''. The advantage of using a Distribution List is that you eliminate the costs associated with maintaining an account just for forwarding. | NOTE: You may also use Distribution Lists to forward domain based emails without needing an account for the specific address. For example, you may need to forward ''project@mydomain.com'' to ''johndoe@someotheremail.com''. The advantage of using a Distribution List is that you eliminate the costs associated with maintaining an account just for forwarding. | ||
| + | ==Granting Domain Administrator Access== | ||
| + | |||
| + | To grant an existing mailbox domain administrator privileges start by logging in to the admin interface. Next, select their account then double click to edit. Inside the General Information area, the second category down is "Account Setup." Check the "Administrator" checkbox below "Class of Service." Once checked, a field will appear below, "Administrator role." Enter "admins@yourdomain.com", replacing yourdomain.com with the domain you are granting access rights for. This will add the user to a distribution list, "admins", on your domain, which grants the privileges. | ||
| + | |||
| + | Click "Save" near top-right corner to complete the assignment of rights. | ||
| + | |||
| + | Note that if the "Administrator" checkbox does not exist, you may need to add yourself to the "admins" distribution list manually and wait up to fifteen minutes. | ||
==Importing Accounts from Exchange== | ==Importing Accounts from Exchange== | ||
| − | Select the | + | This article has moved: https://wiki.xmission.com/Zimbra_Migration:_Exchange_Import_Wizard |
| + | |||
| + | ==Deleting a Zimbra Mailbox== | ||
| + | |||
| + | There are two fairly simple ways to properly delete a Zimbra mailbox from the XMission system. | ||
| + | |||
| + | * Log into the Zimbra domain administration panel https://zimbraadmin.xmission.com and select the "Manage" area on the left. Once in the management area you simply highlight the mailbox and then right-mouse click to show the option menu. Select "Delete" and confirm the mailbox deletion request. | ||
| + | |||
| + | * From inside the domain administration panel you may also highlight the mailbox name and then click on the gear wheel in the top right corner of the browser screen to display an options menu. Inside this menu select "Delete" and confirm the deletion request. | ||
| + | |||
| + | Notes: | ||
| + | * Changing mailbox status is not the same as deletion. All provisioned mailboxes are billable. | ||
| + | * Deletion of a mail domain cannot be completed via the domain admin interface and requires contacting XMission billing department. | ||
| + | * Be certain not to delete resource accounts such as galsync or distribution lists unless you know they are no longer needed. Doing so can impact mail performance. | ||
| + | |||
| + | == Zimbra Themes == | ||
| + | |||
| + | You can see all the themes [https://wiki.xmission.com/Hosted_Email:_Admin_Panel/Zimbra_Themes here] | ||
| − | |||
| − | [[Category: | + | [[Category:Zimbra|Admin Panel]] |
{{footer}} | {{footer}} | ||
Latest revision as of 16:00, 27 January 2023
Contents
- 1 Overview/Logging In
- 2 Domain Administrator Responsibilities
- 3 Email Domain Health
- 4 About the Administrative Console
- 5 Creating an Email Account
- 6 Class of Service
- 7 Updating Account Information
- 8 Change Password
- 9 Password Expiration and Failed Login Attempts
- 10 Mailbox locked for abuse
- 11 Creating an Alias
- 12 Updating Alias Information
- 13 Creating a Distribution List
- 14 Updating Distribution List information
- 15 Forwarding Email to Another Address
- 16 Granting Domain Administrator Access
- 17 Importing Accounts from Exchange
- 18 Deleting a Zimbra Mailbox
- 19 Zimbra Themes
Overview/Logging In
The Zimbra domain administration console is the browser-based user interface used to centrally manage user accounts and most settings.
As a domain administrator, you will be able to create and maintain the following:
- Email accounts
- Mailbox aliases
- Distribution lists
- Zimbra Archive & Discovery
- Zimbra Connect
- Resources
To login to the domain administration console, go to https://zimbraadmin.xmission.com/ and login with your administrative username and password. Domain administrators can also login from the dropdown menu next to your mailbox name in the top right corner of the webmail session. Click on 'Admin Console' to proceed.
Domain Administrator Responsibilities
It is important to understand that as domain administrators you are responsible for changing passwords, creating distribution lists, setting email forwards, managing mailboxes, training on phishing, and etc. Our support policy for email is clearly outlined at: https://xmission.com/legal_policies#emlsup We require domain administrators be added as Technical contacts on your billing account in order to receive advanced assistance from our support staff. Please keep contacts up-to-date in the account management portal or contact XMission Billing for assistance.
Phishing and email scams are on the rise. It is important to educate yourself and your mailbox holders on how to avoid it. Reference this guide on understanding phishing.
Email Domain Health
An important part of effective business email mean protecting your domain with some simple settings to improve delivery and reduce fraud.
XMission advises implementing SPF and DKIM on domains. These are two simple methods domain owners have of "authorizing" specific email servers to send mail on their behalf and prevent abuse. How to configure SPF and DKIM
About the Administrative Console
The area above the Content pane includes the Search and Help functions.
Search allows you to quickly find accounts, aliases, distribution lists and resources for editing.
Help utilizes Zimbra’s wiki, forums, and documentation. This is a powerful unified search to quickly find answers to common questions.
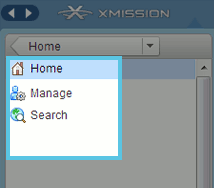
The Navigation pane on the left includes the following sections:
- Home: At any time, clicking here will return you to the administrative Home options.
- Manage: Clicking here will permit you to create and edit any accounts, aliases, distribution lists, and resources for your domain(s).
- Help: utilizes Zimbra’s wiki, forums, and documentation. This is a powerful unified search to quickly find answers to common questions.
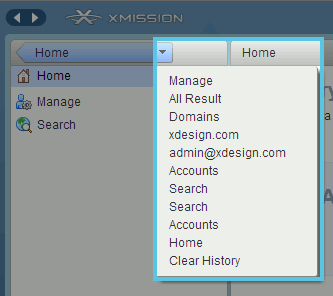
Alternatively, you can also click on the arrow beside the "Home" button. This will give you the same options listed above, as well as recent searches and the options available under "Manage." In this example, the recent search was for "xdesign.com."
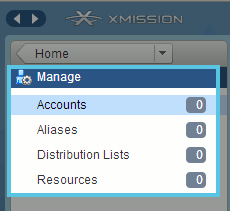
Clicking on "Manage" either way will permit you to make changes to your existing accounts, aliases, distribution lists, and resources.
- Accounts: Lists all accounts. In the Accounts folder, you create and manage end-user accounts, setting options, class of service, passwords and aliases for an account.
- Aliases: Lists all aliases that have been created in Accounts. You can use the Move Alias feature from the toolbar to move an alias from one account to another.
- Distribution Lists: Lists all distribution lists. You can create new distribution lists and add or delete members of a distribution list.
- Resources: This lists locations or equipment that can be scheduled from your Calendar. Here is where you can create new resources and set the scheduling policy for the resource.
Creating an Email Account
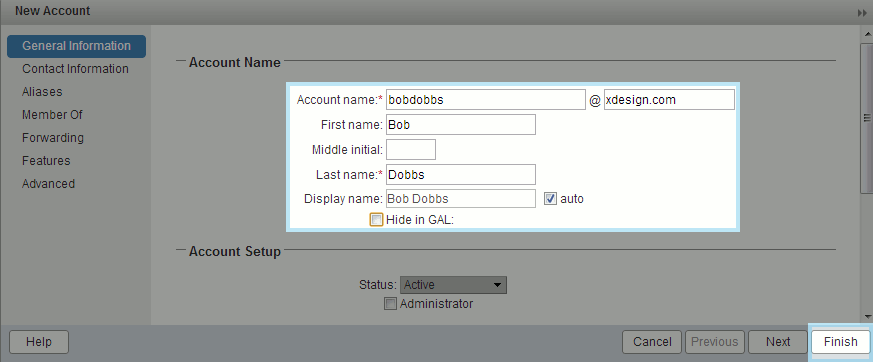
Select Manage and then Accounts section. Click on the gear icon ![]() and select New. This will open a dialogue asking for information about the email mailbox you are about to create. Enter the following required information:
and select New. This will open a dialogue asking for information about the email mailbox you are about to create. Enter the following required information:
- Account Name: This will be the mailbox account that you are about to create. In this example, we are creating "bobdobbs@xdesign.com."
- First Name: The first name of the email user.
- Last Name: The last name of the email user.
When creating a new mailbox account you will set the Class of Service (CoS) under General Information / Account Setup / Class of Service. Don't forget to deselect the "[ ] auto" box to enter the class type.
You may mix and match Class of Service (CoS) for mailbox accounts in your domain to maximize benefits for your organization. Details below.
Something to note, XMission identifies a billable Zimbra account as mailbox with a physical email Inbox and typically belonging to one person. So even if it is not "active" but still provisioned, it will count toward billing. Example, a mailbox set to "closed" or "maintenance" status remains billable.
Class of Service
To upgrade an existing account, or to change existing accounts, simply log in to the admin interface, click on "Manage" and select the user by double-clicking on the name. Inside the "General Information" pane you will see "Account Setup" in the middle of the page. In this area you will find "Class of Service" with an input box next to it and the "[x] auto" box checked. Deselect the "[ ] auto" box and type "xmpremium" or "xmbase" in the field and then hit "Save" towards the top right of the window. Your account is now set to the selected service level with all the features and storage associated with the account type.
Click the "Finish" button. You will be returned to the main admin screen, and the new account will have been created at the established service level.
NOTE: If the "Class of Service" field is not available to you, you may need to add your admin account's email address to the "admins" distribution list on your domain and wait up to fifteen minutes. Some older accounts do not have this setup automatically. See Granting Domain Administrator Access for more details.
Updating Account Information
To add, change, or remove information from an account, simply double-click the account you want to edit. Alternatively, you can right-click the account you wish to update and choose "Edit" from the pop-up menu.
Change Password
All Zimbra domain administrator should read this quick blog post on email security: https://xmission.com/blog/2017/10/17/best-practices-for-zimbra-email-security
Changing your end-user mailbox password through the Zimbra domain admin control panel is easy, but first let's review XMission password best practices.
XMission Zimbra Password requirements:
XMission recommends secure passphrases consisting of five to six words, with a few special characters and numbers, since they can be much easier to remember.
- Ideally it is best to use longer, more complex passphrases to properly protect your mailboxes, and your company, from hackers. Our Zimbra system supports passwords up to 128 characters. We advise using a minimum passphrase length of 12-15 characters with 25-28 characters providing very reasonable security.
- Shorter passwords require use of at least 1 of the following: UPPER CASE letter, lower case letter, special characters, and a numeral to meet minimum security requirements.
- Passwords expire after 1 year and must be changed at that time. Changing more frequently is advised.
- You cannot re-use your current password.
- Please allow 15 minutes for the new password to propagate through the system.
- Write credentials down in a secure place until you memorize it then destroy the note.
- Here is a quick and easy to understand visual tutorial on password security: | https://xkcd.com/936/
Three ways to change passwords from domain admin control panel:
- Inside the control panel main page click on "Manage" in left column. Right-mouse click on the mailbox name to reveal a drop down menu, select "Change password."
- Inside the control panel main page click on "Manage" in left column and highlight a mailbox. Now right-mouse click on the gear icon in the top right corner. Select "Change password".
- Inside the control panel main page click on "Manage" in left column and double click on the desired mailbox. When it opens the settings page of the mailbox use the "Password" area to change the password.
NOTE: XMission Zimbra servers will allow a password as short as 12 characters. Short passwords are poor security. Please take the time to protect your company email data buy using a passphrase in the 25-28 character length.
Password Expiration and Failed Login Attempts
Please note the following details about XMission's email password expiration and failed login attempts policy.
Should you ever have an end-user mailbox that is not allowing login there are two primary reasons for this.
- The password has expired.
- There have been too many failed login attempts to the account causing it to be temporarily suspended.
Expired Password
All XMission email passwords must be changed once yearly. XMission sends email notices to the user mailbox 2 (two) weeks before expiration. Please ask your mailbox owners to change their password in a timely manner.
Domain administrators are *not* emailed about the user mailbox need to change their password. Repeat, domain administrators are not emailed about password expirations.
Failed Login Attempt - Mailbox Access Suspension
Failed login attempt account suspension practices are a way to safeguard mailboxes from brute force attacks where a bad actor is trying to access the sensitive information inside. XMission protects customer mailboxes by temporarily suspending mail accounts with too many failed login attempts. This prevents new logins and halts all access on active mail sessions. Incoming email is not restricted.
If you, or another entity, are trying to access the account with too many failed password attempts within the monitoring cycle, the system blocks access for a short period of time, after which you can again attempt to authenticate with correct credentials.
Failed login attempt definition: Improper entry of a password for a valid mailbox.
How failed login attempts are measured and enforced: When the first failed login attempt occurs, the monitoring cycle begins. Thereafter, each time a unique wrong password fails, that adds to the count.
It is important to note that when the same wrong password is used, from any number of IP addresses or devices, it only counts as one (1) failed login attempt.
During the monitoring cycle, if additional failed login attempts are made using a different password from the original attempt, it add to the failed login attempt total. IE: Bad password "A" activates monitoring period. A second unique password "B" is used bringing the total to two (2) failed attempts. If password "A" is used again, it counts as another new unique password totaling three (3) failed attempts.
Once the maximum number of failed attempts is reached, access to the mailbox is temporarily suspended.
Troubleshooting
Mailbox accounts having failed login issues appear to have the same symptoms as an expired password. The way to test is to access webmail, https://zimbra.xmission.com, with your credentials. If the password is expired it will prompt you to set a new password immediately. If the account is locked out, it will simply not validate with the credentials until the suspension period ends.
If an account is temporarily suspended for too many failed password attempts you need to either wait for the suspension period to pass, reset the mailbox status to active in the domain admin panel, or contact XMission Support to have the suspension manually removed.
Domain administrators can change mailbox status and passwords via the domain admin interface.
NOTE: Use of Two-Factor Authentication (2FA) does not prevent account suspension due to failed authentication attempts.
Mailbox locked for abuse
A user mailbox can also be locked for abuse. This abuse can be due to any of the following reasons;
- Successfully compromised by a phishing attempt and shared their password with someone they shouldn't have.
- Use of a previously compromised password on another Internet site or service.
- Malware on a computer or device.
- Rootkit on the computer.
Symptoms of abuse:
Domain administrators often ask why a mailbox was locked for a spam run when they do not see evidence of malicious messages in the Sent folder. The primary reason for this is because the spammers use SMTP mail applications that do not sync the Sent mail folder. Only messages sent via the Zimbra webmail interface, via Outlook with the Zimbra Connector, or sent via ActiveSync (Exchange) configuration on mobile devices, will sync Sent messages to the mail system. So a bad actor can send copious amounts of unwanted email quickly and with no trace the end user can see. However, XMission has logs for all messages sent which we use to identify and lock accounts as well as to train system rules to prevent future abuse.
Determining why a mailbox has been locked for abuse can be difficult. XMission will do their best to provide data on what was compromised and how. In some cases this is possible, in others it is not. Most often phishing and re-used passwords are the primary attack vector resulting in a locked user mailbox.
"The remedy:"
Regardless of the "how" all compromised mailbox users are required to change their password immediately to continue using the service. It is imperative that domain administrators do not re-use passwords or set poor temporary passwords.
We strongly advise in the use of long passwords (pass phrases) and password managers such as BitWarden, Keepass, and similar.
Additional compromises of the same mailbox will result in a small fine which we hope is just enough to encourage proper mailbox security. You can read about this policy here: https://xmission.com/blog/2019/05/14/our-new-compromised-email-policy
Creating an Alias
Select Manage and then Aliases section. Click on the gear icon ![]() and select New. This will open a dialogue asking for information about the email alias you wish to create. Enter the following required information:
and select New. This will open a dialogue asking for information about the email alias you wish to create. Enter the following required information:
- Alias: This is the aliased address you will create. In this example, we are adding "bob.dobbs@xdesign.com."
- Target Account: This is the actual email box that will receive any emails directed to the aliases address.
Click "Ok" to add your new alias.
Updating Alias Information
To add, change, or remove information from an alias, simply double-click the alias you want to edit. Alternatively, you can right-click the alias you wish to update and choose "Edit" from the pop-up menu.
Creating a Distribution List
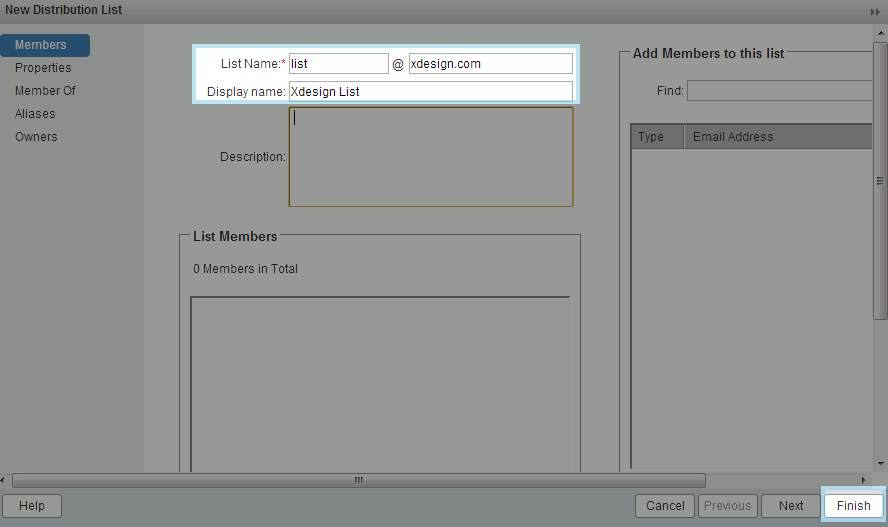
Select Manage and then Distribution Lists section. Click on the gear icon ![]() and select New. This will open a dialogue asking for information about the distribution list you wish to create. Enter the following required information:
and select New. This will open a dialogue asking for information about the distribution list you wish to create. Enter the following required information:
- List Name: This will be the email address for the mailing list.
- Display Name: This can be a descriptive name for the list.
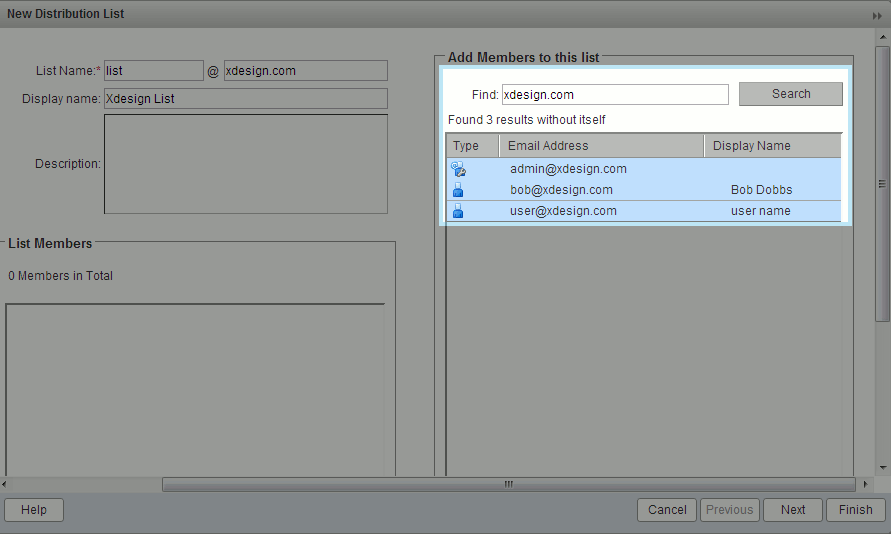
To add email addresses to the list, scroll a bit to the right and you will see a "Search" button below the Add Members to this list section. If you want add email addresses that are withing your Zimbra package, search for the appropriate domain name(s). In this case, we searched for "xdesign.com." Highlight any results you would like to be added to the list.
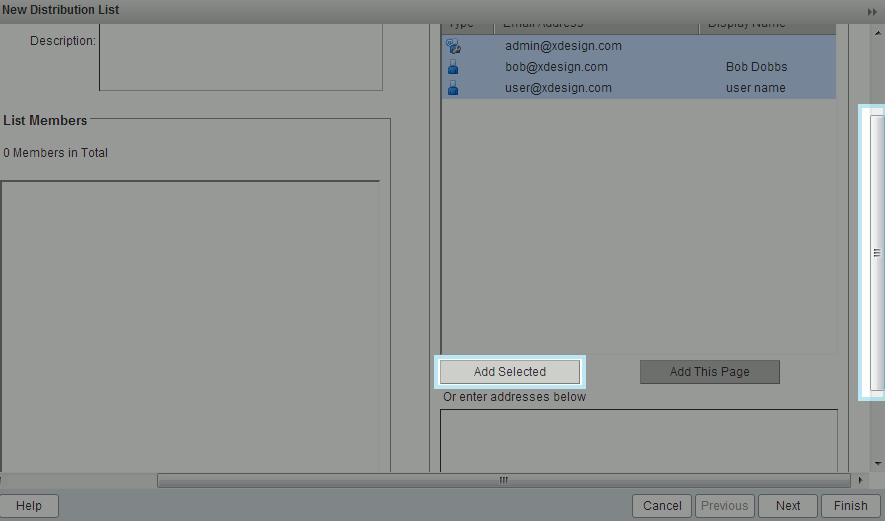
Using the scroll bar on the right, scroll down and click the "Add Selected" button.
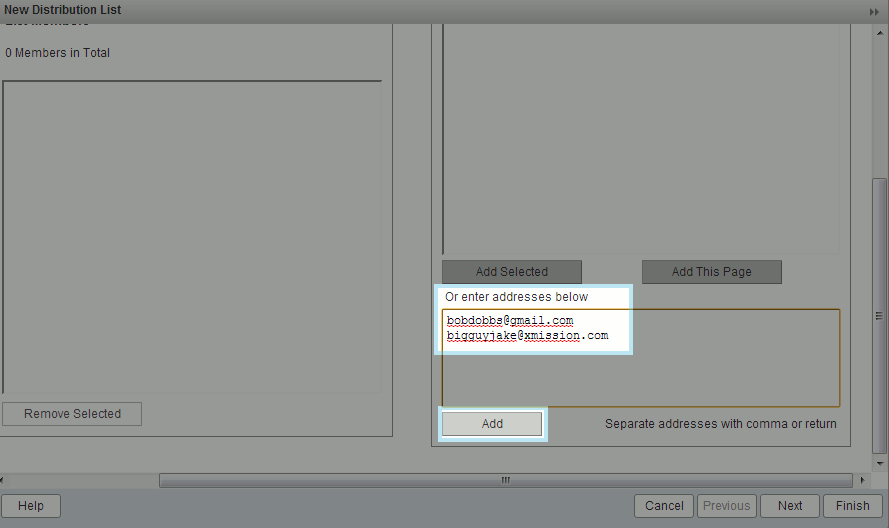
If you want to manually add addresses or need to add addresses that are not within Zimbra's search function, you can type the email addresses in the box pictured below. In this case, we are adding two email addresses to the list -- "bobdobbs@gmail.com" and "bigguyjake@xmission.com." Once you've typed in the email addresses you want added to your list, simply click the "Add" button below.
Notes:
You can make lists members of other lists. This is a handy way to create umbrella lists. For example, if you wanted a staff list, but had various departments, you could add your employees to the departmental list, and then subscribe the departmental lists to the staff lists. This way, an account is only entered once, rather than adding an account to each list individually.
Distribution Lists can also be used to forward domain based emails. For example, you may need to forward project@yourdomain.com to address@someotherdomain.com. This does not require a Zimbra account for the primary domain email address.
Updating Distribution List information
To add, change, or remove information from a list, simply double-click the list you want to edit. Alternatively, you can right-click the list you wish to update and choose "Edit" from the pop-up menu.
Forwarding Email to Another Address
If you wish to forward emails sent to your hosted email to another email address, first select Manage and then Accounts. Double-click the account you wish to edit or right-click and choose Edit from the pop-up menu.
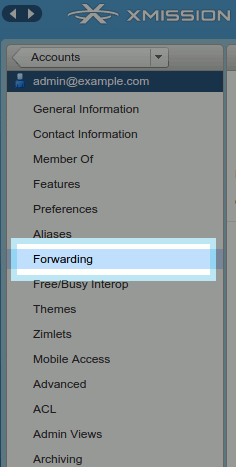
To add a forward, click on the Forwarding section on the left-hand column.
Enter the following required information:
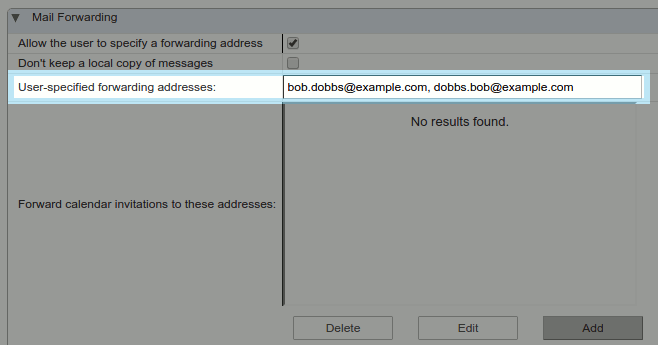
- User-specified forwarding address: This will be the email account that emails are forwarded to that the account owner is aware of. In the example below, we will be forwarding emails to "bob.dobbs@xmission.com."
Don't forget to choose "Save" near the upper right hand corner after you've added the forwarding address!
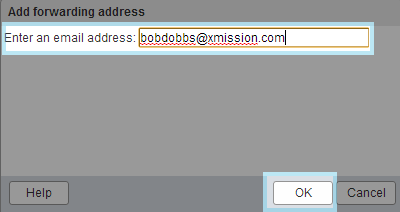
- Forwarding addresses hidden from the user: This can be a list of email accounts that emails are forwarded to that the account owner is unaware of. To do this, first click the "Add" button located below the Forwarding addresses hidden from the user box. It will prompt you to enter an email address. After you've done so, simply click "Ok." In the example below, we will be forwarding messages to "bobdobbs@xmission.com."
NOTE: You may also use Distribution Lists to forward domain based emails without needing an account for the specific address. For example, you may need to forward project@mydomain.com to johndoe@someotheremail.com. The advantage of using a Distribution List is that you eliminate the costs associated with maintaining an account just for forwarding.
Granting Domain Administrator Access
To grant an existing mailbox domain administrator privileges start by logging in to the admin interface. Next, select their account then double click to edit. Inside the General Information area, the second category down is "Account Setup." Check the "Administrator" checkbox below "Class of Service." Once checked, a field will appear below, "Administrator role." Enter "admins@yourdomain.com", replacing yourdomain.com with the domain you are granting access rights for. This will add the user to a distribution list, "admins", on your domain, which grants the privileges.
Click "Save" near top-right corner to complete the assignment of rights.
Note that if the "Administrator" checkbox does not exist, you may need to add yourself to the "admins" distribution list manually and wait up to fifteen minutes.
Importing Accounts from Exchange
This article has moved: https://wiki.xmission.com/Zimbra_Migration:_Exchange_Import_Wizard
Deleting a Zimbra Mailbox
There are two fairly simple ways to properly delete a Zimbra mailbox from the XMission system.
- Log into the Zimbra domain administration panel https://zimbraadmin.xmission.com and select the "Manage" area on the left. Once in the management area you simply highlight the mailbox and then right-mouse click to show the option menu. Select "Delete" and confirm the mailbox deletion request.
- From inside the domain administration panel you may also highlight the mailbox name and then click on the gear wheel in the top right corner of the browser screen to display an options menu. Inside this menu select "Delete" and confirm the deletion request.
Notes:
- Changing mailbox status is not the same as deletion. All provisioned mailboxes are billable.
- Deletion of a mail domain cannot be completed via the domain admin interface and requires contacting XMission billing department.
- Be certain not to delete resource accounts such as galsync or distribution lists unless you know they are no longer needed. Doing so can impact mail performance.
Zimbra Themes
You can see all the themes here

