Entourage Setup: Difference between revisions
Jump to navigation
Jump to search
m Entourage Setup moved to Email Archives:Entourage Setup |
No edit summary |
||
| (7 intermediate revisions by 2 users not shown) | |||
| Line 1: | Line 1: | ||
{{Archived}} | {{Archived}} | ||
#Start Entourage. Click on <span class="button">Hard Drive</span>, go to <span class="button">Applications</span>, go to <span class="button">Microsoft Office X</span> and select <span class="button">Entourage</span>. | #Start Entourage. Click on <span class="button">Hard Drive</span>, go to <span class="button">Applications</span>, go to <span class="button">Microsoft Office X</span> and select <span class="button">Entourage</span>. | ||
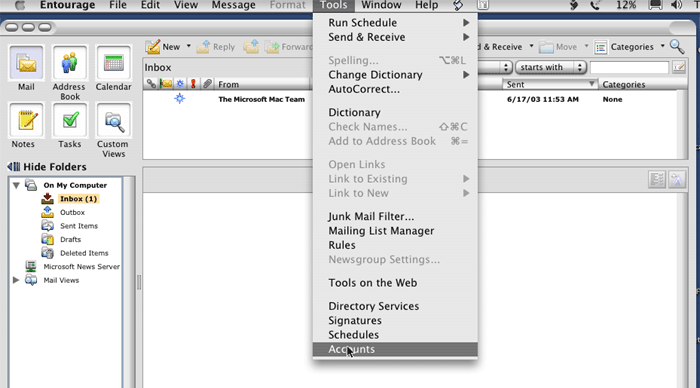
#Click <span class="button">Tools</span> and select <span class="button">Accounts</span>. | #Click <span class="button">Tools</span> and select <span class="button">Accounts</span>. | ||
#: | #:[[Image:toolsmenu.png]] | ||
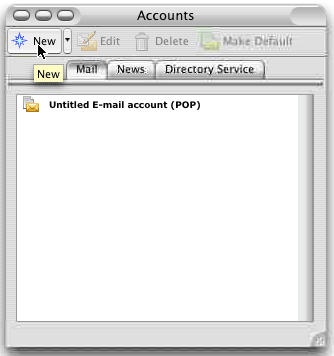
#Click <span class="button">New</span>. | #Click <span class="button">New</span>. | ||
#: | #:[[Image:accounts.png]] | ||
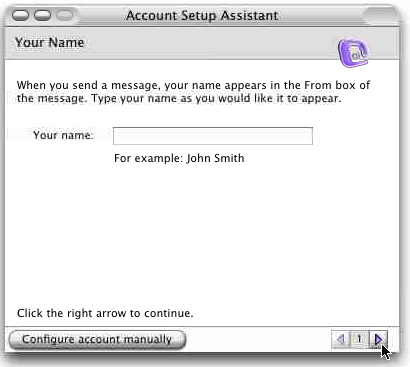
#In the field labeled <span class="button">Your Name</span>, type in the name you wish to appear on your outgoing email messages. | #In the field labeled <span class="button">Your Name</span>, type in the name you wish to appear on your outgoing email messages. | ||
#Click the Right Arrow at the bottom of the Assistant Window. | #Click the Right Arrow at the bottom of the Assistant Window. | ||
#: | #:[[Image:setup_page1.png]] | ||
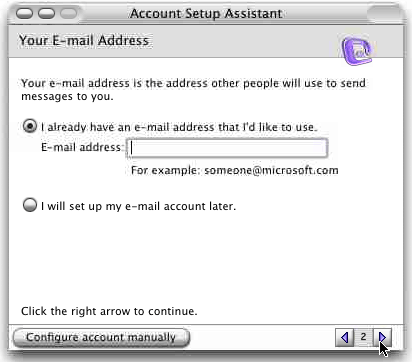
#In the field labeled <span class="button">Email Address</span>, type your XMission email address | #In the field labeled <span class="button">Email Address</span>, type your XMission email address | ||
#Click the Right Arrow. | #Click the Right Arrow. | ||
#: | #:[[Image:setup_page2.png]] | ||
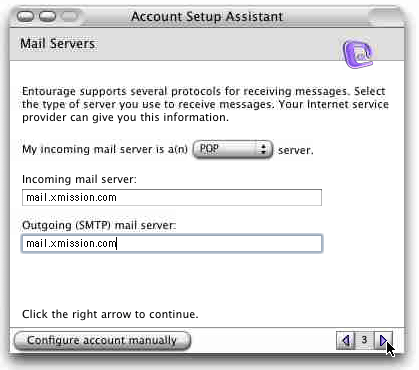
#In the field labeled <span class="button">Incoming mail server:</span>, type "mail.xmission.com". | #In the field labeled <span class="button">Incoming mail server:</span>, type "mail.xmission.com". | ||
#In the field labeled <span class="button">Outgoing (SMPT) mail server:</span>, type "mail.xmission.com". | #In the field labeled <span class="button">Outgoing (SMPT) mail server:</span>, type "mail.xmission.com". | ||
#Click the Right Arrow. | #Click the Right Arrow. | ||
#: | #:[[Image:setup_page3.png]] | ||
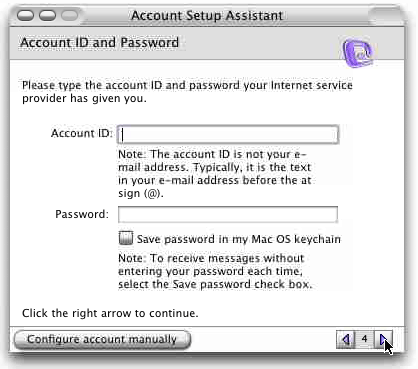
#In the <span class="button">Account ID</span> field, type your XMission username (Make certain not to include @xmission.com). | #In the <span class="button">Account ID</span> field, type your XMission username (Make certain not to include @xmission.com). | ||
#In the <span class="button">Password</span> field, type the password for your XMission account. | #In the <span class="button">Password</span> field, type the password for your XMission account. | ||
#Click the Right Arrow. | #Click the Right Arrow. | ||
#: | #:[[Image:setup_page4.png]] | ||
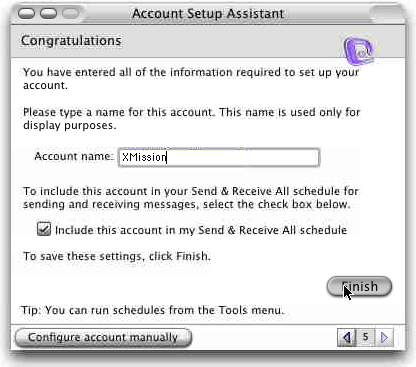
#In the <span class="button">Account Name</span> field, type a name for the XMission mail account (such as XMission Email). | #In the <span class="button">Account Name</span> field, type a name for the XMission mail account (such as XMission Email). | ||
#Click Finish. | #Click Finish. | ||
#: | #:[[Image:setup_page5.png]] | ||
#Close the Accounts Window (Click on the X in the upper left hand corner). | #Close the Accounts Window (Click on the X in the upper left hand corner). | ||
#Click on <span class="button">Tools</span> go to <span class="button">Send and Receive</span>, and select <span class="button">Send and Receive All</span>. | #Click on <span class="button">Tools</span> go to <span class="button">Send and Receive</span>, and select <span class="button">Send and Receive All</span>. | ||
Congratulations! You should now see your Inbox. You're ready to start sending and receiving email. | Congratulations! You should now see your Inbox. You're ready to start sending and receiving email. | ||
[[Category:XMission Email Archives|Entourage]] | |||
[[Category:Email Archives | |||
{{footer}} | {{footer}} | ||
Latest revision as of 14:55, 14 January 2020
- Start Entourage. Click on , go to , go to and select .
- Click and select .
- Click .
- In the field labeled , type in the name you wish to appear on your outgoing email messages.
- Click the Right Arrow at the bottom of the Assistant Window.
- In the field labeled , type your XMission email address
- Click the Right Arrow.
- In the field labeled , type "mail.xmission.com".
- In the field labeled , type "mail.xmission.com".
- Click the Right Arrow.
- In the field, type your XMission username (Make certain not to include @xmission.com).
- In the field, type the password for your XMission account.
- Click the Right Arrow.
- In the field, type a name for the XMission mail account (such as XMission Email).
- Click Finish.
- Close the Accounts Window (Click on the X in the upper left hand corner).
- Click on go to , and select .
Congratulations! You should now see your Inbox. You're ready to start sending and receiving email.
