XMission HostedPBX: Difference between revisions
| (37 intermediate revisions by 2 users not shown) | |||
| Line 24: | Line 24: | ||
* Click the "Users" button. | * Click the "Users" button. | ||
: [[File:AddUsers.png]] | : [[File:AddUsers.png|700px]] | ||
* Click on "Add User". | * Click on "Add User". | ||
| Line 60: | Line 60: | ||
* <b>Password Required</b>—This indicates that the user does not have a portal password set. | * <b>Password Required</b>—This indicates that the user does not have a portal password set. | ||
[[File:Manageuser.png]] | [[File:Manageuser.png|700px]] | ||
=== Profile === | === Profile === | ||
| Line 81: | Line 81: | ||
In this section you are able to edit how the phone will accept a call. Please review XMission's help pages on proper configuration on [https://wiki.xmission.com/XMission_Voice_Portal#Answering_Rules_Tab Answering Rules]. | In this section you are able to edit how the phone will accept a call. Please review XMission's help pages on proper configuration on [https://wiki.xmission.com/XMission_Voice_Portal#Answering_Rules_Tab Answering Rules]. | ||
=== Voicemail === | === Voicemail === | ||
| Line 88: | Line 86: | ||
Voicemail is optional and can be enabled/disabled for each user. Our voicemail by default allows for 10MB of voicemail storage. <i>(10MB is about 25 2/3 min messages)</i> Please review our help pages on proper configuration on [https://wiki.xmission.com/XMission_Voice_Portal#Voicemail_Settings Voicemail] | Voicemail is optional and can be enabled/disabled for each user. Our voicemail by default allows for 10MB of voicemail storage. <i>(10MB is about 25 2/3 min messages)</i> Please review our help pages on proper configuration on [https://wiki.xmission.com/XMission_Voice_Portal#Voicemail_Settings Voicemail] | ||
[[File:uploadVoicemail.png | [[File:uploadVoicemail.png|500px]] | ||
=== Phone === | === Phone === | ||
| Line 104: | Line 102: | ||
What to look for to ensure users' phones will work correctly: | What to look for to ensure users' phones will work correctly: | ||
[[File:uploadPhone.png]] | [[File:uploadPhone.png|700px]] | ||
* Green Checkmark—Means the phone hardware is properly registered with XMission. | * Green Checkmark—Means the phone hardware is properly registered with XMission. | ||
| Line 116: | Line 114: | ||
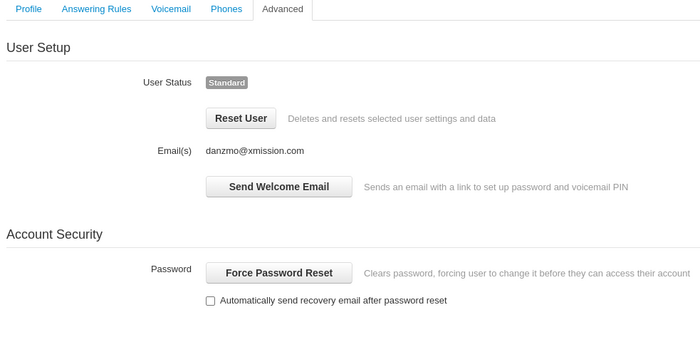
In this section you are able to reset the user's profile to defaults, send emails out to gain access to the control portal, and force reset user passwords. | In this section you are able to reset the user's profile to defaults, send emails out to gain access to the control portal, and force reset user passwords. | ||
[[File:Advanced.png| | [[File:Advanced.png|700px]] | ||
* <b>User Status</b>—This should mirror what you see under the "User's Button" with the warning bubble and operational information. | * <b>User Status</b>—This should mirror what you see under the "User's Button" with the warning bubble and operational information. | ||
| Line 130: | Line 128: | ||
* Click "Conferences" Button. | * Click "Conferences" Button. | ||
: [[File:Conference.png]] | : [[File:Conference.png|700px]] | ||
* Click on Add Conference. | * Click on Add Conference. | ||
:[[File:Addconference.png]] | :[[File:Addconference.png|700px]] | ||
* Fill out the required pop-up window: | * Fill out the required pop-up window: | ||
| Line 160: | Line 158: | ||
* Click "Auto Attendants". | * Click "Auto Attendants". | ||
* Click "Add Attendant". | * Click "Add Attendant". | ||
: [[File:Attendant.png| | : [[File:Attendant.png|700px]] | ||
* Fill in the required information on the pop-up window. | * Fill in the required information on the pop-up window. | ||
:* <b>Name</b>—This will be the name of your attendant. We suggest using your business name such as "XMission Attendant". (Special characters are not allowed) | :* <b>Name</b>—This will be the name of your attendant. We suggest using your business name such as "XMission Attendant". (Special characters are not allowed) | ||
| Line 170: | Line 168: | ||
Once the "attendant extension" has been created the system should have auto-loaded you into the New Attendant Settings. | Once the "attendant extension" has been created the system should have auto-loaded you into the New Attendant Settings. | ||
[[File:Newattendant.png| | [[File:Newattendant.png|700px]] | ||
=== Attendant Settings === | === Attendant Settings === | ||
| Line 196: | Line 194: | ||
Once finished simply click "Save/Upload/Call" to add your greeting to the menu and click "Done" at the bottom of the pop-up window. | Once finished simply click "Save/Upload/Call" to add your greeting to the menu and click "Done" at the bottom of the pop-up window. | ||
[[File:Timeframe.png]] | [[File:Timeframe.png|500px]] | ||
===== Example Scripts ===== | ===== Example Scripts ===== | ||
| Line 203: | Line 201: | ||
* Hello and thank you for calling [Company Name], [mission statement or slogan]. This call may be monitored and recorded for training or quality assurance purposes. | * Hello and thank you for calling [Company Name], [mission statement or slogan]. This call may be monitored and recorded for training or quality assurance purposes. | ||
* Thank you for calling [Company Name], where [mission statement or slogan]. Please be aware that our office hours are [published business hours]. Please listen carefully as menu options may have changed. | * Thank you for calling [Company Name], where [mission statement or slogan]. Please be aware that our office hours are [published business hours]. Please listen carefully as menu options may have changed. | ||
| Line 214: | Line 214: | ||
To add greetings you will click the "<i>pencil button</i>" under the <b>Menu Prompt</b> title. | To add greetings you will click the "<i>pencil button</i>" under the <b>Menu Prompt</b> title. | ||
[[File:Menuprompt.png| | [[File:Menuprompt.png|700px]] | ||
Please add the prompt using one of the following options: | Please add the prompt using one of the following options: | ||
| Line 225: | Line 225: | ||
Once finished simply click "Save/Upload/Call". | Once finished simply click "Save/Upload/Call". | ||
[[File:Menuprompt2.png]] | [[File:Menuprompt2.png|500px]] | ||
===== Example Scripts ===== | ===== Example Scripts ===== | ||
| Line 233: | Line 233: | ||
* If you know the extension you'd like to reach you may dial it at any time. For Accounting, press 1. For Sales, press 2. For Support, press 3. Otherwise please stay on the line and you will be connected with an operator. | * If you know the extension you'd like to reach you may dial it at any time. For Accounting, press 1. For Sales, press 2. For Support, press 3. Otherwise please stay on the line and you will be connected with an operator. | ||
* To speak with the operator, press 0 at any time. For sales, press 1. For technical support, press 2. For billing, press 3. For information about our company, press 4. To repeat this message, press 9. | * To speak with the operator, press 0 at any time. For sales, press 1. For technical support, press 2. For billing, press 3. For information about our company, press 4. To repeat this message, press 9. | ||
==== Dial Pad Menu ==== | ==== Dial Pad Menu ==== | ||
You will want to match your recording to the corresponding buttons to route the caller to the correct destination. You will see an icon for each option available. | You will want to match your recording to the corresponding buttons to route the caller to the correct destination. You will see an icon for each option available. | ||
[[File:Dialpadmenu2.png]] | [[File:Dialpadmenu2.png|700px]] | ||
* <b>User</b>—Transfer call to any user or extension configured under "Users". | * <b>User</b>—Transfer call to any user or extension configured under "Users". | ||
| Line 262: | Line 260: | ||
Now to apply the attendant for incoming calls to use. | Now to apply the attendant for incoming calls to use. | ||
[[File:Inventory.png| | [[File:Inventory.png|700px]] | ||
* Click on "<b>Inventory</b>" button | * Click on "<b>Inventory</b>" button | ||
* Click on the "Edit" icon at the right of the phone number you wish to use | * Click on the "Edit" icon at the right of the phone number you wish to use | ||
* Change treatment to "Auto Attendant" | * Change treatment to "Auto Attendant" | ||
: [[File:Treatment.png|500px]] | : [[File:Treatment.png|500px]] | ||
| Line 301: | Line 299: | ||
* Click the "<b>Call Queues</b>" button. | * Click the "<b>Call Queues</b>" button. | ||
: [[File:Callqueues.png| | : [[File:Callqueues.png|700px]] | ||
* Click "Add Call Queue". | * Click "Add Call Queue". | ||
:[[File:XMpbx_addqueue.png| | :[[File:XMpbx_addqueue.png|700px]] | ||
* Fill in required information on pop-up: | * Fill in required information on pop-up: | ||
:* <b>Name</b>—Enter the name of the queue (e.g. Sales, Support, Accounting). | :* <b>Name</b>—Enter the name of the queue (e.g. Sales, Support, Accounting). | ||
| Line 338: | Line 336: | ||
* <b>Voicemail</b>—Callers will be sent to queue's voicemail if agents fail to answer before the Ring Timeout and Forward if unanswered is not set. Typically companies do not wish use queue voicemails and often we set this to a user's voicemail. However, if you wish to use queue voicemail, this will also trigger the system message <i>“Please continue to hold or Press 2 to leave a voicemail.”</i> and then return the call back to the queue if nothing is pressed. | * <b>Voicemail</b>—Callers will be sent to queue's voicemail if agents fail to answer before the Ring Timeout and Forward if unanswered is not set. Typically companies do not wish use queue voicemails and often we set this to a user's voicemail. However, if you wish to use queue voicemail, this will also trigger the system message <i>“Please continue to hold or Press 2 to leave a voicemail.”</i> and then return the call back to the queue if nothing is pressed. | ||
[[File: | [[File:Inqueueoptions.png|500px]] | ||
== Save and Apply == | == Save and Apply == | ||
| Line 346: | Line 344: | ||
If you wish for direct dial or a phone number to call directly into the queue, or if you did not select an available number in the "Basic" set up, you need to apply the queue for incoming calls to use. Otherwise, the queue will be available for Dial Pad Menu of your Auto Attendant. | If you wish for direct dial or a phone number to call directly into the queue, or if you did not select an available number in the "Basic" set up, you need to apply the queue for incoming calls to use. Otherwise, the queue will be available for Dial Pad Menu of your Auto Attendant. | ||
[[File: | [[File:Inventory.png|700px]] | ||
* Click on "<b>Inventory</b>" Button | * Click on "<b>Inventory</b>" Button | ||
* Click on the "Edit" icon at the right of the phone number you wish to use | * Click on the "Edit" icon at the right of the phone number you wish to use | ||
* Change treatment to "Call Queue" | * Change treatment to "Call Queue" | ||
: [[File: | : [[File:Callqueuetreatment.png|500px]] | ||
* In the field below enter the extension number of the Call Queue you wish to use. | * In the field below enter the extension number of the Call Queue you wish to use. | ||
* Click Save | * Click Save | ||
| Line 362: | Line 360: | ||
* Click on "Call Queues" Button. | * Click on "Call Queues" Button. | ||
: [[File: | : [[File:Callqueues.png|700px]] | ||
* Click on the "Person icon" of the call queue you want to add agents too. | * Click on the "Person icon" of the call queue you want to add agents too. | ||
* Click on Add Agents. | * Click on Add Agents. | ||
: [[File: | : [[File:Addagent.png|500px]] | ||
* Fill out the required filed on the pop-up: | * Fill out the required filed on the pop-up: | ||
:* <b>Add Agent(s) by </b>—Select available agents to add in a drop-down box or be able to enter the name/extension. | :* <b>Add Agent(s) by </b>—Select available agents to add in a drop-down box or be able to enter the name/extension. | ||
| Line 378: | Line 375: | ||
:* <b>Request Confirmation</b>—If checked, this requires a user to press 1 to accept the call from the queue. | :* <b>Request Confirmation</b>—If checked, this requires a user to press 1 to accept the call from the queue. | ||
:* <b>Auto Answer</b>—If checked, the call will be routed to the user extension and automatically be answered on Speaker or Headset. | :* <b>Auto Answer</b>—If checked, the call will be routed to the user extension and automatically be answered on Speaker or Headset. | ||
: [[File: | : [[File:Saveagent.png|500px]] | ||
* Click Save Agent. | * Click Save Agent. | ||
* Click Done | * Click Done | ||
| Line 415: | Line 412: | ||
* Weekend Hours | * Weekend Hours | ||
[[File: | [[File:Preferredtimeframe.png|700px]] | ||
To ensure proper routing, please [mailto:voip@xmission.com email] a request that contains: | To ensure proper routing, please [mailto:voip@xmission.com email] a request that contains: | ||
| Line 429: | Line 426: | ||
* Click on "Time Frames". | * Click on "Time Frames". | ||
: [[File: | : [[File:Clickontimeframes.png|700px]] | ||
* Click "Add Time Frame". | * Click "Add Time Frame". | ||
: [[File: | : [[File:Addtimeframe.png|700px]] | ||
* Enter a name for the time frame. | * Enter a name for the time frame. | ||
: [[File: | : [[File:Nametimeframe.png|700px]] | ||
* Select how you would like to configure the time frame: | * Select how you would like to configure the time frame: | ||
:* <b>Always</b>—Applies 24/7, default call routing, most likely would never use this option. | :* <b>Always</b>—Applies 24/7, default call routing, most likely would never use this option. | ||
| Line 451: | Line 448: | ||
* Click Save. | * Click Save. | ||
[[File: | [[File:Daysoftheweek.png|500px]] | ||
=== Specified Dates, Example === | === Specified Dates, Example === | ||
| Line 462: | Line 459: | ||
* Click Save. | * Click Save. | ||
[[File: | [[File:Specifieddates.png|700px]] | ||
= Music On Hold = | = Music On Hold = | ||
| Line 480: | Line 477: | ||
* Click on "Music On Hold" | * Click on "Music On Hold" | ||
: [[File: | : [[File:Musiconhold.png|700px]] | ||
* Click on Add Music | * Click on Add Music | ||
: [[File: | : [[File:Addmusic.png|700px]] | ||
:* Click on "Browse" | :* Click on "Browse" | ||
:* Locate and select your .MP3 or .WAV file from your computer. | :* Locate and select your .MP3 or .WAV file from your computer. | ||
| Line 494: | Line 491: | ||
The "Inventory" section of the portal is a central location for your entire service. Entering this section and making unauthorized edits can break the PBX service. It is strongly suggested to send your requests to [mailto:voip@xmission.com XMission] for proper configuration. | The "Inventory" section of the portal is a central location for your entire service. Entering this section and making unauthorized edits can break the PBX service. It is strongly suggested to send your requests to [mailto:voip@xmission.com XMission] for proper configuration. | ||
[[File: | [[File:Inventory.png|700px]] | ||
== Phone Numbers == | == Phone Numbers == | ||
| Line 500: | Line 497: | ||
Under the Phone Number tab you'll be able to see all the outside numbers assigned to your service. Through this you'll be able to see how those numbers are routed: | Under the Phone Number tab you'll be able to see all the outside numbers assigned to your service. Through this you'll be able to see how those numbers are routed: | ||
[[File: | [[File:Phonenumbers.png|700px]] | ||
To help understand how numbers are routed: | To help understand how numbers are routed: | ||
| Line 518: | Line 515: | ||
Currently XMission does not provide SMS functionality. This is a feature that will be available in the future. | Currently XMission does not provide SMS functionality. This is a feature that will be available in the future. | ||
== Phone Hardware == | == Phone Hardware == | ||
| Line 533: | Line 528: | ||
Please contact XMission's voice team if you wish to make any changes or edits in this section of the profile as not all phone makes and models are supported. Our team will research and assist in additional configurations on the phone to get registration. | Please contact XMission's voice team if you wish to make any changes or edits in this section of the profile as not all phone makes and models are supported. Our team will research and assist in additional configurations on the phone to get registration. | ||
[[File: | [[File:Phonehardware.png|700px]] | ||
== Fax Accounts == | == Fax Accounts == | ||
| Line 539: | Line 534: | ||
XMission fax services will be assigned via the Fax Account tab. XMission-registered devices are required. | XMission fax services will be assigned via the Fax Account tab. XMission-registered devices are required. | ||
[[File: | [[File:Faxaccounts.png|700px]] | ||
== Emergency Numbers == | == Emergency Numbers == | ||
| Line 545: | Line 540: | ||
E911 location services. In this tab we ensure that emergency services will dispatch to the correct location. While "Office Managers" are able to edit the location services, XMission strongly recommends contacting your sales executive to make proper adjustments to E911 locations. | E911 location services. In this tab we ensure that emergency services will dispatch to the correct location. While "Office Managers" are able to edit the location services, XMission strongly recommends contacting your sales executive to make proper adjustments to E911 locations. | ||
[[File: | [[File:E911.png|700px]] | ||
= Call History = | = Call History = | ||
| Line 553: | Line 548: | ||
When logged in as the Office Manager you are able to see the entire call history on each individual extension. The search process is the same, but includes more options. | When logged in as the Office Manager you are able to see the entire call history on each individual extension. The search process is the same, but includes more options. | ||
[[File: | [[File:Callhistory.png|700px]] | ||
= Extension and Reserved Extension List = | = Extension and Reserved Extension List = | ||
| Line 578: | Line 573: | ||
| 6100 - 6199 || Auto Attendant || Suggested extensions for Attendant options. | | 6100 - 6199 || Auto Attendant || Suggested extensions for Attendant options. | ||
|- | |- | ||
| 6200 - | | 6200 - 6900 || Available Use || Available to use for any extension option. | ||
|- | |- | ||
| 6901 - 6999 || Call Logic || Used only for PBX Administration. | |||
|- | |||
| 8000 - 8999 || User Extensions || 4 digit extensions for phone hardware. | | 8000 - 8999 || User Extensions || 4 digit extensions for phone hardware. | ||
|- | |- | ||
| Line 645: | Line 642: | ||
|- | |- | ||
| 03<extension> || Transfer/Dial 03101 || Connects directly to extension voicemail. | | 03<extension> || Transfer/Dial 03101 || Connects directly to extension voicemail. | ||
|- | |||
| 07<extension> || Dial 07101 || Directed Pickup, Picks up caller from ringing extension or park. | |||
|- | |||
| 08<extensoon> || Dial 08100 || Activates intercom if phone hardware has been provisioned for intercom service. | |||
|- | |- | ||
| 700 - 719 || Transfer/Dial 701 || Transfer/Pickups caller in Call Park. | | 700 - 719 || Transfer/Dial 701 || Transfer/Pickups caller in Call Park. | ||
Latest revision as of 10:41, 31 July 2025
Welcome to your new Hosted PBX service by XMission. This service offers a suite of features to support your growing business. This page provides instruction on your new system and how to manage options via the Hosted PBX portal. We recommend emailing all change requests to our XMission Voice team to avoid any unintentional service disruptions.
XMission Hosted PBX includes:
- Auto Attendant (IVR) — A welcome recording allowing callers to press designated buttons to contact specific desk(s).
- Call Queue — These work with the attendant, where "Press 1 for Sales" calls assigned extensions only.
- Individual Voicemail — Each desk phone has its own voicemail
- Individual Online Portal — Each desk phone has its own login to manage call routing, eg. desk to mobile.
- Voicemail to Email
We suggest visiting our website for additional information on all the features and functions available.
NOTE: User administration requires "Office Manager" access the Hosted PBX portal. By default administrative permissions are only provided upon request. If you or a team member wish to make edits, please contact XMission to be granted access.
Below we cover the features available in the online portal. We cover how to add/edit/remove options from your Hosted PBX service.
Users
The "Users" button is the central management location for all created extensions. The primary use is to add/edit/delete extensions from your PBX.
NOTE: XMission regularly audits extensions the PBX service. Making changes in this section may affect your voice billing.
Add Users
- Click the "Users" button.
- Click on "Add User".
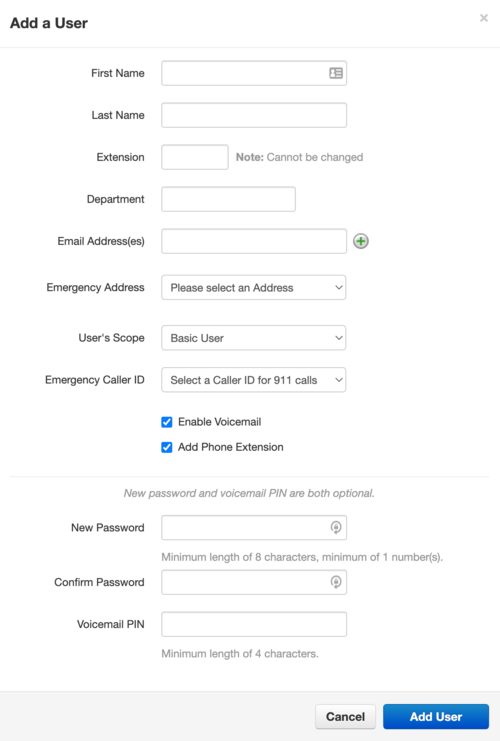
- Fill out the required fields on the pop-up window:
- First Name—First name of person or resource. (Required)
- Last Name—Last name of person or resource. (Required)
- Extension—Extension number for user. This cannot be changed later.
- We suggest using three digit extensions, 100–400.
- Please review our suggested Extension and Reserved Extension List.
- Department—Create departmental logins if wanted. (Optional)
- Email Addresses—Valid email addresses are required. XMission has options available that will allow for system notifications if applicable.
- User Scope—Select from below:
- Beware each user scope provides different access to the control portal. Some scopes provide "administrator" access that can break or prevent service from working.
- Basic User—Default for most users
- Call Center Agent—Has call center facilities on dashboard. (May require additional billing.)
- Call Center Supervisor—Has call center supervisor facilities on dashboard. (May require additional billing.)
- Office Manager—Used for customer administrator. (Has additional permissions, should be used likely.)
- Enable Voicemail—Check if customer will need voicemail.
- Add Phone Extension—Only check if this extension will have a handset or softphone associated.
- New Password—Enter a password for the user. (Optional)
- Confirm Password—Re-enter password. (Optional)
- Voicemail PIN—At least four digits, numbers only. (Required)
- Click "Add User".
Manage Users
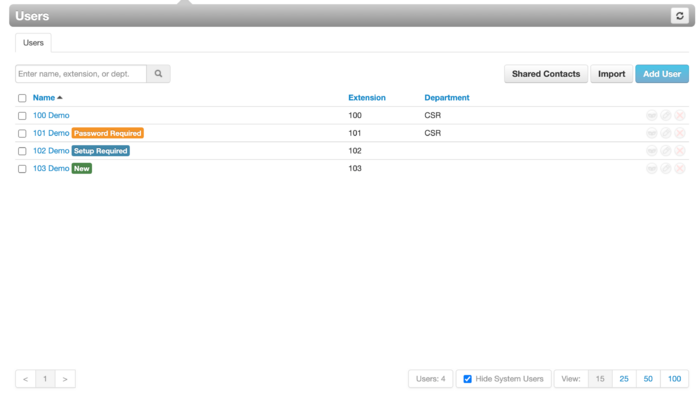
Please note that after users are created you will notice warning bubbles next to each user. This is intended to allow for easy management and for knowing what is happening with each user/extension in your PBX.
- New—This indicates that the user has an email, but no PIN or portal password.
- Setup Required—This indicates that the user does not have an email address
- Password Required—This indicates that the user does not have a portal password set.
Profile
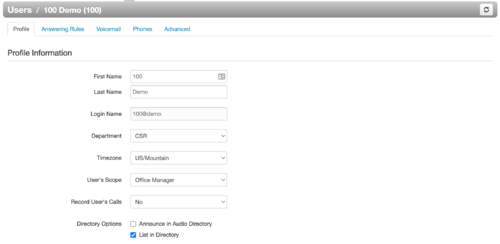
Profile is also known as the "User Contact Card" From here you are able to edit permissions and other minor information for each extension.
Profile Information
- First Name—First name of person or resource. (Required)
- Last Name—Last name of person or resource. (Required)
- Login Name—Used to log in to users' control portal. (Cannot be changed)
- Department—Create departmental logins if wanted. (Optional)
- Time Zone—Phone hardware uses this to set the correct time and date to display.
- User's Scope—Please refer to "Add User" for scope definition.
- Directory Options—Dial by directory options.
Answering Rules
In this section you are able to edit how the phone will accept a call. Please review XMission's help pages on proper configuration on Answering Rules.
Voicemail
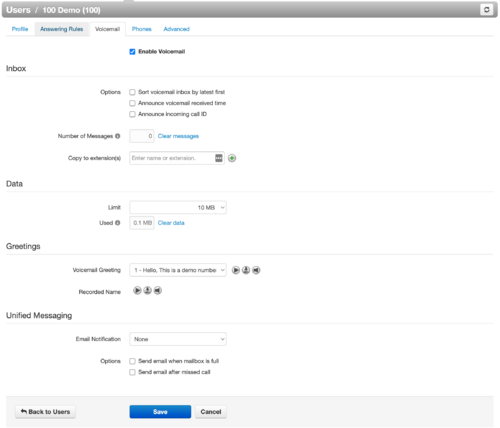
Voicemail is optional and can be enabled/disabled for each user. Our voicemail by default allows for 10MB of voicemail storage. (10MB is about 25 2/3 min messages) Please review our help pages on proper configuration on Voicemail
Phone
Your PBX service requires IP-based phones that are not firmware- or carrier-locked. XMission supports a variety of phone brands.
* Avaya
* Cisco
* Polycom
* Yealink
* And More
NOTE: Please contact XMission's voice team to make any changes in this section of the profile as not all phone makes and models are supported. Our team can assist with configuration to complete new phone registrations.
What to look for to ensure users' phones will work correctly:
- Green Checkmark—Means the phone hardware is properly registered with XMission.
- Device Type—The make and model of the requested hardware.
- IP Address—Internal IP Address (XMission use only) .
- MAC Address—The hardware identification (required for proper registration, can be a MAC Address or S/N).
- Line—How many extensions are assigned to that hardware.
Advanced
In this section you are able to reset the user's profile to defaults, send emails out to gain access to the control portal, and force reset user passwords.
- User Status—This should mirror what you see under the "User's Button" with the warning bubble and operational information.
- Reset User—Deletes and resets the user to system defaults.
- Sent Welcome Email—Sends an email to the user's notification address to grant access to their unique online control portal.
- Force Password Reset—Please check the box below "Automatically send recovery email ..." if using this button. It will force the user, via email notification, to reset their password.
Conference
A conference bridge allows a multiple participants on a single call. The most common form of bridge allows customers to dial into a virtual meeting room from their own phone. Meeting rooms can hold many callers based upon your specific call plan. This feature is different than three-way calling and does not require a conference phone to be configured.
Add a Conference Bridge
- Click "Conferences" Button.
- Click on Add Conference.
- Fill out the required pop-up window:
- Name—Enter a name for the conference bridge like "{Your Business Name} Bridge".
- Type—Dedicated conference bridge. (Please do not use individual bridges without direct numbers to extensions)
- Extension—Select an available extension number between 9200 and 9299. (Required conference extensions)
- Direct Phone Number—Select a direct phone number from your PBX inventory to use for the bridge if available.
- Leader PIN—Required PIN to create bridge. (4 to 6 digit Leader PIN)
- Participant PIN—Required PIN for callers to join the bridge. (4 to 6 digit Participant PIN)
- Max Participants—You can restrict the number of callers that can join a bridge. By default we limit it to 15 callers.
- Minimum Participants—Required amount of callers including the "Leader" for the bridge to start.
- Options:
- Require Leader to start—Please use if you have a direct dial number assigned.
- Announce Participants arrivals/departures—Please use if you have more than five callers on the bridge.
- Prompt all participants for their name—Please use if you are going to announce arrivals/departures.
- Click Save.
Auto Attendant
An Auto Attendant, also known as an IVR, helps automate your calls and provides multiple options for individuals that call your company's direct dial options. This can also be added for simple pre-call recordings, remote voicemail access, and dial by directory.
How to Create
Add Attendant Extension
- Click "Auto Attendants".
- Click "Add Attendant".
- Fill in the required information on the pop-up window.
- Name—This will be the name of your attendant. We suggest using your business name such as "XMission Attendant". (Special characters are not allowed)
- Extension—This needs to be a unique extension in the PBX system. We suggest using four digit extensions for system features, such as 6000-6009.
- Please review our suggested Extension and Reserved Extension List.
- Timeframe - If you've enabled timeframes with the voice admin, you can select "Business Hours", otherwise select "Default".
- Click Continue.
Once the "attendant extension" has been created the system should have auto-loaded you into the New Attendant Settings.
Attendant Settings
The Attendant Extension is broken into two sections.
Intro
Once created the Auto Attendant Name and Extension can not be changed or edited. If you are required to change this information, it will require a new attendant be made and the old one deleted.
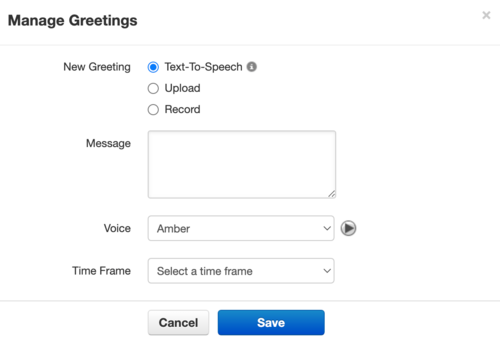
- Intro Greetings—This is intended to be the opening message for your attendant. Intro Greeting button is where you add/edit the welcome recording customers hear when calling in. To set up this recording please press the "speaker" button.
Manage Greetings Menu
To start with adding the greeting you'll click the "Add Greeting" button at the bottom of the pop-up window
Please add the greeting using one of the following options:
 * Text-to-Speech—Type what you want the recording to say and generate an automated recording out of your choice of various voices. By clicking on the "play button" next to the voice option, you are able to preview the recording.
 * Upload—Allows you to use software to perfect your recording and upload. The recording must be in .wav or .MP3 file from you local computer.
 * Record—You'll be asked to enter any extension number for the system to call you.
   When recording by call, you will receive a phone call and get an automated voice asking you to record your greeting and press # when finished. Once you've finished the "Done" button should highlight for you to click.
Timeframe—If you've enabled timeframes with the voice admin you can select "Business Hours", otherwise select "Default"
Once finished simply click "Save/Upload/Call" to add your greeting to the menu and click "Done" at the bottom of the pop-up window.
Example Scripts
Intro / Greeting
* Hello and thank you for calling [Company Name], [mission statement or slogan]. This call may be monitored and recorded for training or quality assurance purposes.
* Thank you for calling [Company Name], where [mission statement or slogan]. Please be aware that our office hours are [published business hours]. Please listen carefully as menu options may have changed.
Dial Menu
This section is where we create the menu options and establish call routing.
Menu Prompt
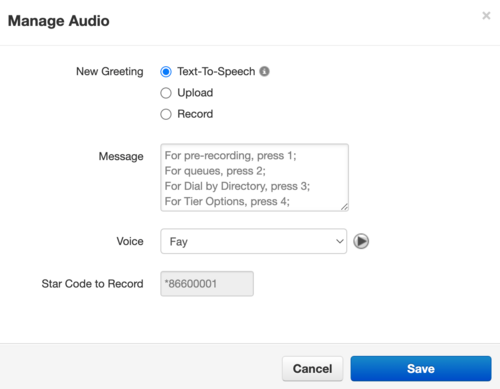
Menu Prompt advises the customer on navigation options. Example, "Press 1, for Support. Press 2, for Sales..."
To add greetings you will click the "pencil button" under the Menu Prompt title.
Please add the prompt using one of the following options:
 * Text-to-Speech—Type what you want the recording to say. This generates an automated recording as announce by a pre-configured voice of your choosing. Click the "play button" next to the voice option to preview the recording.
 * Upload—Allows you to use software to perfect your recording and upload. The recording must be in .wav or .MP3 file from your local computer.
 * Record—You'll be asked to enter any extension number for the system to call you.
   When recording by call, you will receive a phone call and get an automated voice asking you to record your greeting and press # when finished. Once finished, the "Done" button should highlight for you to click.
Once finished simply click "Save/Upload/Call".
Example Scripts
Menu / Dial Button
* If you know the extension you'd like to reach you may dial it at any time. For Accounting, press 1. For Sales, press 2. For Support, press 3. Otherwise please stay on the line and you will be connected with an operator.
* To speak with the operator, press 0 at any time. For sales, press 1. For technical support, press 2. For billing, press 3. For information about our company, press 4. To repeat this message, press 9.
Dial Pad Menu
You will want to match your recording to the corresponding buttons to route the caller to the correct destination. You will see an icon for each option available.

- User—Transfer call to any user or extension configured under "Users".
- Conference—Transfer call to any conference bridge, configured under "Conferences".
- Call Queue—Transfer call to any call queue, configured under "Call Queues".
- Directory—Plays a company directory with dial-by-name. The directory uses the first and last name entered when extensions are created.
- Voicemail—Sends call directly to an extensions voicemail box. (Do not use "Enable Enhanced Voicemail")
- Voicemail Management—Allows caller to access any extension voicemail and change administrative options. (Requires extension number and password for access.)
- External Number—Calls an external phone number. If forwarding a call to an external number please include a "1" in the number. (IE: 18015390852)
- Play Message—Plays a recorded message, then gives you the option to transfer the caller.
- Repeat Prompt—Repeats Menu Prompt
- Add Tier—Adds another level of Auto Attendant menus
- Options—Additional options. You must have the number options set and saved before setting these.
- Dial by Extension—Allow dial-by-extension or not.
- In no key pressed—Option to follow if no key is pressed.
- If unassigned key pressed—Option to follow if a wrong key is pressed.
Save and Apply
- Click on the " Save " button located at the bottom of the screen.
Now to apply the attendant for incoming calls to use.
- Click on "Inventory" button
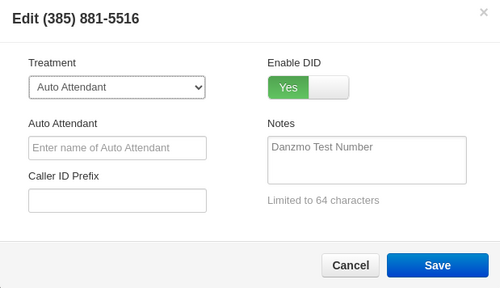
- Click on the "Edit" icon at the right of the phone number you wish to use
- Change treatment to "Auto Attendant"
- In the field below enter the extension number of the Auto Attendant you wish to use.
- Click Save
Once you click "Save" incoming calls should immediately start getting the recording.
Call Queues
Call queues are used to help manage high traffic. With queues you can use a single number to route to multiple extensions by placing the caller in queue until the next available user is free. This is often used instead of having the caller listen to a busy signal or sending them to voicemail. While in a queue, callers can hear music on hold or custom company announcements.
Types of Call Queues
- Round-robin (longest idle)—Routes callers to the available agent that has been idle longest.
- Ring All—Routes callers to all available agents at the same time.
- Linear Hunt—Routes callers to the available agents in a predefined order.
- Linear Cascade—Routes callers to groups of available agents in a predefined order.
- Call Park—Places the caller on hold until an agent retrieves them. (Please review additional information regarding Call Park).
Important Information
- Only online agents can be part of an active queue.
- If a device is not registered than the agent will be considered to be offline.
- Icon colors represent agent status: grey = offline, green = online, red = online but currently taking a call.
- Agents that are a part of multiple queues can prioritize one queue over another.
- Queues can have unique music on hold, otherwise our default music on hold will be played.
Add Call Queue
When adding queues, please be aware there are four configuration menus that are required to ensure call routing is completed correctly.
Basic Menu
This is the basic extension configuration for the queue:
- Click the "Call Queues" button.
- Click "Add Call Queue".
- Fill in required information on pop-up:
- Name—Enter the name of the queue (e.g. Sales, Support, Accounting).
- Extension—Choose an extension between 6000 and 6100 (Required Queue extensions).
- Department—Used for departmental logins (Optional)
- Type—Select type of call queue (Please refer to the options above.)
- Please note that the following options do not apply to the "Call Park" call type.
- Phone Number—Select an available number from "Inventory". (optional, please see Save and Apply)
- Record Calls (Call recording has to be enabled by XMission, If you wish to use this, please contact XMission Support). If you select YES you will have the option to record calls.
- Statistics—If you select Yes the system will generate call queue-related information for the call center supervisor.
- Click "Next".
Pre Queue Options
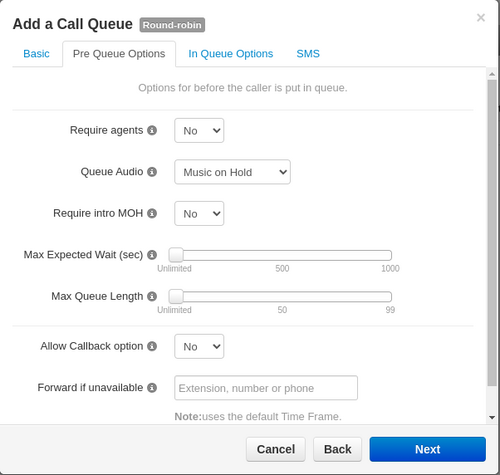
Queue configuration prior to routing the customer to the available "Queue Type".
- Require Agents—Require at least one agent to be online before sending callers to the queue. Otherwise callers will go to "Forward if Unavailable" destination.
- Queue Audio—Allows choice between music on hold or ringback playing while in the queue.
- Require intro MOH—Please keep this set to "No". Plays a complete initial greeting before placing callers in the the queue.
- Max Expected Wait (sec)—The time in seconds before the queue is unavailable to new callers. This applies when the queue's average wait time reaches the maximum expected wait. (Default is unlimited)
- Max Queue Length—Maximum amount of callers allowed in the queue before it is full and unavailable to new callers. (Default is unlimited)
- Allow Callback Option—Allows the system to prompt for a call back option instead of waiting if timing conditions are met. Callers will be called back in the order they entered the queue.
- Forward if unavailable—Where to send calls if the queue is unavailable. (Typically sent to a users voicemail.)
In Queue Options
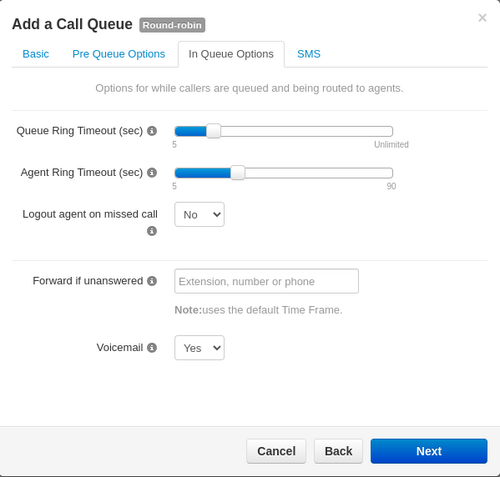
Queue configuration for callers waiting in queue.
- Queue Ring Timeout (sec)—How long the queue will attempt to ring agents before following "Forward if unanswered". (Default 30 sec)
- Logout agent on missed call - How long the queue will ring agents before moving on to the next available. This should be less than the Queue Ring Timeout. (Default is 15 seconds)
- Forward if unanswered—Where to send the call if agents fail to answer before the Queue Ring Timeout.
- Voicemail—Callers will be sent to queue's voicemail if agents fail to answer before the Ring Timeout and Forward if unanswered is not set. Typically companies do not wish use queue voicemails and often we set this to a user's voicemail. However, if you wish to use queue voicemail, this will also trigger the system message “Please continue to hold or Press 2 to leave a voicemail.” and then return the call back to the queue if nothing is pressed.
Save and Apply
- Click on the "add" button located at the bottom of the screen.
If you wish for direct dial or a phone number to call directly into the queue, or if you did not select an available number in the "Basic" set up, you need to apply the queue for incoming calls to use. Otherwise, the queue will be available for Dial Pad Menu of your Auto Attendant.
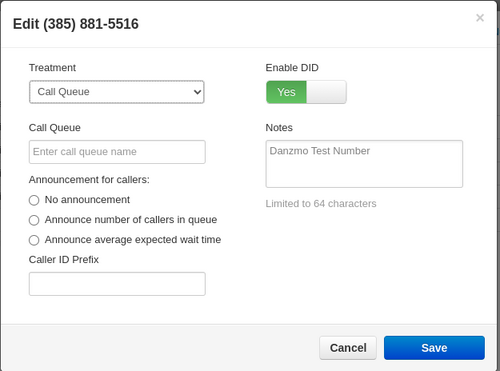
- Click on "Inventory" Button
- Click on the "Edit" icon at the right of the phone number you wish to use
- Change treatment to "Call Queue"
- In the field below enter the extension number of the Call Queue you wish to use.
- Click Save
Once you click "Save" incoming calls should immediately start.
Add Agents
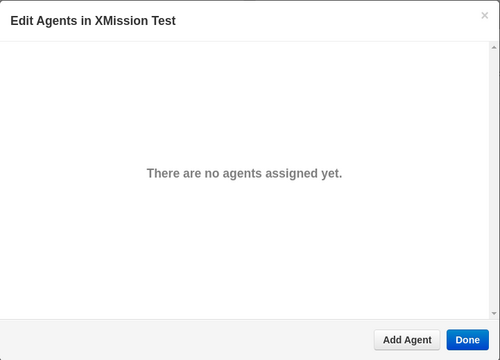
Call Queues will default with no agents assigned to them. To ensure callers ring to agents you'll need to:
- Click on "Call Queues" Button.
- Click on the "Person icon" of the call queue you want to add agents too.
- Click on Add Agents.
- Fill out the required filed on the pop-up:
- Add Agent(s) by —Select available agents to add in a drop-down box or be able to enter the name/extension.
- Agent Extension—Type in or click in the box to select the users you want added to the queue. (You'll select them one by one)
- Status—Queue status of availability. XMission defaults to Online. (please don't change).
- Note: the agent options will alter depending on the queue type selected. This example is for "Round Robin"
- Wrap up time (sec)—Gives the user a break between waiting callers to be routed to them. (Default setting is 0 sec)
- Max Simultaneous Calls—Allows the queue to assign more than one call to them. (Default setting is 1)
- Max SMS Sessions—This feature is disabled by default.
- Queue Priority for agent—If you have a user extension in more than one queue, this allows you to assign priority over another. (Default setting is 1)
- Request Confirmation—If checked, this requires a user to press 1 to accept the call from the queue.
- Auto Answer—If checked, the call will be routed to the user extension and automatically be answered on Speaker or Headset.
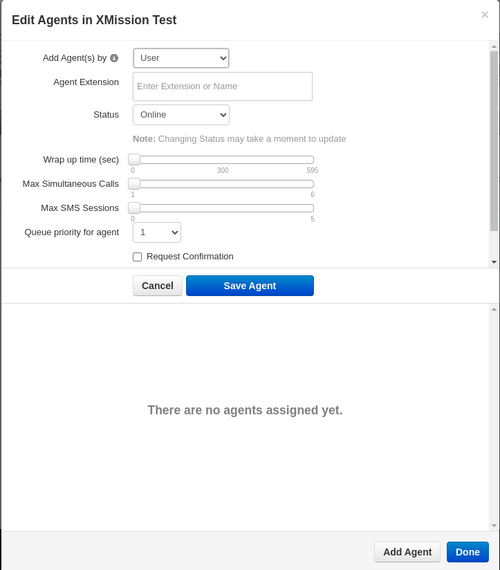
- Click Save Agent.
- Click Done
Call Park
Call park is a feature that allows you to put a call on hold at one telephone set and continue the conversation from any other telephone set.
Example: Think of when you are at the grocery store and you hear the announcement "Call for produce on 121". This means the phone operator placed a call on "park 121" so a store employee in produce can pick up that call.
We offer two kinds of Call Park Queues:
- Directed—This is the traditional call parking feature where one user simply transfers the caller to a specific Call Park so another user is able to retrieve this call somewhere else in the office.
- Dynamic—This is an advanced feature where the system determines what "Park Extension" will be used. The user will transfer the caller by dialing *** and the system will transfer the caller to any available queue. After the call has transferred, the system will announce the location.
Create Call Park Queue
- Click "Call Queues"
- Click on "Add Call Queue"
- Fill out the required information on the pop-up window:
- Name—Can be any word(s) that is descriptive of the purpose. We suggest {Park 1, Park 2, etc}
- Extension—The extension must be between 700 and 729.
- Queues in 710-729 have Ringback enabled, if a call sits in park longer then 2 min, it will complete a "ring all" transfer.
- Type—Select Call Park
- Click on Add
Repeat the steps above for each additional call park you wish to have.
Time Frames
Time Frames is a very powerful tool in the PBX Software. This is used to determine at what time calls are routed. Typically this is used for organizations that wish to have Auto Attendants and Call Queues to operate during specific hours such as:
- Business Hours
- After Hours
- Holiday Hours
- Weekend Hours
To ensure proper routing, please email a request that contains:
- Hours of Operation.
- Business Hours, After Hours, etc.
- Preferred routing during each operation.
- Business Hours, All calls reach <preferred ring configuration>.
However, in situations of Holiday Hours or Emergency Hours, using "Office Manager" allows you to add/edit/remove Time Frame configurations. Please use caution when making changes in Time Frames.
Creating Time Frame
- Click on "Time Frames".
- Click "Add Time Frame".
- Enter a name for the time frame.
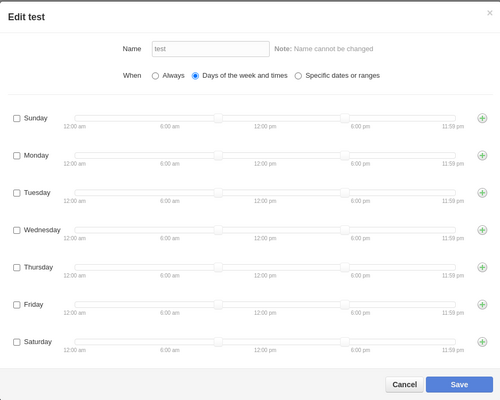
- Select how you would like to configure the time frame:
- Always—Applies 24/7, default call routing, most likely would never use this option.
- Days of the Week and Times—Setting a range of days and times. We mostly use this for Business Hours.
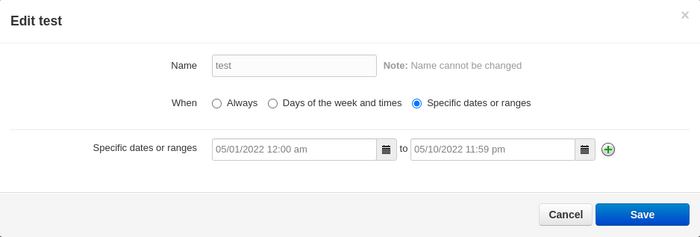
- Specific dates or ranges—Specified dates in the future. Used for holidays or scheduled closings.
- Click Save
Days of the Week, Example
- Click Add Time Frame
- Name—"Business Hours"
- When—Days of the week and times
- Select the checkboxes:
- Monday, Tuesday, Wednesday, Thursday, and Friday.
- The system will default to 9 AM to 5 PM for each day.
- Alter hours to match business hours.
- Click Save.
Specified Dates, Example
- Click Add Time Frame
- Name—Holidays
- When—Specific dates or ranges
- Click the calendar icon to select the date and time for each date you want to add.
- For additional dates use the green add icon at the right
- Click Save.
Music On Hold
XMission PBX software comes with default hold music for Queues, Users and Conferences. However, our default hold music may not apply perfectly to your business. Requirements for "Music on Hold" are:
- Any licensed music owned can be uploaded to the system.
- XMission is not responsible to verify licensing of music and copyright fees.
- Files must be .MP3 or .WAV file format.
- 8KHz Mono Audio and encoded in 8-bit PCM u-law
To help ensure any music uploaded has been edited for 8KHz Mono Audio and encoded in 8-bit PCM u-law usage, we recommend using this free online program.
Upload new Music
NOTE: This uploads the music to the "Global" PBX. Each user has the same button to upload music for their extension only.
- Click on "Music On Hold"
- Click on Add Music
- Click Upload
The page will refresh and you will see your newly uploaded selection.
Inventory
The "Inventory" section of the portal is a central location for your entire service. Entering this section and making unauthorized edits can break the PBX service. It is strongly suggested to send your requests to XMission for proper configuration.
Phone Numbers
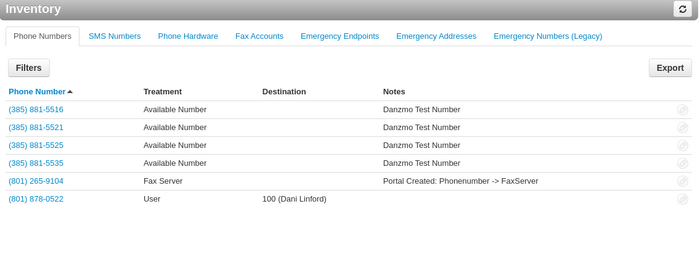
Under the Phone Number tab you'll be able to see all the outside numbers assigned to your service. Through this you'll be able to see how those numbers are routed:
To help understand how numbers are routed:
- Treatment—This is determining what form of service that number will be used for.
- Available Number—The number is available to be routed to a final location. If the number is called, a recording will play "The number is currently not in service."
- User—The number is assigned to a specific extension as a "Direct Dial".
- Fax—No longer in use.
- Conference—The number is assigned to a Conference Bridge.
- Call Queue—The number is a direct dial to call queues.
- Auto Attendant—The number will use the Auto Attendant.
- Fax Server—Fax Numbers can only be used for fax when assigned to this service. No voice option is available.
- Destination—The assigned extension for the above services.
SMS Numbers
Currently XMission does not provide SMS functionality. This is a feature that will be available in the future.
Phone Hardware
Requires IP Based phones that are not firmware- or carrier-locked. XMission supports a variety of phone brands.
* Avaya
* Cisco
* Polycom
* Yealink
* And More
Please contact XMission's voice team if you wish to make any changes or edits in this section of the profile as not all phone makes and models are supported. Our team will research and assist in additional configurations on the phone to get registration.
Fax Accounts
XMission fax services will be assigned via the Fax Account tab. XMission-registered devices are required.
Emergency Numbers
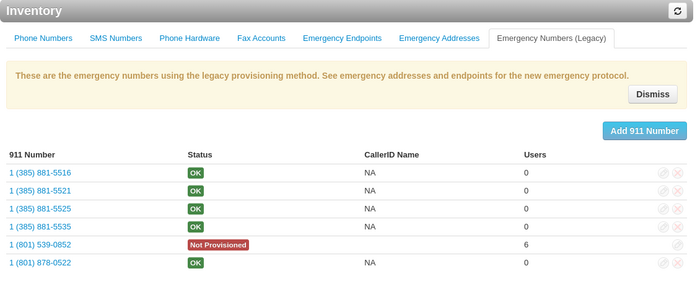
E911 location services. In this tab we ensure that emergency services will dispatch to the correct location. While "Office Managers" are able to edit the location services, XMission strongly recommends contacting your sales executive to make proper adjustments to E911 locations.
Call History
Call History is available for each user on our XMission Voice Portal help page.
When logged in as the Office Manager you are able to see the entire call history on each individual extension. The search process is the same, but includes more options.
Extension and Reserved Extension List
Usable Extensions
Suggested Extension options:
| Number | Description | Usage |
|---|---|---|
| 100 - 399 | User Extensions | 3 digit extensions for phone hardware. |
| 500 - 699 | User Extensions | 3 digit extensions for phone hardware. |
| 700 - 729 | Park Call Queue | Reserved for Call Queue Type "Call Park". |
| 800 - 899 | User Extensions | 3 digit extensions for phone hardware. |
| 1000 - 4999 | User Extensions | 4 digit extensions for phone hardware. |
| 6000 - 6099 | Call Queue | Suggested extensions for Call Queue options. |
| 6100 - 6199 | Auto Attendant | Suggested extensions for Attendant options. |
| 6200 - 6900 | Available Use | Available to use for any extension option. |
| 6901 - 6999 | Call Logic | Used only for PBX Administration. |
| 8000 - 8999 | User Extensions | 4 digit extensions for phone hardware. |
| 9200 - 9299 | Conference | Suggested extension for conference bridge usage. |
Pre-reserved extensions
Reserved Extensions (not available for use outside of specified description)
| Number | Description | Usage |
|---|---|---|
| 000 - 099 | Internal Use | Pre-defined software usage and dial plans. |
| 411 | Directory Information | National 411 Directory look up. (Additional charges may occur if used) |
| 400 - 499 | System Services | Reserved for software programing / National Hotlines |
| 730 - 799 | System Failure | Reserved to prevent failure with Call Park. |
| 900 - 999 | System Failure | Reserved to prevent E911 conflicts. |
| 911 | Emergency Services | Emergency 911 dispatch. |
| 988 | Hot Line | National Suicide Prevention hotline. |
| 5000 - 5999 | System Services | Reserved for Voicemail and other system functionality. |
| 7000 - 7990 | System Failure | Reserved to prevent service failure. |
| 9000 - 9199 | System Features | Reserved for system functionality. |
| 9300 - 9999 | System Features | Reserved for system functionality. |
PBX Star Codes
These Star Codes are available for all PBX Customers and should be available in real time. If a code does not work for you please notify the XMission voice team at voip@xmission.com.
| Star Code | Example | Description |
|---|---|---|
| *35<extension> | Dial *35101 | Extension Pickup—Answer a call that is ringing at another extension. |
| *36 | Dial *36 | PBX Pickup—Answer any ringing call within the system. |
| *55<extension> | Dial *55701 | Call Park Pickup—Answer a call from Park if not programed on the phone. |
| *67<external number> | Dial *678015390852 | Caller ID blocking—Anonymous Caller ID. |
| *72<external number> | Dial *7218015390852 | Call Forwarding—Enable call forwarding per extension. (Dialing a 1 before the area code is required) |
| *73 | Dial *73 | Call Forwarding—Disabled call forwarding per extension. |
| *97 | Dial *97 | Voicemail Access. |
System Feature Codes
| Code | Example | Description |
|---|---|---|
| 03<extension> | Transfer/Dial 03101 | Connects directly to extension voicemail. |
| 07<extension> | Dial 07101 | Directed Pickup, Picks up caller from ringing extension or park. |
| 08<extensoon> | Dial 08100 | Activates intercom if phone hardware has been provisioned for intercom service. |
| 700 - 719 | Transfer/Dial 701 | Transfer/Pickups caller in Call Park. |
| 99<extension> | Dial 99101 | Activates intercom if phone hardware has been provisioned for intercom service. |
| 5001 | Dial 5000 | Connects you to global voicemail. |

