Difference between revisions of "Netscape 7 Setup"
From XMission Wiki
m |
|||
| Line 1: | Line 1: | ||
| − | |||
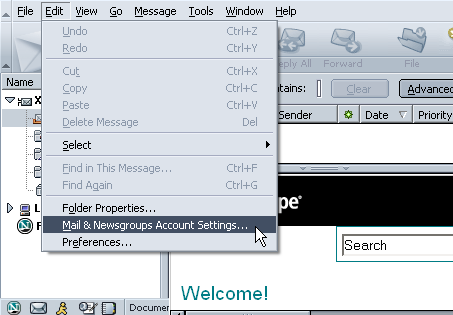
#Open Netscape 7 Mail. Click the <span class="button">Edit</span> menu at the top, then select <span class="button">Mail & Newsgroups Account Settings</span>. | #Open Netscape 7 Mail. Click the <span class="button">Edit</span> menu at the top, then select <span class="button">Mail & Newsgroups Account Settings</span>. | ||
| − | #: | + | #[[Image:Winns701.png]] |
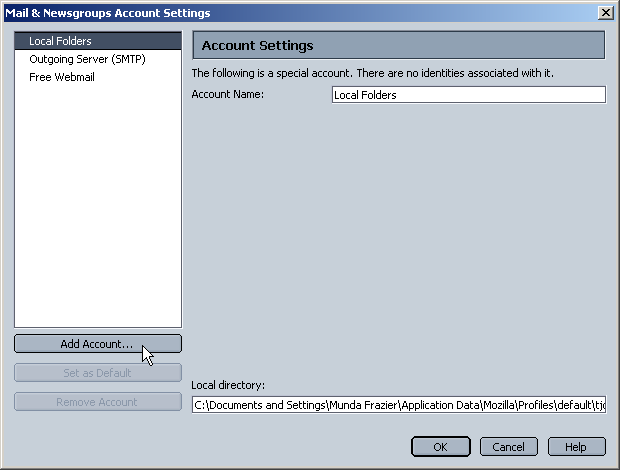
#Click the <span class="button">Add Account</span> button to begin setting up your XMission account. | #Click the <span class="button">Add Account</span> button to begin setting up your XMission account. | ||
| − | #: | + | #[[Image:Winns702.png]] |
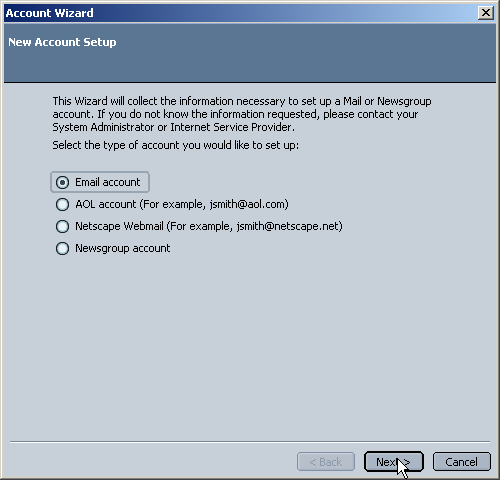
#Select the <span class="button">Email Account</span> option, then click <span class="button">Next</span> | #Select the <span class="button">Email Account</span> option, then click <span class="button">Next</span> | ||
| − | #: | + | #[[Image:Winns703.png]] |
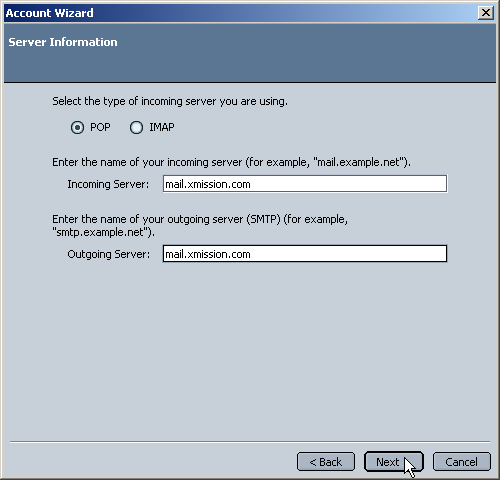
#Select <span class="button">POP</span> for the incoming server option. In the spaces provided for <span class="button">Incoming Server</span> and <span class="button">Outgoing Server</span> type <span class="button"><tt>mail.xmission.com</tt></span> as shown in the picture below, then click <span class="button">Next</span>. | #Select <span class="button">POP</span> for the incoming server option. In the spaces provided for <span class="button">Incoming Server</span> and <span class="button">Outgoing Server</span> type <span class="button"><tt>mail.xmission.com</tt></span> as shown in the picture below, then click <span class="button">Next</span>. | ||
| − | #: | + | #[[Image:Winns704.png]] |
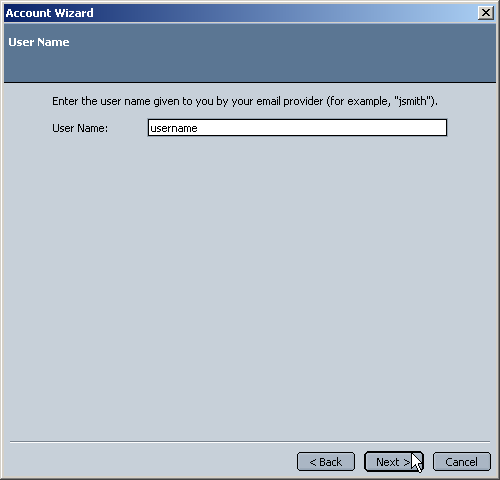
#Enter your XMission user name, then click <span class="button">Next</span>. | #Enter your XMission user name, then click <span class="button">Next</span>. | ||
| − | #: | + | #[[Image:Winns705.png]] |
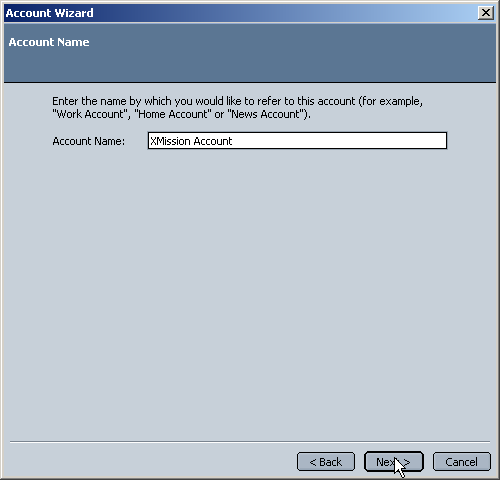
#Enter a name by which you will identify this account in Netscape, something like <span class="button">XMission Account</span> or your email address is recommended, then click <span class="button">Next</span>. | #Enter a name by which you will identify this account in Netscape, something like <span class="button">XMission Account</span> or your email address is recommended, then click <span class="button">Next</span>. | ||
| − | #: | + | #[[Image:Winns706.png]] |
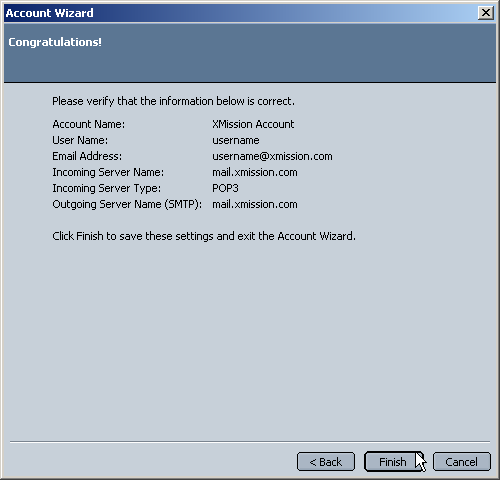
#Take a look at this page and verify that you havenít made any spelling errors or other typos, if everything looks correct, click <span class="button">Finish</span> to complete the setup process. | #Take a look at this page and verify that you havenít made any spelling errors or other typos, if everything looks correct, click <span class="button">Finish</span> to complete the setup process. | ||
| − | #: | + | #[[Image:Winns707.png]] |
You have successfully configured Netscape to check your XMission email account. | You have successfully configured Netscape to check your XMission email account. | ||
| − | |||
[[Category:XMission Email Archives|Netscape 7]] | [[Category:XMission Email Archives|Netscape 7]] | ||
Revision as of 10:45, 2 June 2009
- Open Netscape 7 Mail. Click the menu at the top, then select .
- Click the button to begin setting up your XMission account.
- Select the option, then click
- Select for the incoming server option. In the spaces provided for and type as shown in the picture below, then click .
- Enter your XMission user name, then click .
- Enter a name by which you will identify this account in Netscape, something like or your email address is recommended, then click .
- Take a look at this page and verify that you havenít made any spelling errors or other typos, if everything looks correct, click to complete the setup process.


You have successfully configured Netscape to check your XMission email account.