Difference between revisions of "OS X 10.3 Setup"
From XMission Wiki
m (Protected "Dialup Archives:OS X 10.3 Setup" [edit=sysop:move=sysop]) |
m (Removed protection from "OS X 10.3 Setup") |
||
| (2 intermediate revisions by 2 users not shown) | |||
| Line 1: | Line 1: | ||
| − | |||
Macintosh OSX 10.3.x Dialup Setup | Macintosh OSX 10.3.x Dialup Setup | ||
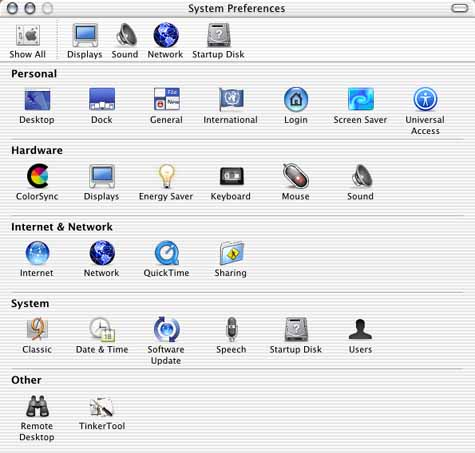
#Click on the Apple menu and select <span class="button">System Preferences...</span>. | #Click on the Apple menu and select <span class="button">System Preferences...</span>. | ||
#Click on the <span class="button">Network</span> icon. | #Click on the <span class="button">Network</span> icon. | ||
| − | #: | + | #[[Image:Macosx1.png]] |
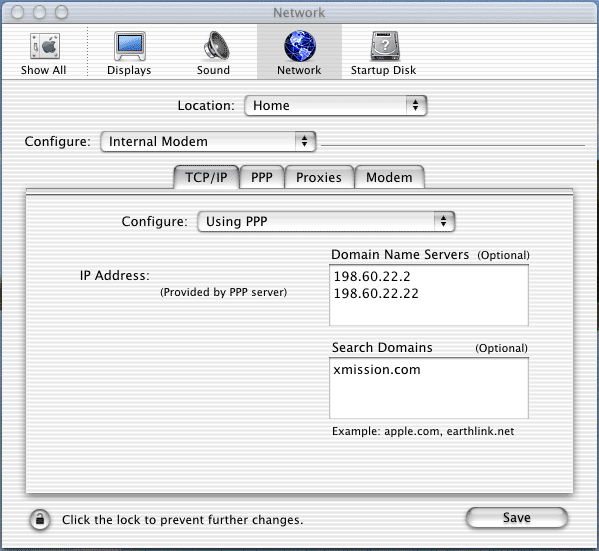
#Next to <span class="button">Show:</span>, select <span class="button">Internal Modem</span>. | #Next to <span class="button">Show:</span>, select <span class="button">Internal Modem</span>. | ||
#Click on the <span class="button">TCP/IP</span> tab, if it's not already selected. | #Click on the <span class="button">TCP/IP</span> tab, if it's not already selected. | ||
| Line 10: | Line 9: | ||
#In the box labeled <span class="button">Domain Name Servers (Optional)</span>, enter <tt>198.60.22.2</tt> and <tt>198.60.22.22</tt>. | #In the box labeled <span class="button">Domain Name Servers (Optional)</span>, enter <tt>198.60.22.2</tt> and <tt>198.60.22.22</tt>. | ||
#In the box labeled <span class="button">Search Domains</span>, enter <tt>xmission.com</tt>. | #In the box labeled <span class="button">Search Domains</span>, enter <tt>xmission.com</tt>. | ||
| − | #: | + | #[[Image:Macosx2.png]] |
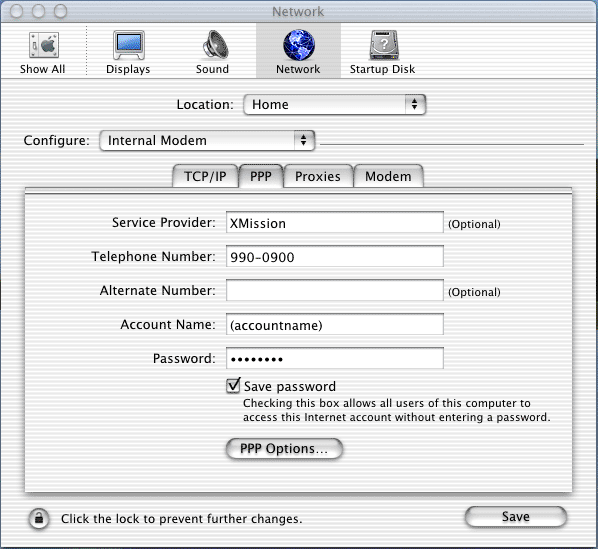
#Click on the <span class="button">PPP</span> tab. | #Click on the <span class="button">PPP</span> tab. | ||
#Next to <span class="button">Service Provider:</span>, enter <tt>XMission</tt>. | #Next to <span class="button">Service Provider:</span>, enter <tt>XMission</tt>. | ||
| Line 17: | Line 16: | ||
#Next to <span class="button">Password:</span>, enter your XMission password. | #Next to <span class="button">Password:</span>, enter your XMission password. | ||
#If you would like your password to be saved on your computer, check the box labeled <span class="button">Save password</span>. | #If you would like your password to be saved on your computer, check the box labeled <span class="button">Save password</span>. | ||
| − | #: | + | #[[Image:Macosx3.png]] |
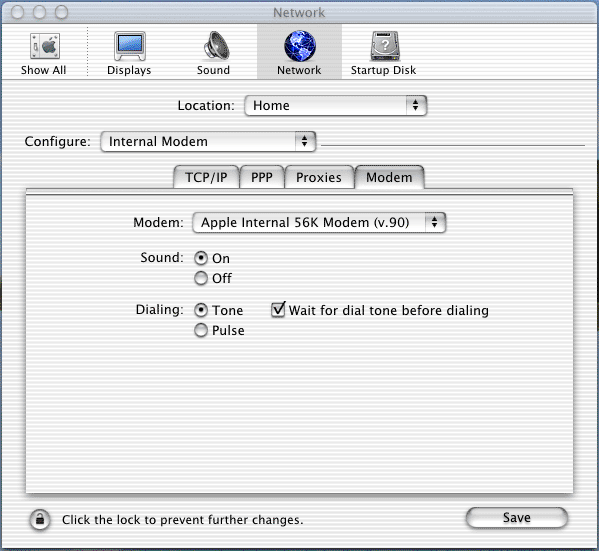
#Click on the <span class="button">Modem</span> tab. | #Click on the <span class="button">Modem</span> tab. | ||
#If it's not already selected, select your modem from the pull-down list next to <span class="button">Modem:</span>. | #If it's not already selected, select your modem from the pull-down list next to <span class="button">Modem:</span>. | ||
#Click on the <span class="button">Save</span> (may also say <span class="button">Apply Now</span>) button. | #Click on the <span class="button">Save</span> (may also say <span class="button">Apply Now</span>) button. | ||
| − | #: | + | #[[Image:Macosx4.png]] |
#To dial, pen the hard drive icon on your desktop, open the <span class="button">Applications</span> folder, open the <span class="button">Internet Connect</span> icon, then click on the <span class="button">Connect</span> button. To disconnect, open the <span class="button">Internet Connect</span> utility and click on the <span class="button">Disconnect</span> button. | #To dial, pen the hard drive icon on your desktop, open the <span class="button">Applications</span> folder, open the <span class="button">Internet Connect</span> icon, then click on the <span class="button">Connect</span> button. To disconnect, open the <span class="button">Internet Connect</span> utility and click on the <span class="button">Disconnect</span> button. | ||
| Line 27: | Line 26: | ||
[[Category:Dialup Archives|OSX 10.3]] | [[Category:Dialup Archives|OSX 10.3]] | ||
| − | |||
| − | |||
| − | |||
| − | |||
Latest revision as of 13:04, 13 December 2012
Macintosh OSX 10.3.x Dialup Setup
- Click on the Apple menu and select .
- Click on the icon.
- Next to , select .
- Click on the tab, if it's not already selected.
- Next to , select .
- In the box labeled , enter 198.60.22.2 and 198.60.22.22.
- In the box labeled , enter xmission.com.
- Click on the tab.
- Next to , enter XMission.
- Next to , enter your local XMission access number here.
- Next to , enter your XMission username.
- Next to , enter your XMission password.
- If you would like your password to be saved on your computer, check the box labeled .
- Click on the tab.
- If it's not already selected, select your modem from the pull-down list next to .
- Click on the (may also say ) button.
- To dial, pen the hard drive icon on your desktop, open the folder, open the icon, then click on the button. To disconnect, open the utility and click on the button.


