Windows XP
From XMission Wiki
Windows XP PPPoE procedure:
- Before you begin, ensure that an Ethernet cable is connected from the appropriately provisioned port on your UTOPIA equipment to your computer.
Click the Windows icon ![]() on your task bar. This will pop up a menu, as seen below. Select "All Programs" and then "Accessories" and "Communications." Choose the "New Connection Wizard."
on your task bar. This will pop up a menu, as seen below. Select "All Programs" and then "Accessories" and "Communications." Choose the "New Connection Wizard."

- At the following screen, simply click "Next" and then choose "Connect to the Internet."

Select "Setup my connection manually."

- Select "Connect using a broadband connection that requires a username and password."

You may name the connection whatever you like, but we recommend naming it "XMission" as seen below. Once you've named your connection, click "Next."

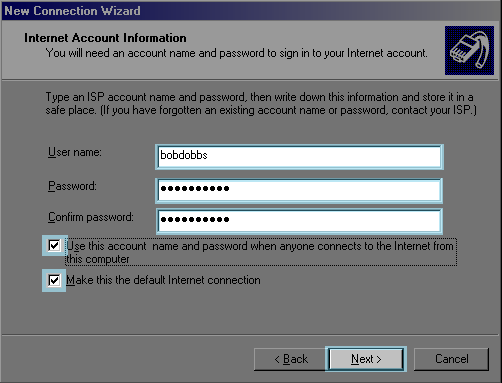
- Enter your XMission username and corresponding password. In the example below, we have used "bobdobbs" as a username. You would replace this with your own, unique XMission username. Remember that passwords are case-sensitive! You will also likely want to check the two boxes indicated below. Once finished, click "Next." At the following screen, simply click "Finish."

One last step you may want to take is to go to your "Control Panel" by returning to your Windows start icon ![]() as seen below:
as seen below:

Go to "network