Adding a Domain Alias: Difference between revisions
Jump to navigation
Jump to search
Created page with '== Plesk Unlimited Hosting: Adding a Domain Alias == You can create additional aliases for use with any domains in your Unlimited Hosting account. First, ensure you are logged i…' |
No edit summary |
||
| Line 2: | Line 2: | ||
You can create additional aliases for use with any domains in your Unlimited Hosting account. First, ensure you are logged into your account at http://hosting.xmission.com. | You can create additional aliases for use with any domains in your Unlimited Hosting account. First, ensure you are logged into your account at http://hosting.xmission.com. | ||
*From the Control Panel, click on the "Websites & Domains" tab near the top of the screen. | *From the Control Panel, click on the "Websites & Domains" tab near the top of the screen. | ||
Revision as of 13:33, 29 November 2012
Plesk Unlimited Hosting: Adding a Domain Alias
You can create additional aliases for use with any domains in your Unlimited Hosting account. First, ensure you are logged into your account at http://hosting.xmission.com.
- From the Control Panel, click on the "Websites & Domains" tab near the top of the screen.
- Near the bottom of the screen, click the "Add New Domain Alias" button.
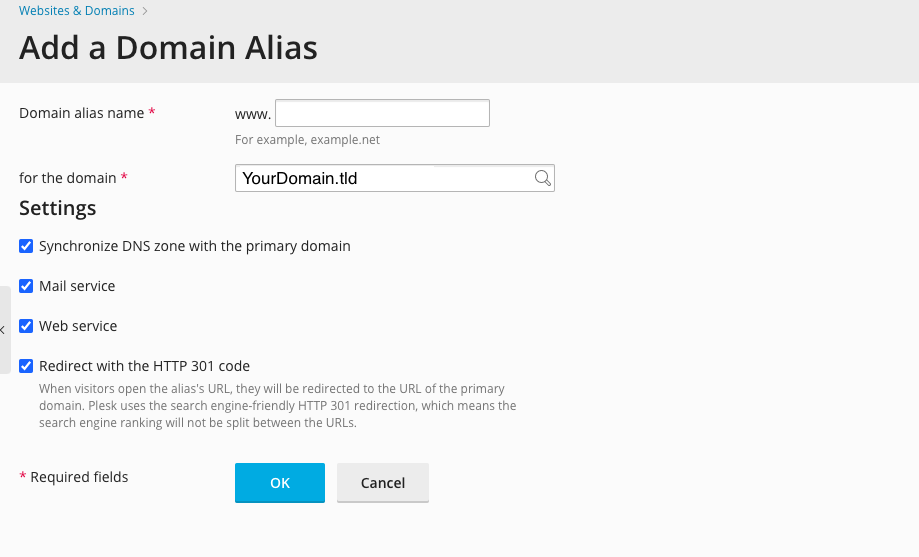
- On this screen, you will need to complete the following highlighted pieces of information. A brief description of each follows the image.
- Domain alias name: This is the name of the domain that will be aliased to your existing site. In this example, we would be adding "xdesign.org" which would alias to "xdesign.com"
- Synchronize DNS zone with the primary domain: As this is an alias, you will likely want this checked so any DNS changes made to your primary domain work with your new domain alias.
- Mail service: Check this box if you would like your domain alias to redirect emails to your actual domain. For example, if this box is checked, someone could email "example@xdesign.org" and it would be delivered to the account "example@xdesign.com"
- Web service: Check this box if you would like the web content from your primary domain to be visible at the new domain alias.
- Java web applications: If your primary domain utilizes any Java applications and you want these to be available at the domain alias as well, check this box.
- Once you've entered the correct information for your new domain, simply click "OK." You will see the following text indicating your new domain has been created successfully!
Continue on to...
