Lets Encrypt: Difference between revisions
Jump to navigation
Jump to search
| Line 7: | Line 7: | ||
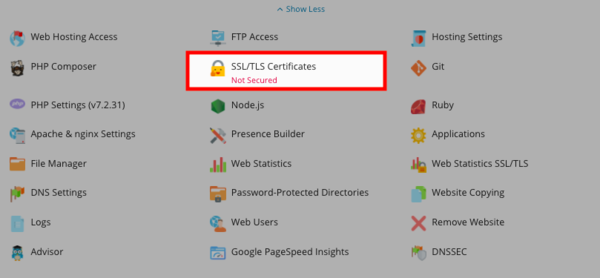
2. Find the "Let's Encrypt!" button under the website you are wanting to add a self-assigned Let's Encrypt SSL certificate for | 2. Find the "Let's Encrypt!" button under the website you are wanting to add a self-assigned Let's Encrypt SSL certificate for | ||
[[File:Letsencrypt.png| | [[File:Letsencrypt.png|600px]] | ||
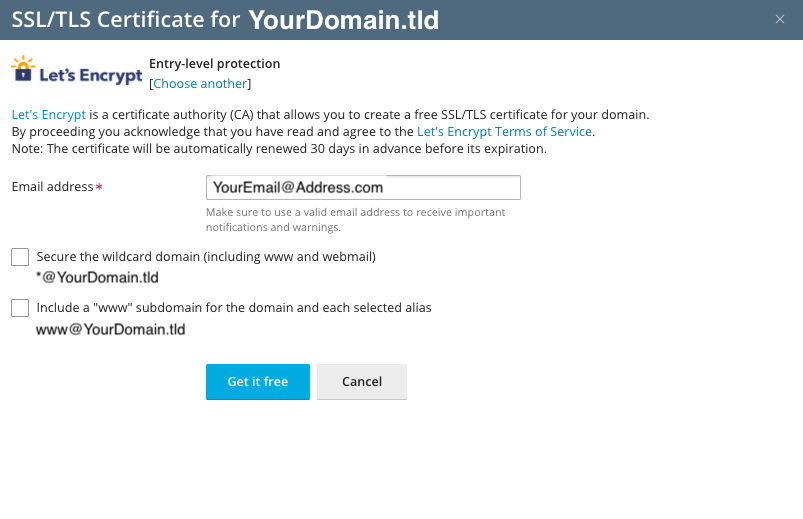
3. Fill in a contact email in case of a lost key, or you are in need of recovery | 3. Fill in a contact email in case of a lost key, or you are in need of recovery | ||
Revision as of 09:56, 9 June 2020
Let's Encrypt!
Let's Encrypt is a free SSL/CA service created by the Internet Security Research Group (ISRG). It allows its users to create their own SSL/TLS certificate to have secure HTTPS connections to their websites through a free service in their Shared Hosting panel. If you would like to know more about the ISRG or the Let's Encrypt product, please see https://letsencrypt.org/about/ .
How to create your own SSL certificate using Let's Encrypt
1. Log in to your hosting panel at hosting.xmission.com
2. Find the "Let's Encrypt!" button under the website you are wanting to add a self-assigned Let's Encrypt SSL certificate for
3. Fill in a contact email in case of a lost key, or you are in need of recovery
- If you wish to have your www website covered by the certificate, check the box "Include www.yourdomain.com" as an alternative domain name."
4 Click Renew
- Administration/Logging in
- Adding a Domain
- Adding MySQL Databases
- Adding/Managing DNS Records
- Managing Domain/Users
- Managing FTP Access/Users
- PHP Settings
- Previewing the Website
- Secure Your Sites
- Web Statistics
Additional Development Help
Applications
Domain Management

