Adding a Domain: Difference between revisions
Jump to navigation
Jump to search
No edit summary |
|||
| (13 intermediate revisions by 4 users not shown) | |||
| Line 1: | Line 1: | ||
= Plesk Shared Hosting: Adding a Domain = | |||
You can create additional domains for use with your | You can create additional domains for use with your Shared Hosting account. First, ensure you are logged into your account at the [https://hosting.xmission.com Shared Hosting login page]. | ||
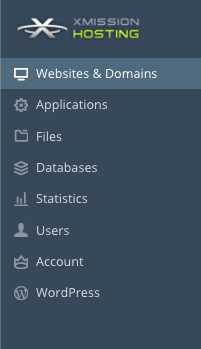
*From the Control Panel, click on the "Websites & Domains" tab near the top of the screen. | *From the Control Panel, click on the "'''Websites & Domains'''" tab near the top of the screen. | ||
[[File: | [[File:Plesk_tabs_new.png]] | ||
* | *Click the "'''Add New Domain'''" button, below Websites and Domains. | ||
[[File:Domainadd.png]] | [[File:Domainadd.png]] | ||
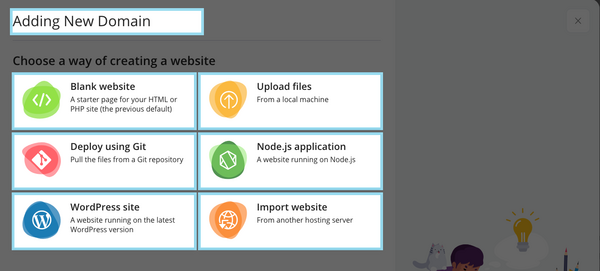
* | *You will be presented with the following options: | ||
[[File: | [[File:PleskAddDomain-1.png|600px]] | ||
* | * '''Blank Website''' - This is the default | ||
* | * '''Deploy using Git''' - Pull files from a Git repository | ||
* | * '''WordPress Site''' - Most Popular if you want to set up a WordPress site | ||
* | * '''Upload Files''' - If you already have your site complete you can choose this option | ||
* '''Node.js''' - A website running on Node.js | |||
* '''Import website''' - Import from another host | |||
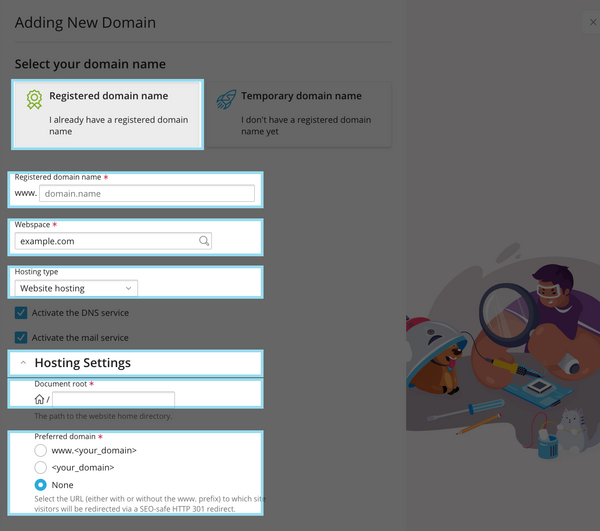
*On this screen, fill in your domain name, A brief description of each follows the image. | |||
[[File:PleskAddDomain-2.png|600px]] | |||
* '''Registered domain name''' vs '''Temporary domain name''' | |||
** It is recommended you choose Registered domain name | |||
** Temporary domain name will assign a randomly generated name that you can change later | |||
*'''Registered domain name''': This is the name of your new domain. | |||
*'''Webspace''': Where the domain will be hosted your primary domain should be listed here | |||
*'''Hosting Type''': | |||
** '''Website Hosting'''- If you are designing a new website. | |||
** '''Forwarding''' - If you want this domain to forward to another | |||
** '''No Hosting''' If you only want the domain available for E-Mail addresses or DNS. | |||
* Be sure to click on '''Hosting Settings''' | |||
*'''Document root''': This is the folder where you will build your new website. We recommend you name your folder specific to each domain. | |||
*'''Preferred domain''': You can choose to have domain.tld or www.domain.tld or none. | |||
<blockquote style="background-color: lightblue; border: solid thin grey;">'''It is highly recommended you create a separate rooted directory for each domain, as opposed to pointing your domain to a sub-directory.'''</blockquote> | |||
*Once you've entered the correct information for your new domain, simply click "'''OK.'''" You will see the following text indicating your new domain has been created successfully! | |||
[[File:Domaininfo.png]] | [[File:Domaininfo.png]] | ||
{{: | |||
[[Category: | {{:Shared_Hosting}} | ||
[[Category:Shared Hosting|Domains]] | |||
Latest revision as of 23:55, 7 December 2022
You can create additional domains for use with your Shared Hosting account. First, ensure you are logged into your account at the Shared Hosting login page.
- From the Control Panel, click on the "Websites & Domains" tab near the top of the screen.
- Click the "Add New Domain" button, below Websites and Domains.
- You will be presented with the following options:
- Blank Website - This is the default
- Deploy using Git - Pull files from a Git repository
- WordPress Site - Most Popular if you want to set up a WordPress site
- Upload Files - If you already have your site complete you can choose this option
- Node.js - A website running on Node.js
- Import website - Import from another host
- On this screen, fill in your domain name, A brief description of each follows the image.
- Registered domain name vs Temporary domain name
- It is recommended you choose Registered domain name
- Temporary domain name will assign a randomly generated name that you can change later
- Registered domain name: This is the name of your new domain.
- Webspace: Where the domain will be hosted your primary domain should be listed here
- Hosting Type:
- Website Hosting- If you are designing a new website.
- Forwarding - If you want this domain to forward to another
- No Hosting If you only want the domain available for E-Mail addresses or DNS.
- Be sure to click on Hosting Settings
- Document root: This is the folder where you will build your new website. We recommend you name your folder specific to each domain.
- Preferred domain: You can choose to have domain.tld or www.domain.tld or none.
It is highly recommended you create a separate rooted directory for each domain, as opposed to pointing your domain to a sub-directory.
- Once you've entered the correct information for your new domain, simply click "OK." You will see the following text indicating your new domain has been created successfully!
- Administration/Logging in
- Adding a Domain
- Adding MySQL Databases
- Adding/Managing DNS Records
- Managing Domain/Users
- Managing FTP Access/Users
- PHP Settings
- Previewing the Website
- Secure Your Sites
- Web Statistics
Additional Development Help
Applications
Domain Management


