WordPress Toolkit: Difference between revisions
| (25 intermediate revisions by 4 users not shown) | |||
| Line 1: | Line 1: | ||
== WordPress Toolkit == | |||
XMission’s Shared Hosting Platform has the WordPress Toolkit enabled on all servers. The WordPress Toolkit is a single management interface that allows you to easily install, configure, and manage your WordPress Development. | |||
Through the WordPress Toolkit you can: | |||
* New WordPress installs | |||
* Sync and Import current WordPress development | |||
* Detach and Remove current WordPress development | |||
* Migrate development from other hosts | |||
To get started using the [[WordPress_Toolkit/Install_WordPress | WordPress Toolkit]] | |||
== Managing Your WordPress Development == | |||
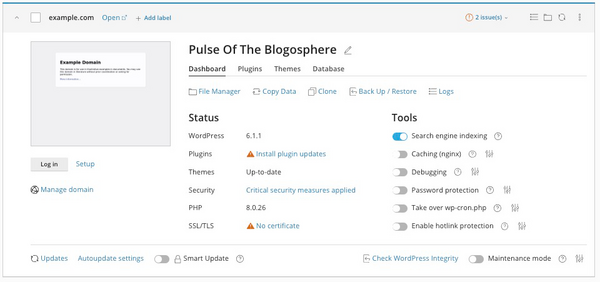
Once you've logged into your Hosting Control Panel, go to one of the WordPress buttons to see all of your currently synced WordPress website(s) hosted on the server. The WordPress Toolkit will create an information card about each sync'd website. | |||
[[File:PleskWPtoolkit-6.png|600px]] | |||
To find out how to [[WordPress_Toolkit/Manage_WordPress | Manage your website cards]] | |||
[[File: | == Update/Maintain WordPress == | ||
The Status Section will keep you up to date with the need to consider updates: | |||
[[File:PleskWPtoolkit-7.png|600px]] | |||
* To keep you site secure and free from vulnerabilities, we suggest you keep your WordPress development updated. Updates are released quite often, and for good reason: to patch against security breaches, provide new features, and add other important functions. | |||
* To keep your website secure, you need to regularly update the WordPress core, as well as any installed plugins and themes. Note that anytime a developer stops supporting a plugin or theme you should find a replacement since they won't continue to provide the necessary bug and security fixes. | |||
For more information on maintaining your website(s) [[WordPress_Toolkit/Updating_WordPress | Click Here]] | |||
== | == Secure WordPress == | ||
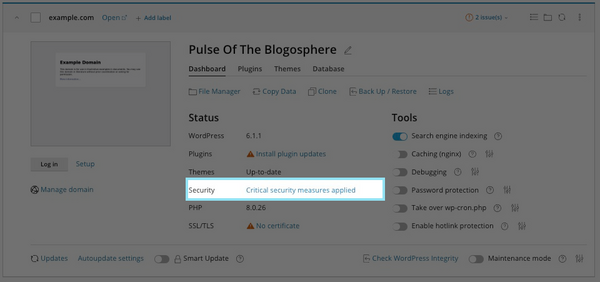
The Toolkit can enhance the security of each of your WordPress websites. It is able to check the wp-content folder, permissions of files and directories, database tables and much more. If the appropriate security measures are not applied to your site, it puts your website at risk of being compromised. You are able to see the current status of your website security on the WordPress card. | |||
* Click on Crucial security measures applied. | |||
[[File:PleskWPtoolkit-8.png|600px]] | |||
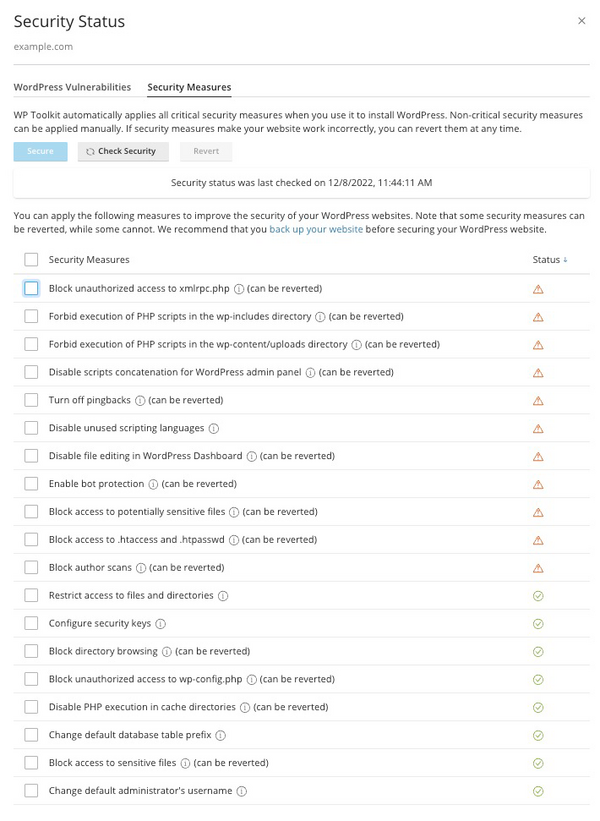
The following window will open: | |||
[[File:PleskWPtoolkit-9.png|600px]] | |||
* From here you can select the type of security measures to protect your site. | |||
== | == Copy and Sync Your WordPress == | ||
You may want to copy or clone your WordPress site in one of the following situations: | |||
* Staging | |||
* | * Production | ||
* | * Backup/Master copy | ||
* | * Multiple Development | ||
Learn how to copy or sync cloned websites [[WordPress_Toolkit/Copy_WordPress | copy or sync cloned websites]] | |||
== Maintenance Mode == | |||
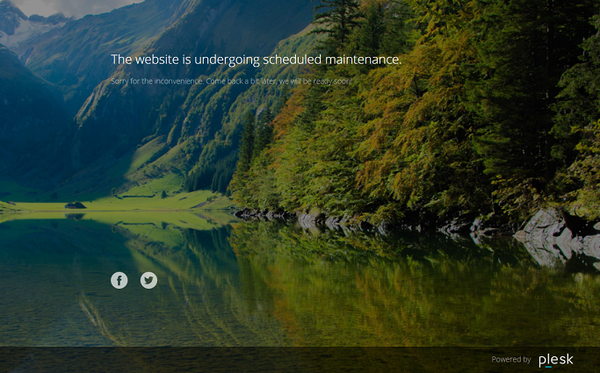
When editing your WordPress website you may want to place it in maintenance mode, so the website's content is hidden from visitors. | |||
[[File:WP_Maintenance.png|600px]] | |||
Your WordPress website enters maintenance mode automatically when you are: | |||
* Upgrading your WordPress instance | |||
* Synchronizing WordPress instances via WordPress Toolkit | |||
# Go | # Go to WordPress and choose the website. | ||
# Switch on “Maintenance mode” on the instance card. | |||
# | |||
#: | #: | ||
#:[[File: | #:[[File:WP_Maintenance2.png]] | ||
#: | #: | ||
# | # To take your website out of maintenance mode, switch off “Maintenance mode”. | ||
=== | === Customize the maintenance page === | ||
# | # Click the tools icon next to “Maintenance mode”. | ||
# | #: | ||
# | #:[[File:PleskMaintenance.png|600px]] | ||
#: | #: | ||
# | # Template | ||
# | #: | ||
# | #:[[File:PleskWPtoolkit-Maint-1.png|600px]] | ||
#* Clicking Customize will allow you to edit the HTML of the Maintenance page. | |||
#: | |||
# Screen Text | |||
#: | |||
#:[[File:PleskMaintenance-2.png|600px]] | |||
#* '''Browser page title''' - This is the title of the page | |||
#* '''Text block 1''' - This is the text people will see on your page in big font | |||
#* '''Text block 2''' - This is the text people will see on. your page in smaller font | |||
* | #: | ||
* | # Timer | ||
#: | |||
#:[[File:PleskMaintenance-3.png|600px]] | |||
#* '''Countdown Timer''' - On or Off | |||
# | #* ''' Remaining Time''' - When on, allows you to set a time frame for your maintenance, this will display across the page. | ||
#: | |||
# Social Network Links | |||
#: | |||
#:[[File:PleskMaintenance-4.png|600px]] | |||
#* '''Default Links''' - You can remove them or restore them to defaults | |||
#* '''Facebook''' - Set your Facebook social media link | |||
#* '''Twitter''' - Set your Twitter social media link | |||
#* '''Instagram''' - Set your Instagram social media link | |||
#: | #: | ||
# Click Ok | |||
# Click | |||
{{:Shared_Hosting}} | |||
[[Category:Shared Hosting|WordPress ToolKit]] | |||
Latest revision as of 15:21, 8 December 2022
WordPress Toolkit
XMission’s Shared Hosting Platform has the WordPress Toolkit enabled on all servers. The WordPress Toolkit is a single management interface that allows you to easily install, configure, and manage your WordPress Development.
Through the WordPress Toolkit you can:
- New WordPress installs
- Sync and Import current WordPress development
- Detach and Remove current WordPress development
- Migrate development from other hosts
To get started using the WordPress Toolkit
Managing Your WordPress Development
Once you've logged into your Hosting Control Panel, go to one of the WordPress buttons to see all of your currently synced WordPress website(s) hosted on the server. The WordPress Toolkit will create an information card about each sync'd website.
To find out how to Manage your website cards
Update/Maintain WordPress
The Status Section will keep you up to date with the need to consider updates:
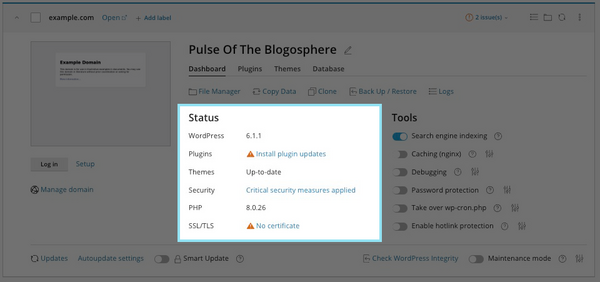
- To keep you site secure and free from vulnerabilities, we suggest you keep your WordPress development updated. Updates are released quite often, and for good reason: to patch against security breaches, provide new features, and add other important functions.
- To keep your website secure, you need to regularly update the WordPress core, as well as any installed plugins and themes. Note that anytime a developer stops supporting a plugin or theme you should find a replacement since they won't continue to provide the necessary bug and security fixes.
For more information on maintaining your website(s) Click Here
Secure WordPress
The Toolkit can enhance the security of each of your WordPress websites. It is able to check the wp-content folder, permissions of files and directories, database tables and much more. If the appropriate security measures are not applied to your site, it puts your website at risk of being compromised. You are able to see the current status of your website security on the WordPress card.
- Click on Crucial security measures applied.
The following window will open:
- From here you can select the type of security measures to protect your site.
Copy and Sync Your WordPress
You may want to copy or clone your WordPress site in one of the following situations:
- Staging
- Production
- Backup/Master copy
- Multiple Development
Learn how to copy or sync cloned websites copy or sync cloned websites
Maintenance Mode
When editing your WordPress website you may want to place it in maintenance mode, so the website's content is hidden from visitors.
Your WordPress website enters maintenance mode automatically when you are:
- Upgrading your WordPress instance
- Synchronizing WordPress instances via WordPress Toolkit
- Go to WordPress and choose the website.
- Switch on “Maintenance mode” on the instance card.
- To take your website out of maintenance mode, switch off “Maintenance mode”.
Customize the maintenance page
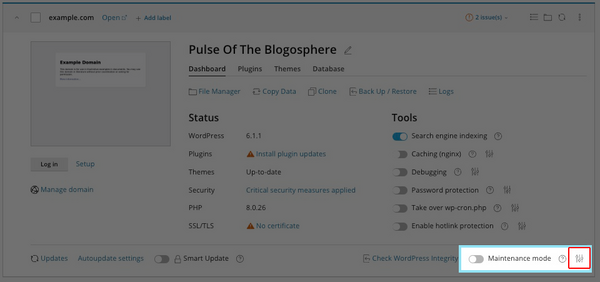
- Click the tools icon next to “Maintenance mode”.
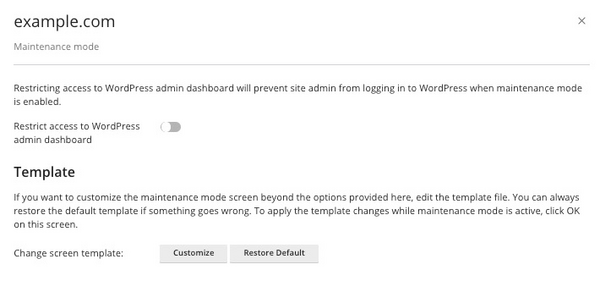
- Template
- Clicking Customize will allow you to edit the HTML of the Maintenance page.
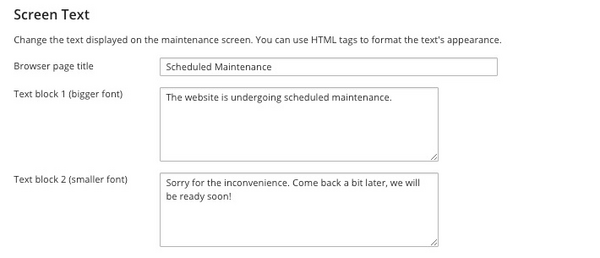
- Screen Text
- Browser page title - This is the title of the page
- Text block 1 - This is the text people will see on your page in big font
- Text block 2 - This is the text people will see on. your page in smaller font
- Timer
- Countdown Timer - On or Off
- Remaining Time - When on, allows you to set a time frame for your maintenance, this will display across the page.
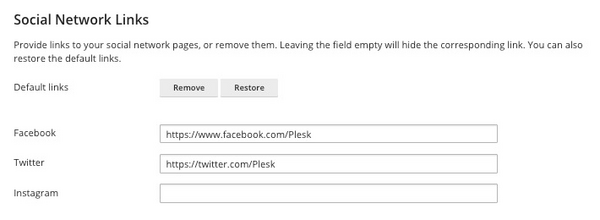
- Social Network Links
- Default Links - You can remove them or restore them to defaults
- Facebook - Set your Facebook social media link
- Twitter - Set your Twitter social media link
- Instagram - Set your Instagram social media link
- Click Ok
- Administration/Logging in
- Adding a Domain
- Adding MySQL Databases
- Adding/Managing DNS Records
- Managing Domain/Users
- Managing FTP Access/Users
- PHP Settings
- Previewing the Website
- Secure Your Sites
- Web Statistics
Additional Development Help
Applications
Domain Management
