Managing Domain/Users: Difference between revisions
Jump to navigation
Jump to search
| (17 intermediate revisions by 5 users not shown) | |||
| Line 1: | Line 1: | ||
== Plesk | == Plesk Shared Hosting: Managing Users & Roles == | ||
If you want to allow other users to access the Panel for managing websites, installed applications, or use e-mail services under your domains, then you need to create user accounts. | If you want to allow other users to access the Panel for managing websites, installed applications, or use e-mail services under your domains, then you need to create user accounts. | ||
| Line 7: | Line 7: | ||
*You will see a list of current users | *You will see a list of current users. If you want to modify this user's role, simply click on the blue name itself. If you want to create a new user, click on button labeled "Create User Account." | ||
[[File:Plesk_create_user1.png]] | [[File:Plesk_create_user1.png|600px]] | ||
*You will see the following screen. | *You will see the following screen. | ||
[[File: | [[File:PleskCreateUser2.png|600px]] | ||
Below is a brief description for each of the fields available to you on this screen: | Below is a brief description for each of the fields available to you on this screen: | ||
* | *'''Contact name''': This would be the name of the person you are creating the account for. | ||
*'''E-mail address''' which is also used as a username for logging in to the Panel: The email address entered should be valid as password reset links will be sent there. | |||
*'''User role''': Define which role this user will play in regards to the Control Panel. You can also modify existing roles or create new ones. For more information about User Roles, see section below. | |||
*'''Access to subscriptions''': Define which domains your users have access to. | |||
*'''Username''': This field is not used, as the username is the email address you defined above. | |||
*'''Password''': Please create a secure password for your user. | |||
*'''Confirm password''': Enter he same password; this is to ensure no mistakes were made when defining the password. Please note if this is entered incorrectly you will be unable to proceed creating a new user. | |||
*'''User is active''': You may un-check this box to restrict this user from being able to log in and make changes. | |||
=== Creating & Managing User Roles === | |||
Assign roles to users to give them access to apps and services hosted on your account. There are several predefined user roles. You can modify them or create your own custom roles. | |||
*From the Control Panel, click on the "Users" tab near the top of the screen. | |||
[[File:Users_tab.png ]] | |||
*Next click on the Tab that says "User Roles." | |||
*You will likely see a list of predefined roles. You may modify these roles by click on the corresponding blue name for each, or you can also create new roles using the "Create User Role" button. | |||
[[File:PleskUserRoles2.png|600px]] | |||
*Whether you are modifying or creating, you will see a page similar to the one below. Simply check either the box for "Granted" or "Denied" to give permissions or restrictions to the role you are editing. | |||
[[File:PleskUserRoles3.png|600px]] | |||
{{:Shared_Hosting}} | |||
[[Category:Shared Hosting|Domain/Users]] | |||
Latest revision as of 21:34, 7 December 2022
If you want to allow other users to access the Panel for managing websites, installed applications, or use e-mail services under your domains, then you need to create user accounts.
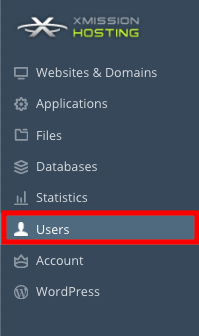
- From the Control Panel, click on the "Users" tab near the top of the screen.
- You will see a list of current users. If you want to modify this user's role, simply click on the blue name itself. If you want to create a new user, click on button labeled "Create User Account."
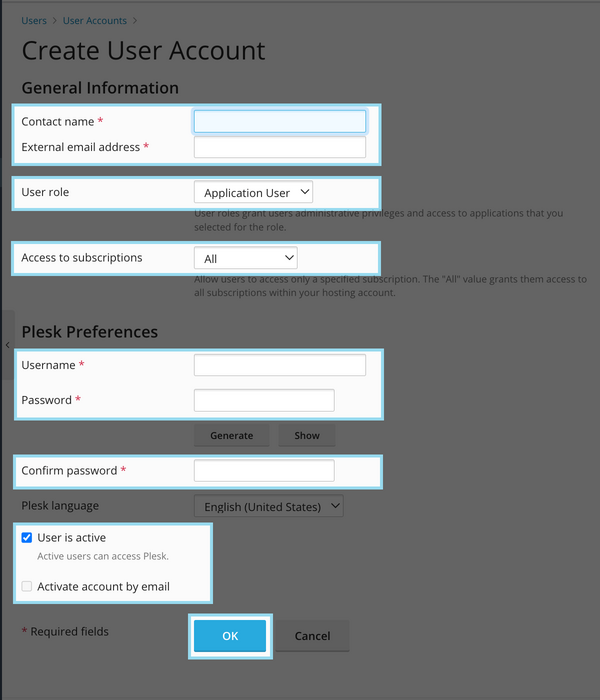
- You will see the following screen.
Below is a brief description for each of the fields available to you on this screen:
- Contact name: This would be the name of the person you are creating the account for.
- E-mail address which is also used as a username for logging in to the Panel: The email address entered should be valid as password reset links will be sent there.
- User role: Define which role this user will play in regards to the Control Panel. You can also modify existing roles or create new ones. For more information about User Roles, see section below.
- Access to subscriptions: Define which domains your users have access to.
- Username: This field is not used, as the username is the email address you defined above.
- Password: Please create a secure password for your user.
- Confirm password: Enter he same password; this is to ensure no mistakes were made when defining the password. Please note if this is entered incorrectly you will be unable to proceed creating a new user.
- User is active: You may un-check this box to restrict this user from being able to log in and make changes.
Creating & Managing User Roles
Assign roles to users to give them access to apps and services hosted on your account. There are several predefined user roles. You can modify them or create your own custom roles.
- From the Control Panel, click on the "Users" tab near the top of the screen.
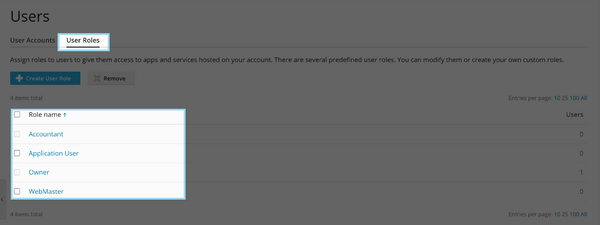
- Next click on the Tab that says "User Roles."
- You will likely see a list of predefined roles. You may modify these roles by click on the corresponding blue name for each, or you can also create new roles using the "Create User Role" button.
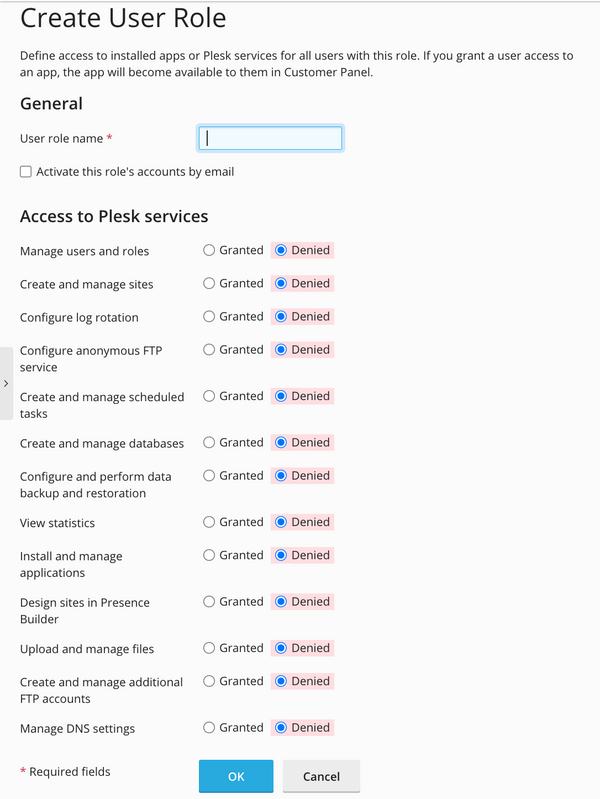
- Whether you are modifying or creating, you will see a page similar to the one below. Simply check either the box for "Granted" or "Denied" to give permissions or restrictions to the role you are editing.
- Administration/Logging in
- Adding a Domain
- Adding MySQL Databases
- Adding/Managing DNS Records
- Managing Domain/Users
- Managing FTP Access/Users
- PHP Settings
- Previewing the Website
- Secure Your Sites
- Web Statistics
Additional Development Help
Applications
Domain Management


