Copying a Website: Difference between revisions
No edit summary |
|||
| (12 intermediate revisions by 4 users not shown) | |||
| Line 1: | Line 1: | ||
== Plesk | == Plesk Shared Hosting: Copying a Website == | ||
Copying your website to a new location can be extremely useful. For example, you may want to make your current website only available at a subdomain or you may want to copy it for development purposes. Luckily, making a copy of your existing website is quite easy. First, ensure you are logged into your account at http://hosting.xmission.com. | Copying your website to a new location can be extremely useful. For example, you may want to make your current website only available at a subdomain or you may want to copy it for development purposes. Luckily, making a copy of your existing website is quite easy. First, ensure you are logged into your account at http://hosting.xmission.com. | ||
| Line 5: | Line 5: | ||
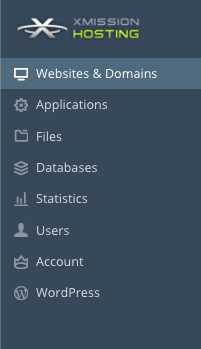
*From the Control Panel, click on the "Websites & Domains" tab near the top of the screen. | *From the Control Panel, click on the "Websites & Domains" tab near the top of the screen. | ||
[[File: | [[File:Plesk tabs new.png]] | ||
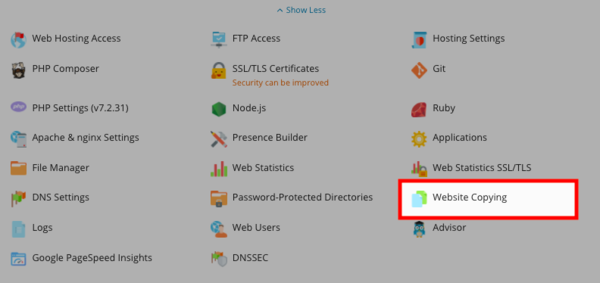
*Click the little arrow in the Doman name Box to expand the Hosting Settings, next select the "Website Copying" button. | |||
[[File:2websitecopy.png |600px]] | |||
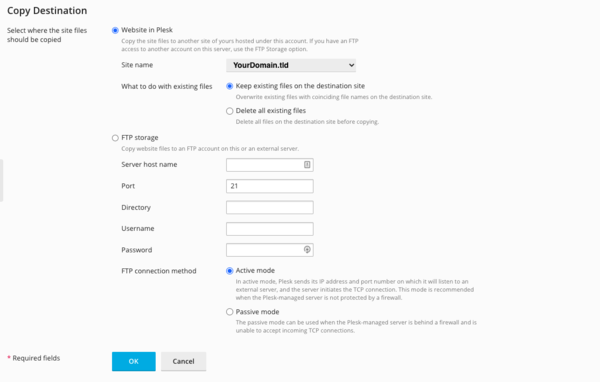
*You will now see a list of options and features. In this example, we will be copying the content of "stmyl.com" to "dev.stmyl.com" A brief description of the options follows below. | |||
[[File:4websitecopy.png |600px]] | |||
*Website in the Panel: ''If you are copying the content of your current site to a location also hosted within your Control Panel, you will want to select this option.'' | |||
*Site name: ''This is the destination for the content to be copied. In our example, it is the subdomain "dev.stmyl.com" You may also copy content to an entirely separate domain.'' <blockquote style="background-color: lightblue; border: solid thin grey;">Please note: You must have first created the destination domain or subdomain before you can copy the content. For information on creating new domains and subdomains, pursue the links at the bottom of this page.</blockquote> | |||
*What to do with existing files: ''If there is already content at the destination you are copying to, you can choose to either have the copy overwrite the relevant existing content or delete all the content completely.'' | *What to do with existing files: ''If there is already content at the destination you are copying to, you can choose to either have the copy overwrite the relevant existing content or delete all the content completely.'' | ||
*FTP Storage: ''If you wish to copy your current content via FTP or to a host outside your Control Panel, you can use this option.'' <blockquote style="background-color: lightblue; border: solid thin grey;">Please note: You will need the relevant FTP information and credentials for any external servers.</blockquote> | *FTP Storage: ''If you wish to copy your current content via FTP or to a host outside your Control Panel, you can use this option.'' <blockquote style="background-color: lightblue; border: solid thin grey;">Please note: You will need the relevant FTP information and credentials for any external servers.</blockquote> | ||
*Once you've entered the correct information for your new domain, simply click "OK." Depending on the size of your website content, it may take the server some time to complete the task. You will receive an email when all content has been copied successfully. | |||
== Backing up a copy of your website to your local computer == | |||
<div id="backup"></div> | |||
You can create an archive of your hosting files and download them to your local computer. First, ensure you are logged into your account at http://hosting.xmission.com. | |||
*From the Control Panel, click on the "Files" tab near the top of the screen. | |||
[[File:Plesk_tabs_new.png]] | |||
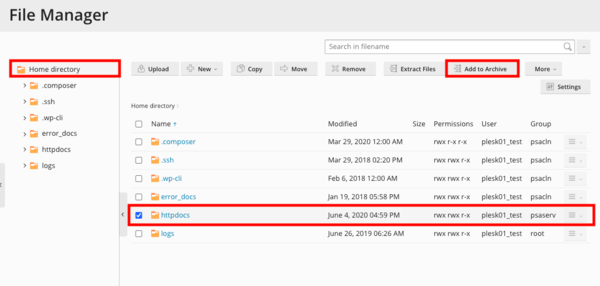
*Using the file tree, click on "Home directory" and select the directory your website is hosted in "httpdocs". To select your directory, click the gray box next to the directory name. | |||
[[File:File_Manager.png|600px]] | |||
*Click on "Add to Archive" and enter a file name for your backup, EX: httpdocs-backup.zip, select OK | |||
[[File:Archive.png]] | |||
*Once | *Once the zip file is completed, click on the drop-down and select Download. | ||
[[File:Download-zip.png|600px]] | |||
*Your web browser will automatically download a copy to your Download Directory on your local computer. | |||
---- | |||
{{: | {{:Shared_Hosting}} | ||
[[Category:Shared Hosting|Copy a Website]] | |||
Latest revision as of 14:21, 8 June 2020
Copying your website to a new location can be extremely useful. For example, you may want to make your current website only available at a subdomain or you may want to copy it for development purposes. Luckily, making a copy of your existing website is quite easy. First, ensure you are logged into your account at http://hosting.xmission.com.
- From the Control Panel, click on the "Websites & Domains" tab near the top of the screen.
- Click the little arrow in the Doman name Box to expand the Hosting Settings, next select the "Website Copying" button.
- You will now see a list of options and features. In this example, we will be copying the content of "stmyl.com" to "dev.stmyl.com" A brief description of the options follows below.
- Website in the Panel: If you are copying the content of your current site to a location also hosted within your Control Panel, you will want to select this option.
- Site name: This is the destination for the content to be copied. In our example, it is the subdomain "dev.stmyl.com" You may also copy content to an entirely separate domain.
Please note: You must have first created the destination domain or subdomain before you can copy the content. For information on creating new domains and subdomains, pursue the links at the bottom of this page.
- What to do with existing files: If there is already content at the destination you are copying to, you can choose to either have the copy overwrite the relevant existing content or delete all the content completely.
- FTP Storage: If you wish to copy your current content via FTP or to a host outside your Control Panel, you can use this option.
Please note: You will need the relevant FTP information and credentials for any external servers.
- Once you've entered the correct information for your new domain, simply click "OK." Depending on the size of your website content, it may take the server some time to complete the task. You will receive an email when all content has been copied successfully.
Backing up a copy of your website to your local computer
You can create an archive of your hosting files and download them to your local computer. First, ensure you are logged into your account at http://hosting.xmission.com.
- From the Control Panel, click on the "Files" tab near the top of the screen.
- Using the file tree, click on "Home directory" and select the directory your website is hosted in "httpdocs". To select your directory, click the gray box next to the directory name.
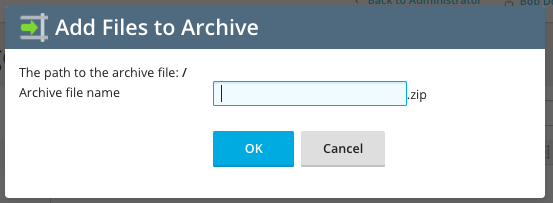
- Click on "Add to Archive" and enter a file name for your backup, EX: httpdocs-backup.zip, select OK
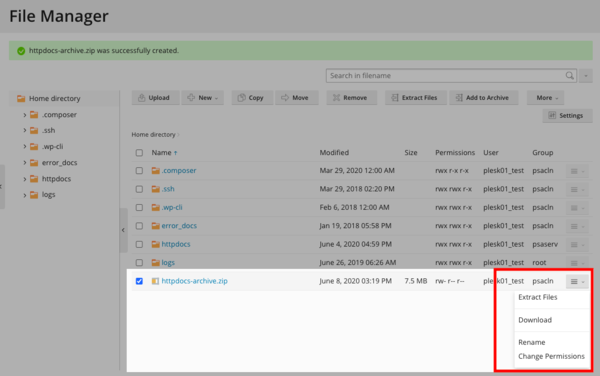
- Once the zip file is completed, click on the drop-down and select Download.
- Your web browser will automatically download a copy to your Download Directory on your local computer.
- Administration/Logging in
- Adding a Domain
- Adding MySQL Databases
- Adding/Managing DNS Records
- Managing Domain/Users
- Managing FTP Access/Users
- PHP Settings
- Previewing the Website
- Secure Your Sites
- Web Statistics
Additional Development Help
Applications
Domain Management
